Product Guide
How to Use Samaro for Event Photography: Complete Guide to Gallery Setup, AI Editing & Sharing (2026)
This guide walks you through every feature in Samaro v2.0 from setting up your first event and uploading media, to AI culling, gallery customisation, client sharing, and building your public profile. Whether you are just getting started or switching from another platform, this is the complete reference for the new workflow.
In This Guide
Create Your Account
Create Your First Event
Add Sub-Events
Upload Your Media
Add Guests and Co-hosts
Set Up Albums (Favourite Lists)
Share the Gallery
Create a New Gallery (Gallery 2.0)
Gallery Customisation for Photographers
Set a Cover Photo
AI Editing
Configure Event Settings
Dynamic Watermarking and Sponsor Frames
Google and Meta Integration
My Account: Public Profile and Portfolio
My Account: Cloud Storage
My Account: Plan and Storage
If you shoot weddings, corporate events, or any gathering where clients expect their photos delivered fast and beautifully, you already know the problem. The shoot is the easy part. Everything after organising thousands of frames, building a gallery, sharing it with clients, managing downloads that is where hours disappear. Samaro is a photo delivery platform for photographers built specifically to fix that. And with version 2.0, the entire workflow has been rebuilt from the ground up.
This guide covers the complete v2.0 journey end to end: account setup, event creation, uploading, guest management, sharing, gallery customisation for photographers, AI editing, AI photo culling, watermarking, and your public profile. Every step, every screen.
Step 1: Create Your Account
Open samaro.ai or the Samaro app. On the sign-in page, choose Continue with Google or Continue with Email. New users land on the account creation form where you enter your name, select how you heard about Samaro, agree to the terms, and click Create account.
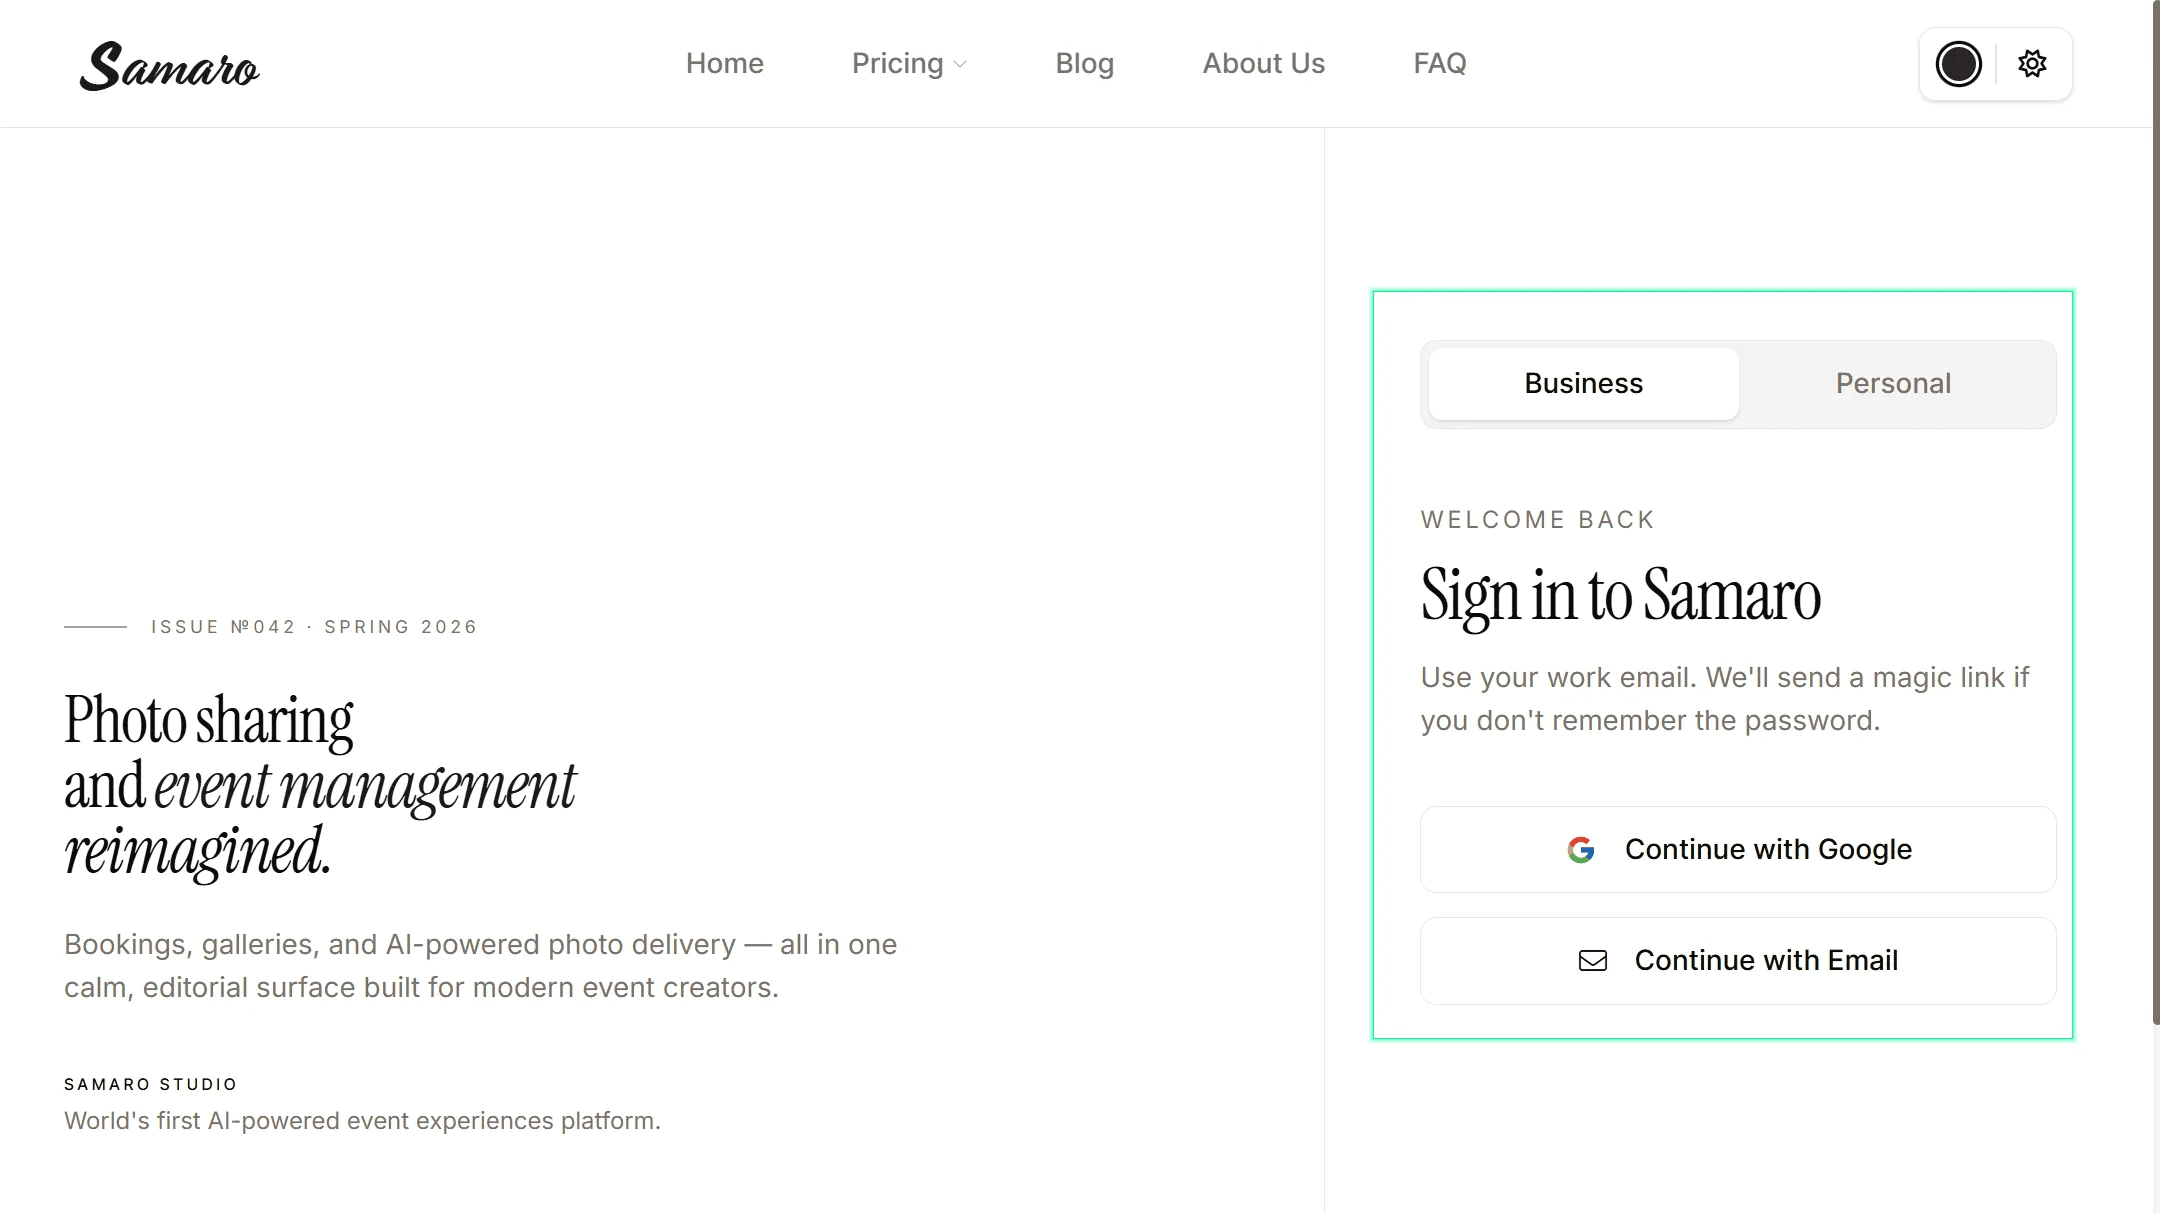
The Samaro sign-in screen. Two options, no friction.
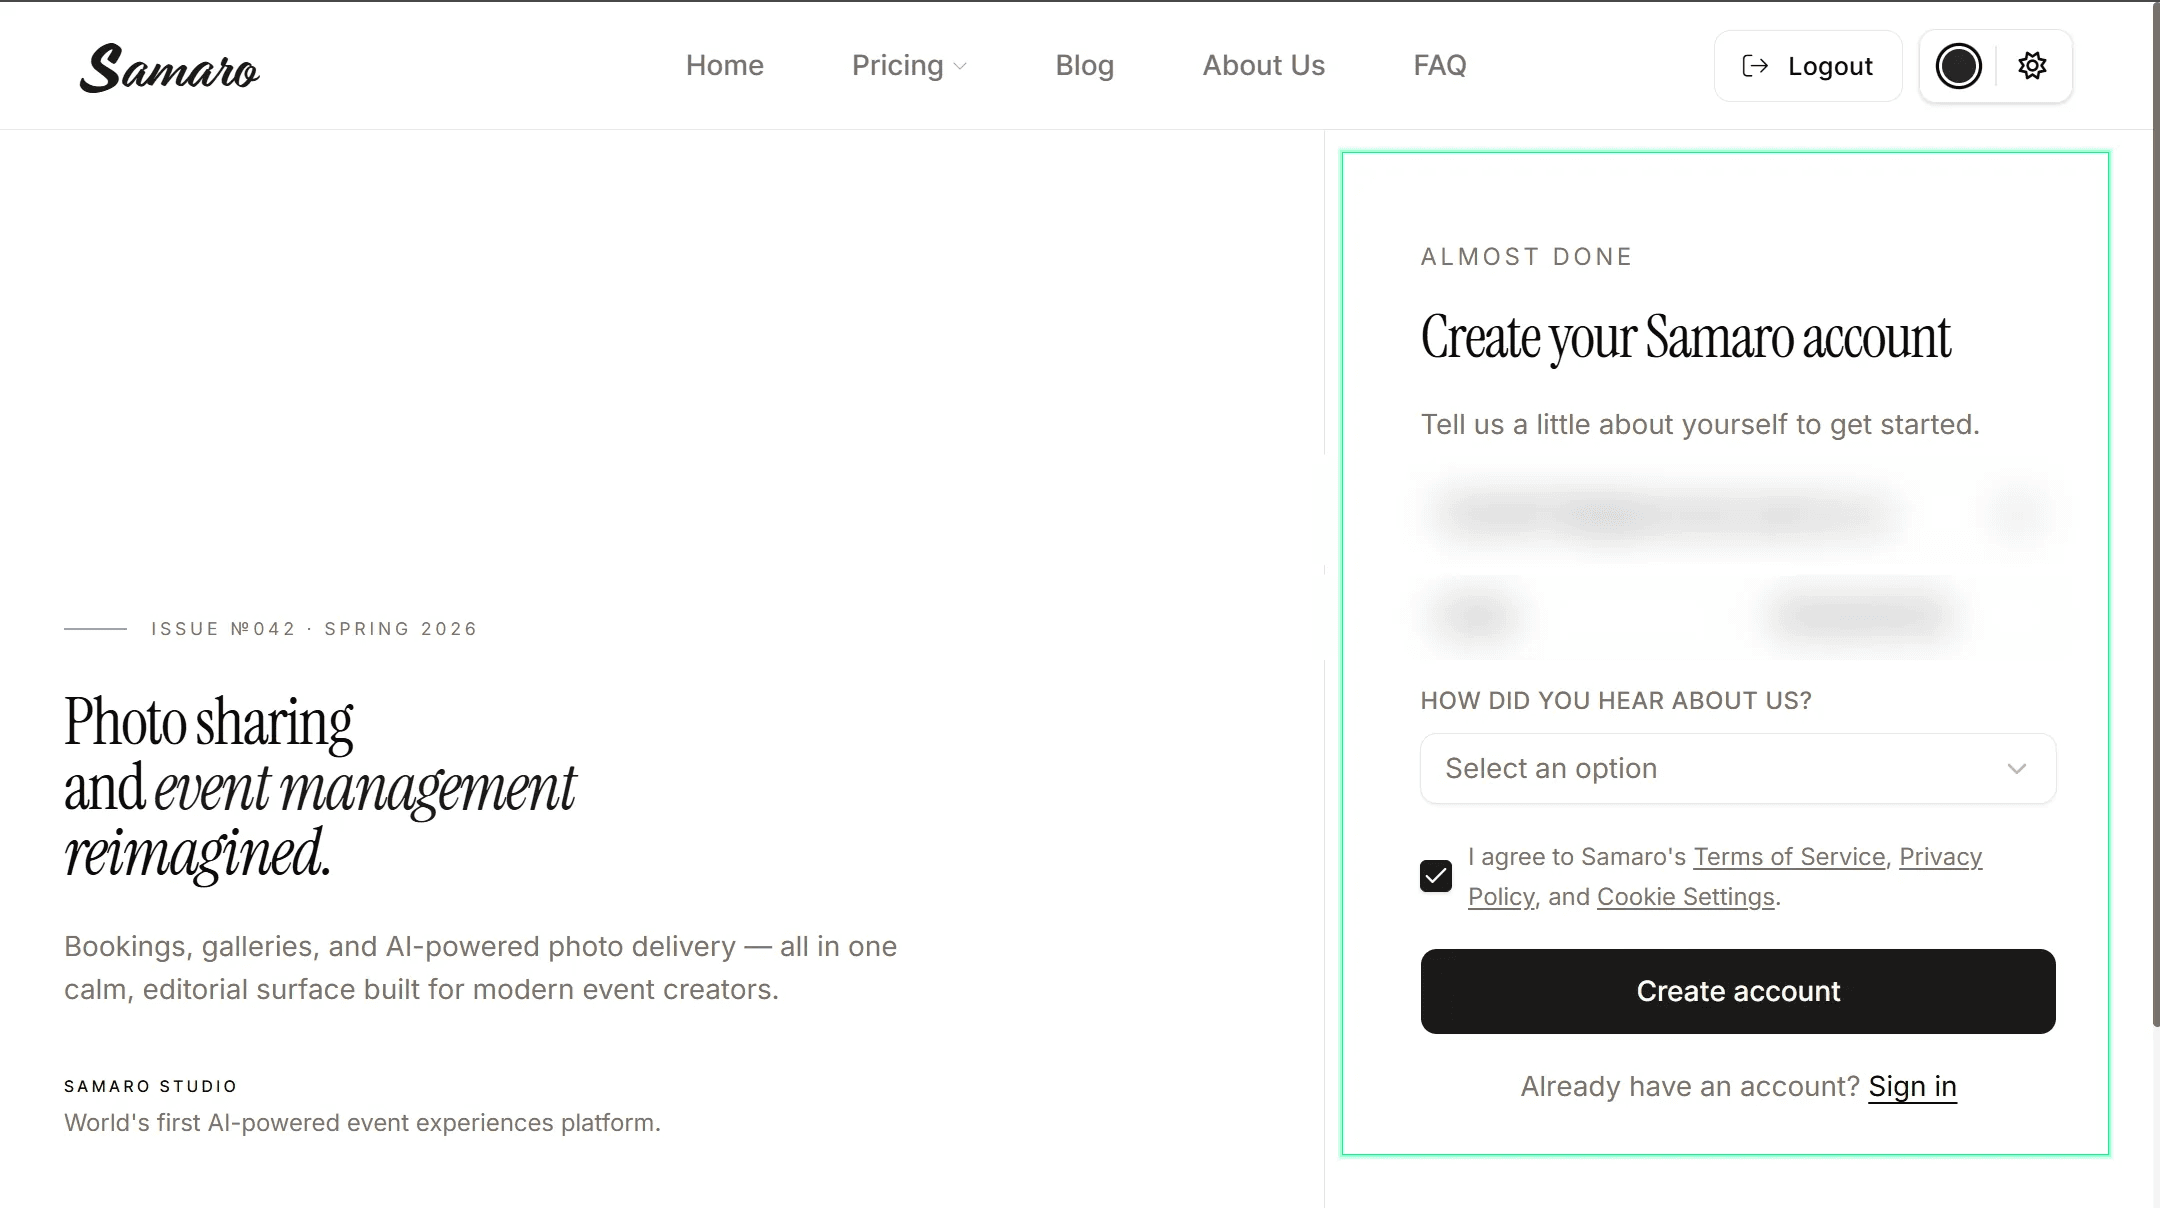
Enter your name and a few quick details to complete sign-up.
After creating your account, Samaro asks for your WhatsApp number. This is used for account verification and platform notifications sent through Samaro's verified WhatsApp channel.
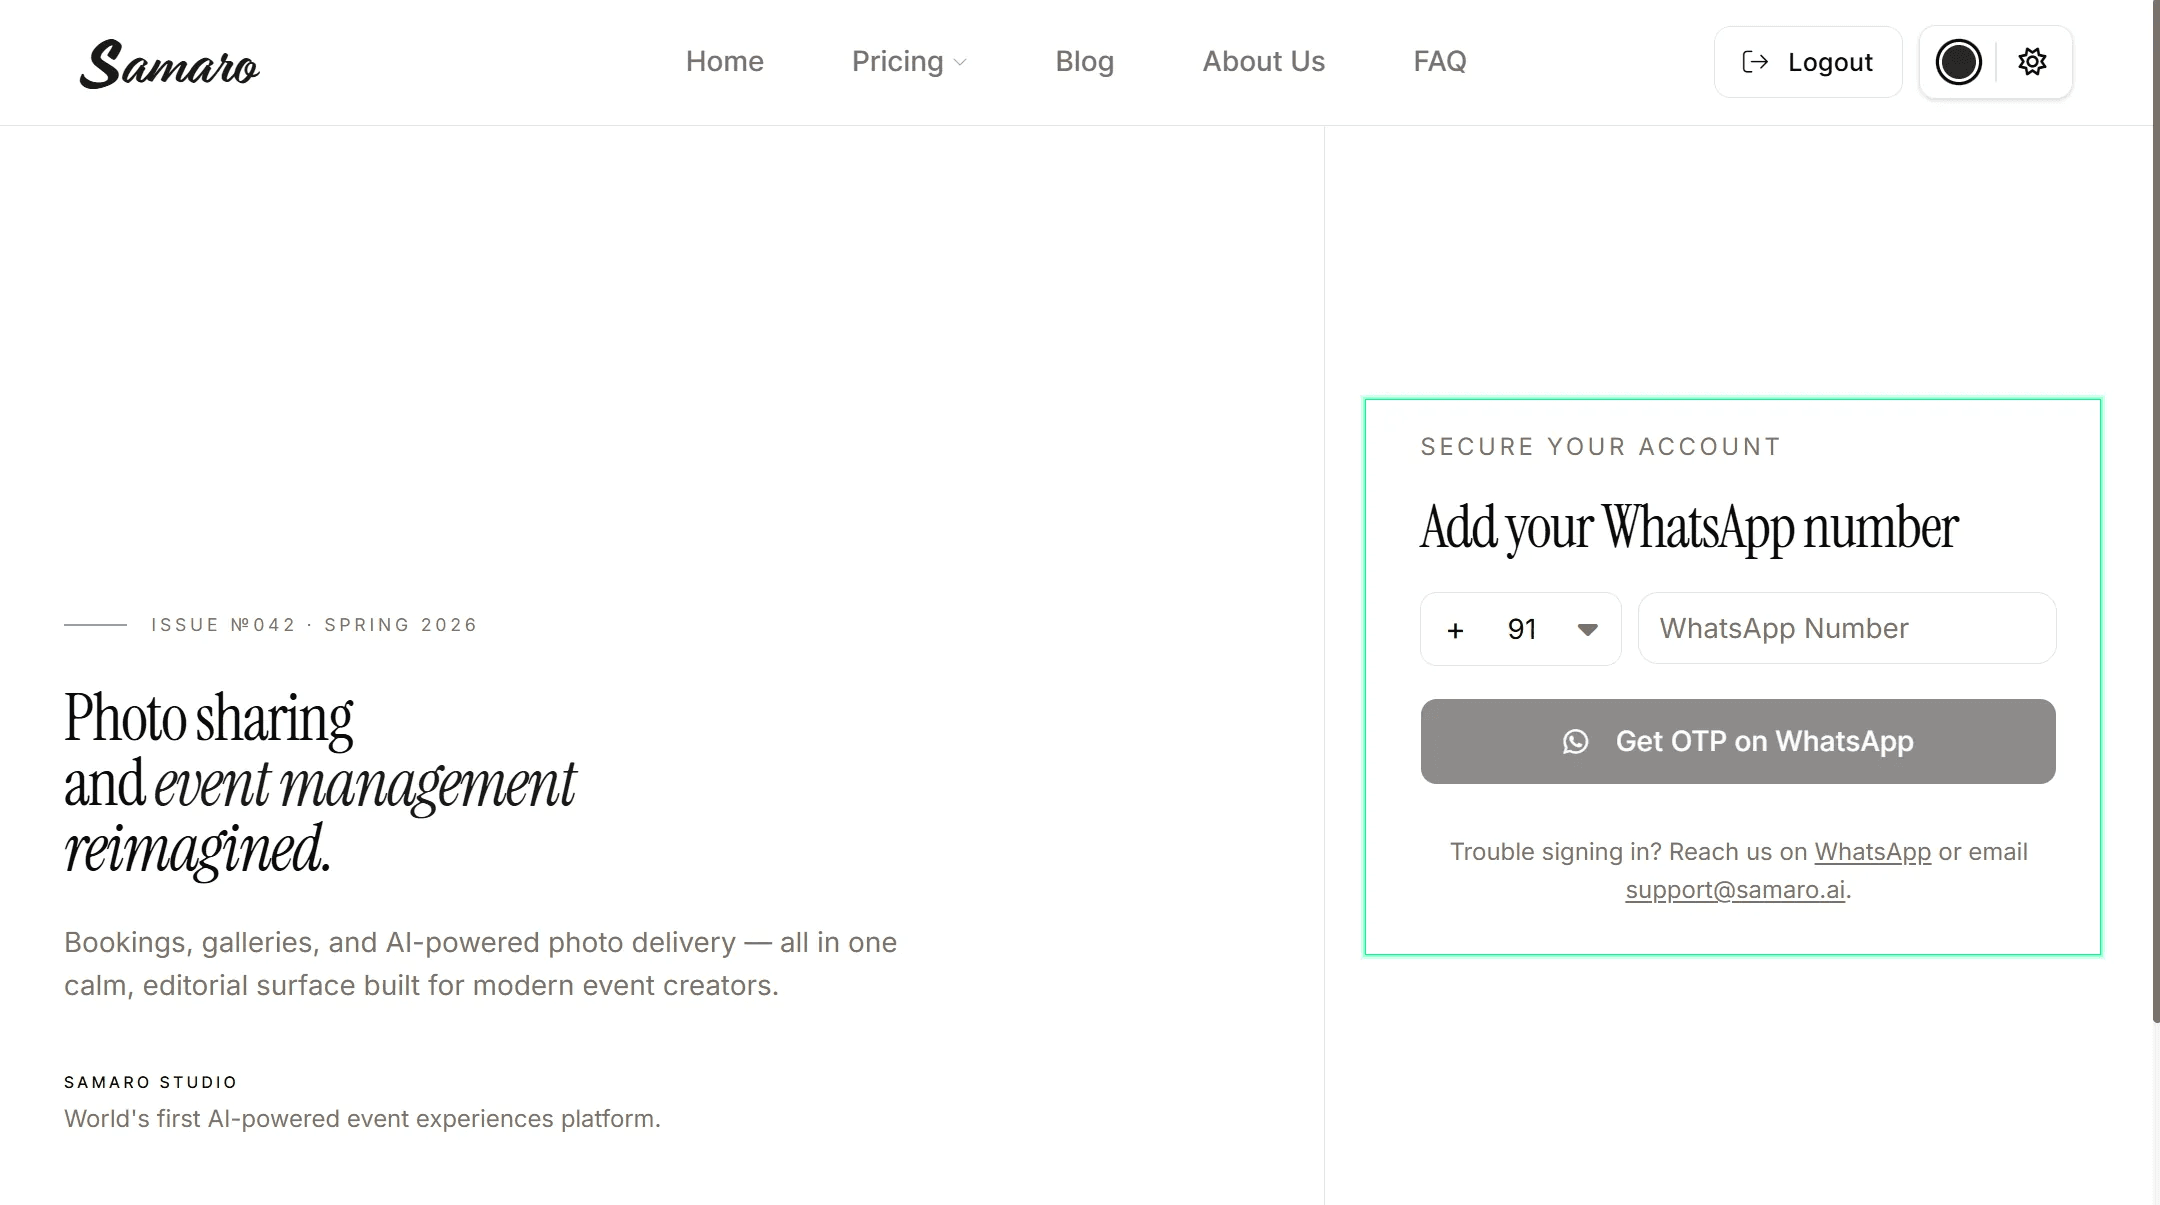
WhatsApp number verification for account security.
Step 2: Create Your First Event
After sign-up, you land on the main dashboard. As a photo delivery platform for photographers, Samaro organises everything around events one event per shoot, with all its media, guests, and galleries in one place. On the right, you will see your current plan details and a Get started checklist that guides you through the initial setup. Click Create event to begin.
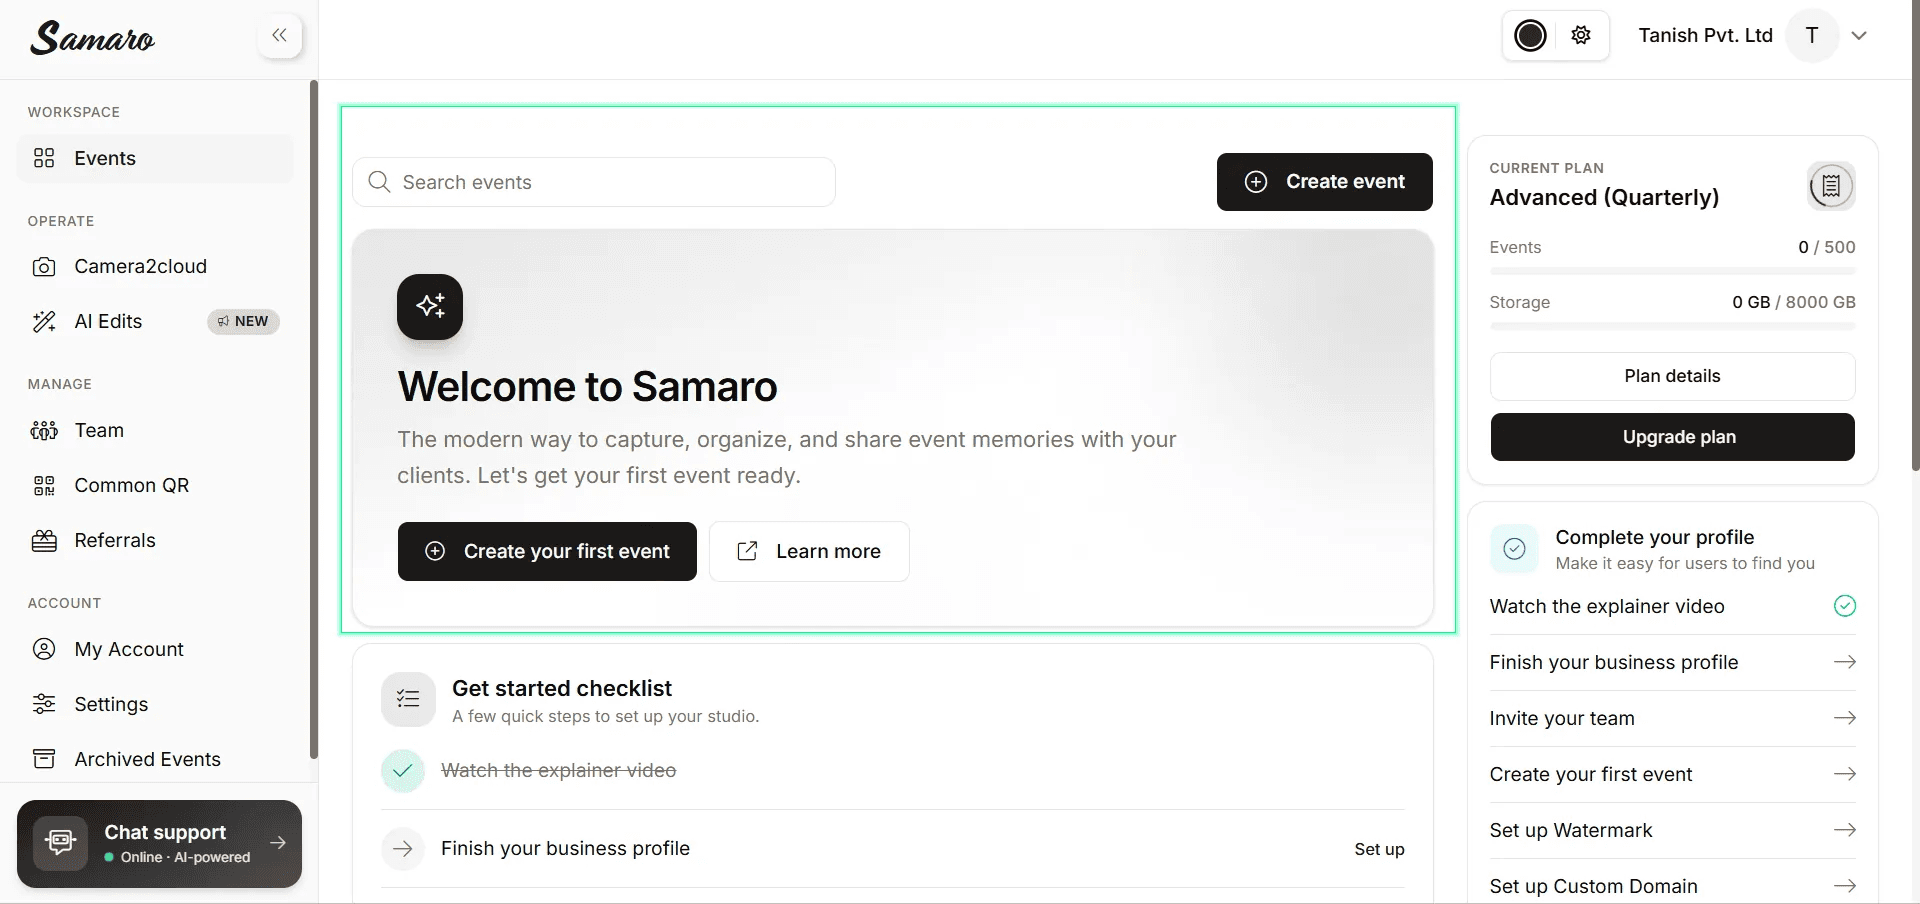
The dashboard. Events, storage, and your setup checklist in one place.
On the Create event screen, fill in the event name, select the event type, set a custom URL slug, and add the start and end dates. You can also add a description and pin the location. Once done, click Create event in the top right corner.

Event name, type, URL, and dates. Fill these in and your event is created.
Step 3: Add Sub-Events
Inside your event, go to the Media section from the left sidebar and click Add sub event. Sub-events let you organise photos by ceremony segment, for example Reception, Haldi, Mehendi, or After-party.
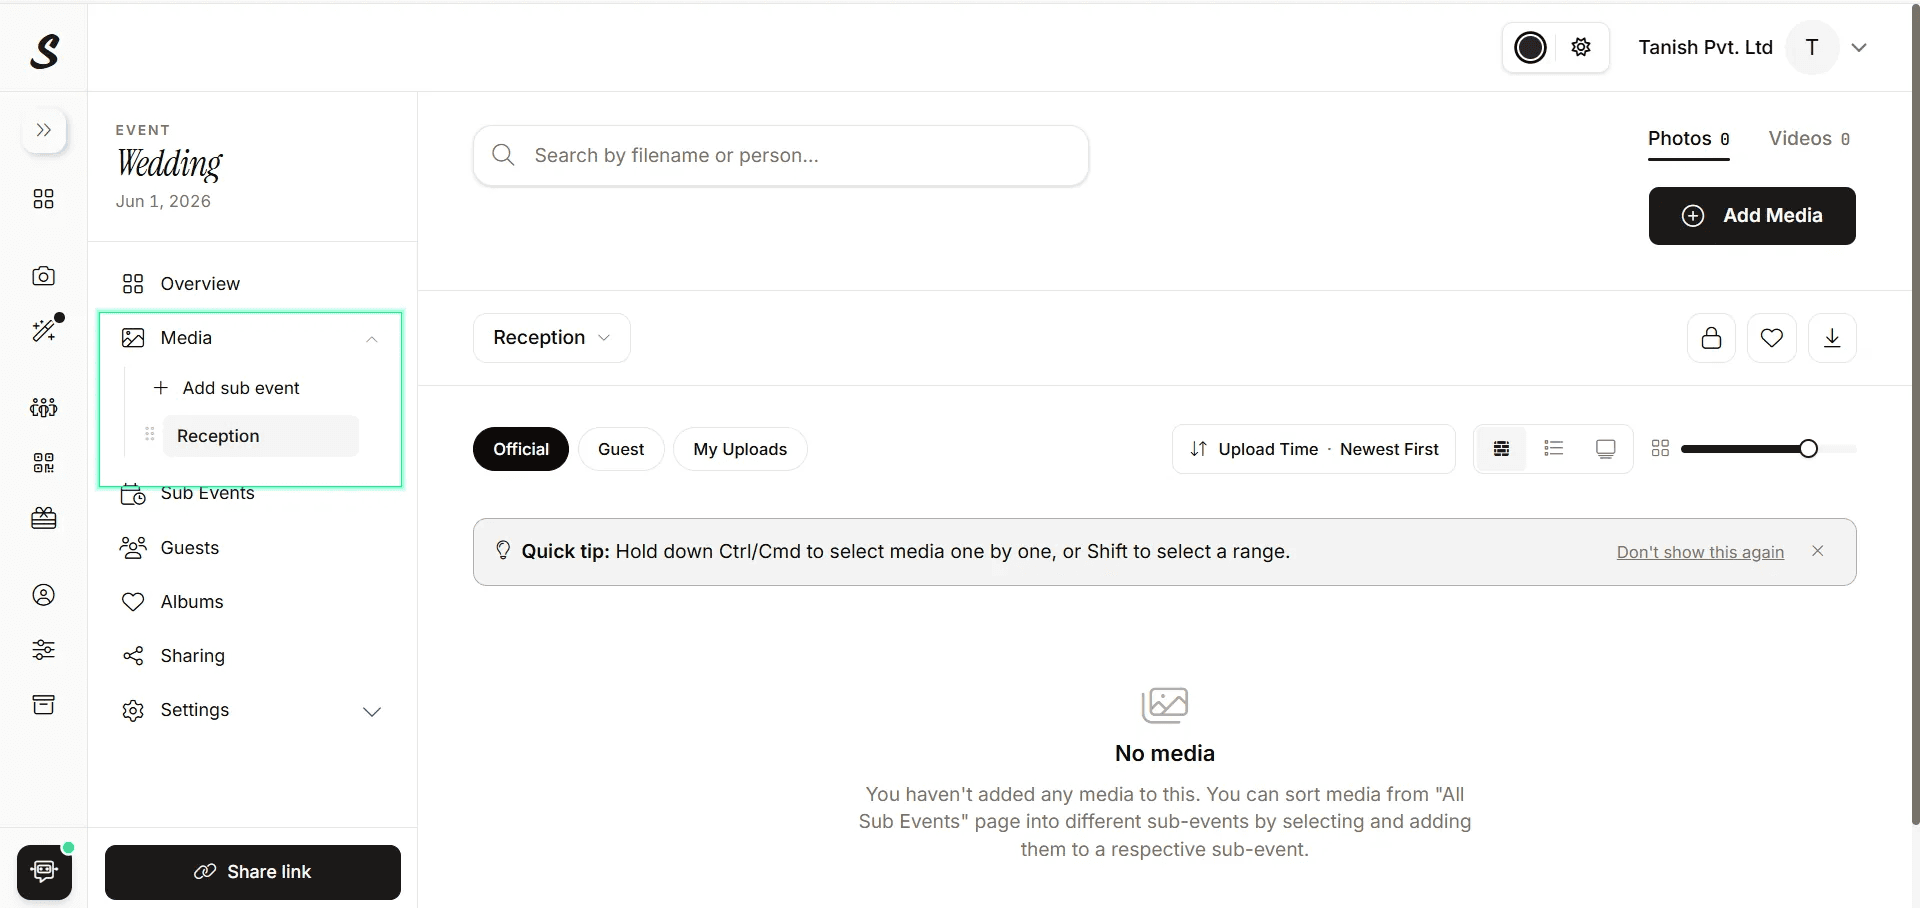
Each sub-event gets its own media folder inside the event.
Once your sub-events are created, the next time you upload media, the upload popup will ask you to select which sub-event you want the photos to go into. This keeps everything organised from the moment it lands in Samaro, and guests browsing the gallery see a clean, segmented view instead of one large unsorted library.
Step 4: Upload Your Media
Select the sub-event you want to upload to, then click Add Media in the top right. A modal appears with four upload options: Upload files, Upload folder, YouTube or Vimeo, and Cloud Imports from Google Drive or Dropbox.
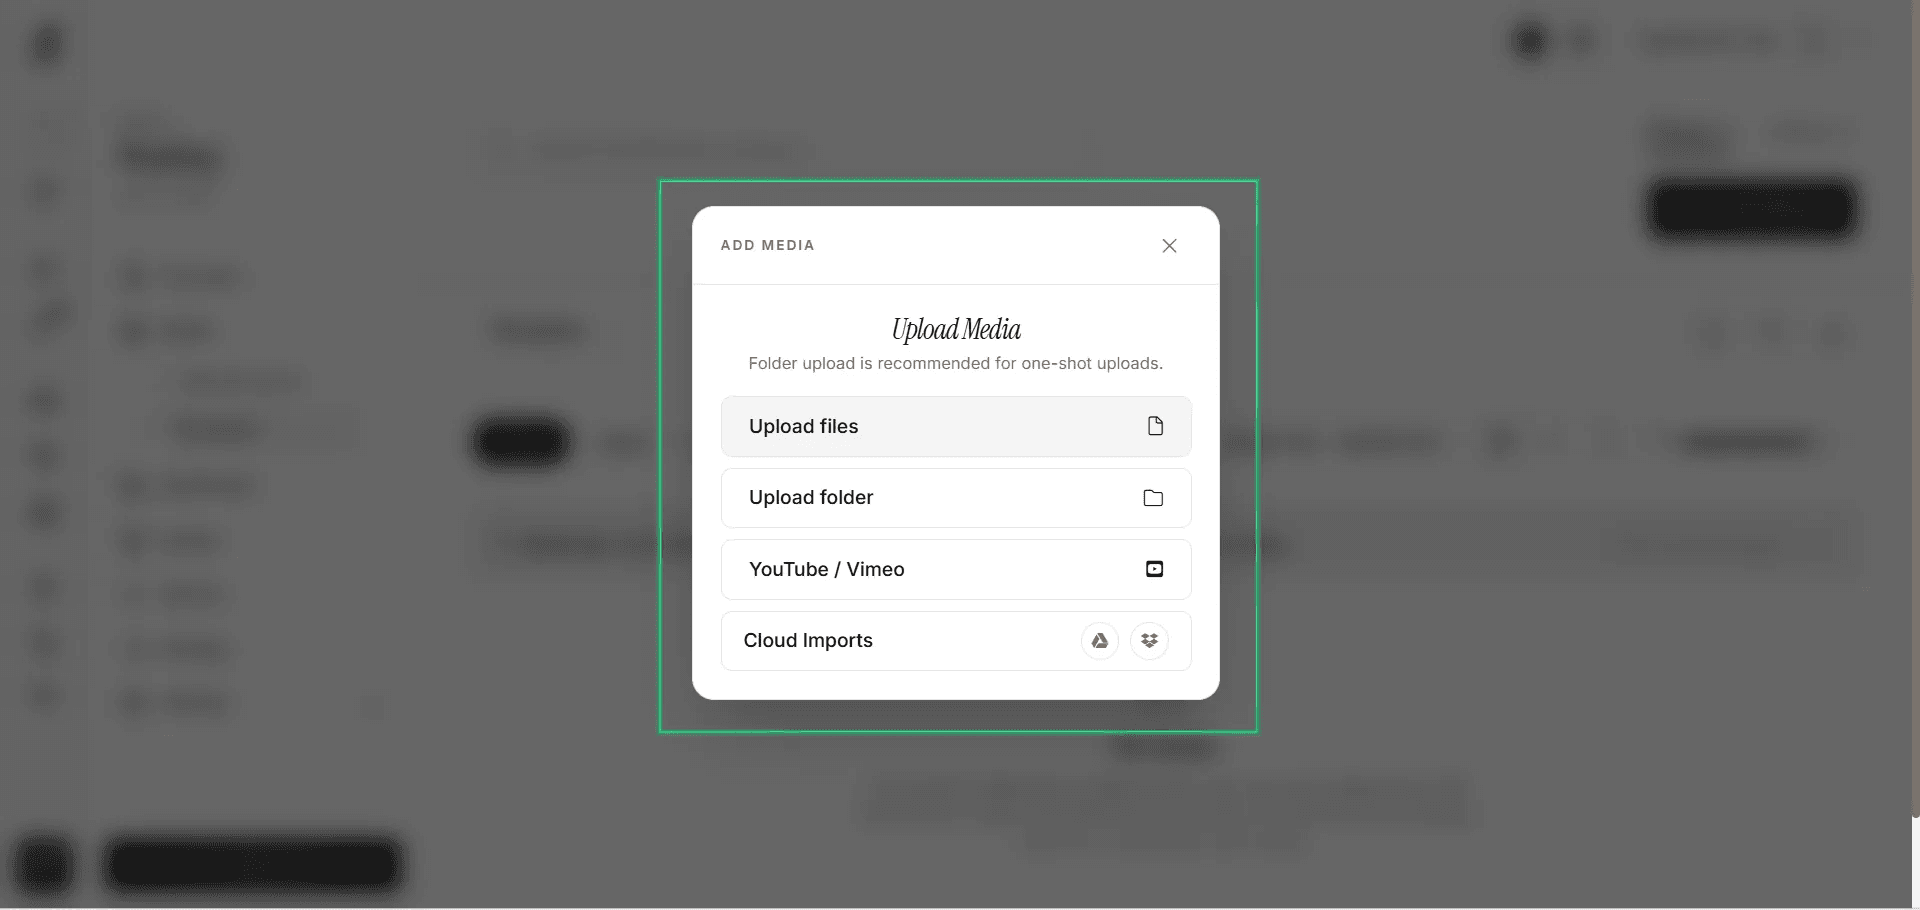
Four ways to get your media in. Upload folder is recommended for large shoots.
For large event shoots, Upload folder is the fastest option. If you are shooting a live event where clients are already waiting, Camera2Cloud photography takes this further Samaro's Camera2Cloud feature lets you upload directly from your camera to the cloud during the event, without waiting until you get home. Photos appear in the gallery in near real-time as you shoot.
Once photos are uploaded, you can select multiple photos using Ctrl or Cmd and perform bulk actions from the bottom action bar, including moving to a sub-event, marking as private or public, triggering Auto edit, running AI cull, or downloading.
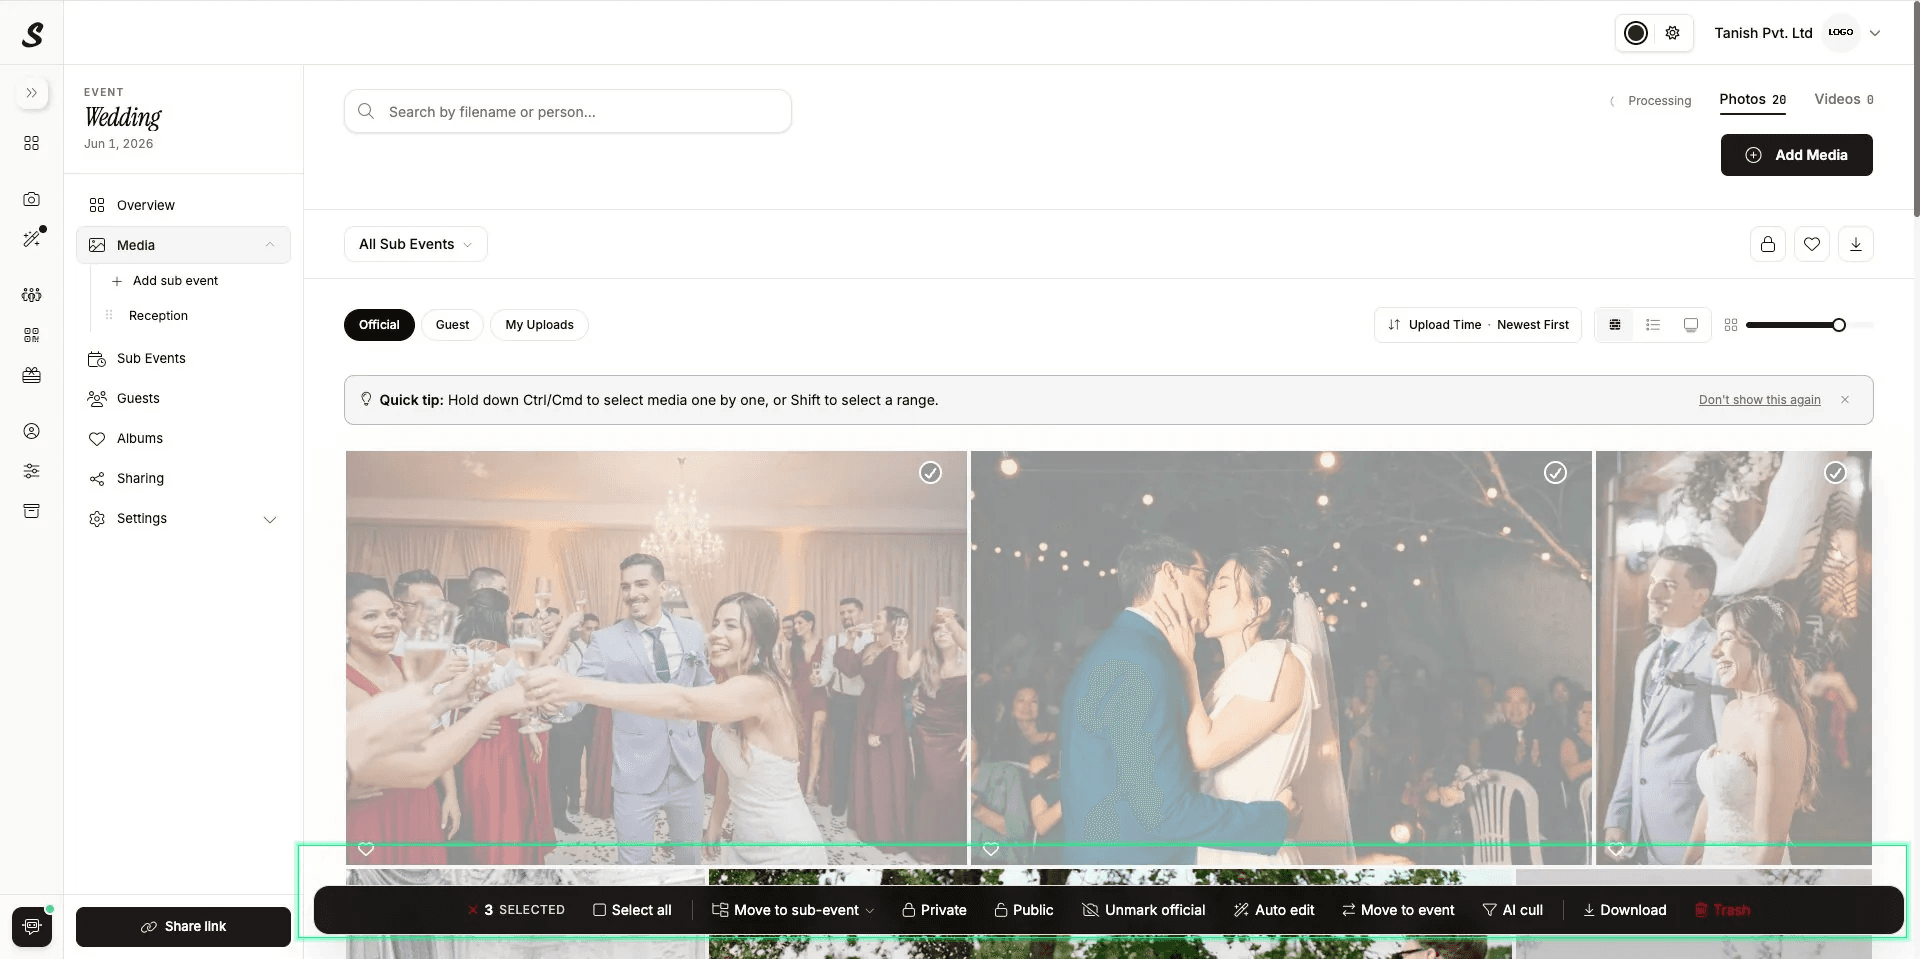
Select multiple photos and use the bottom action bar for bulk actions including Auto edit and AI cull.
Step 5: Add Guests and Co-hosts
Click Guests in the left sidebar. The guest list page shows everyone connected to your event: owner, guests, co-hosts, photographers, and gallery viewers, along with a count for each role. Click Invite guests to start adding people.
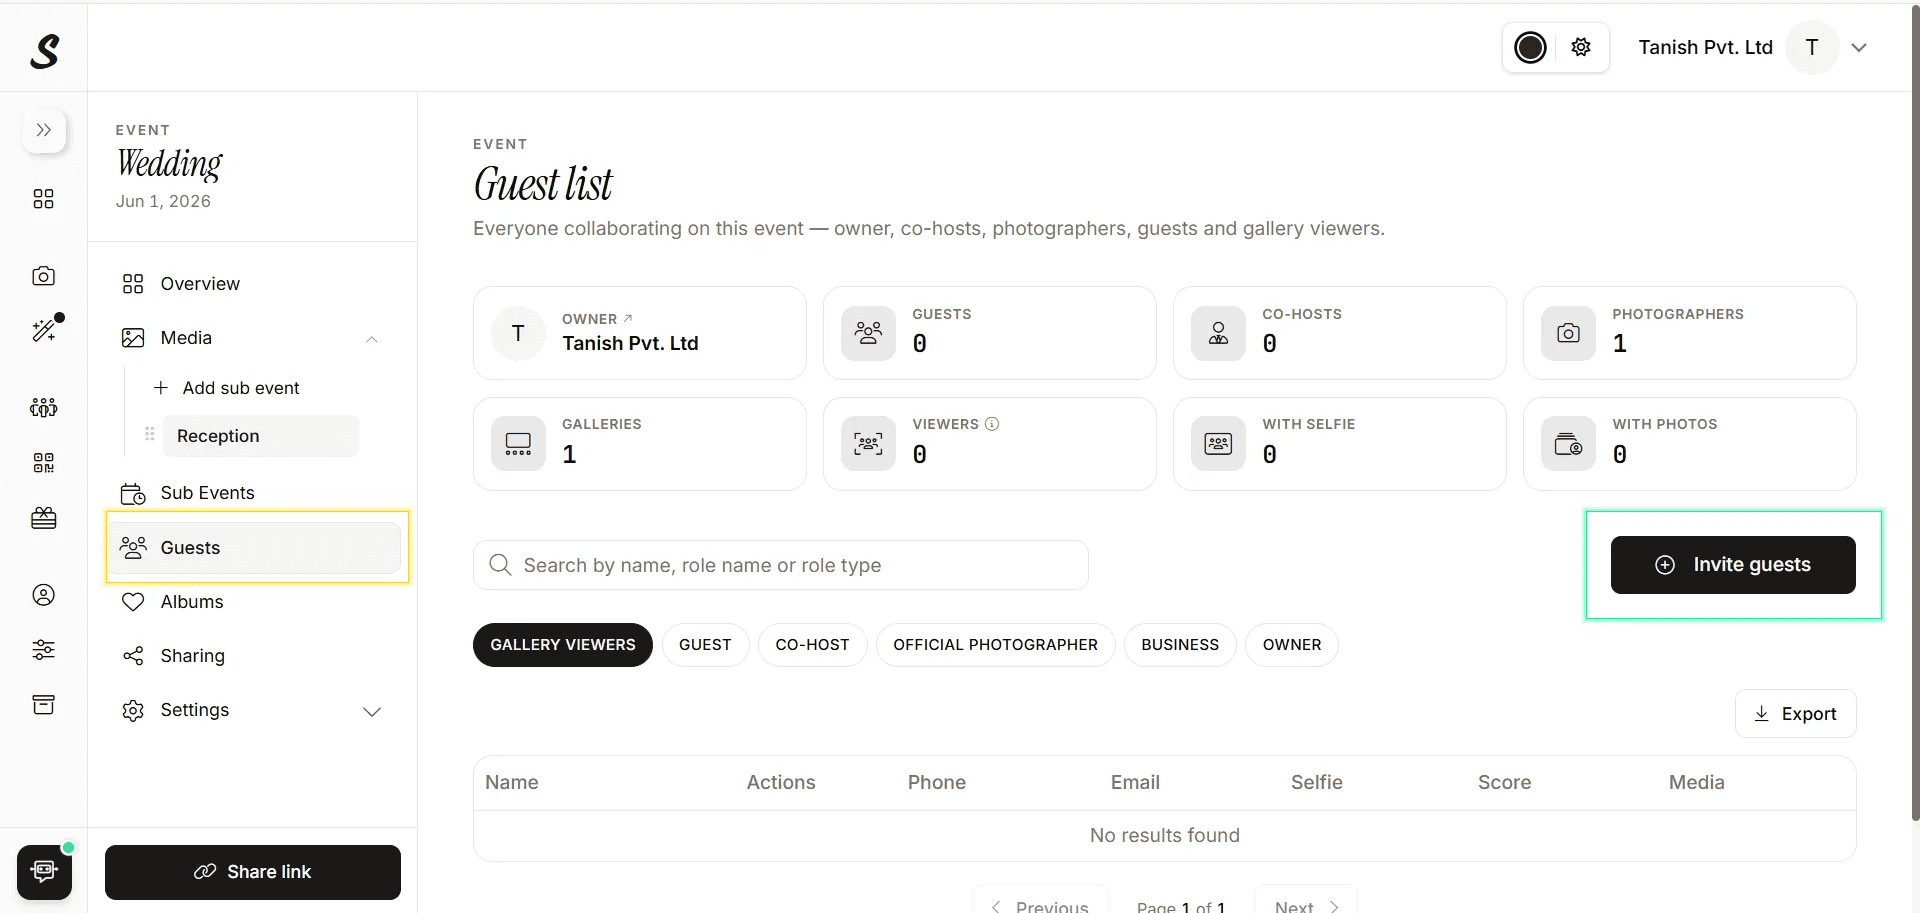
Everyone connected to this event in one place, across all roles.
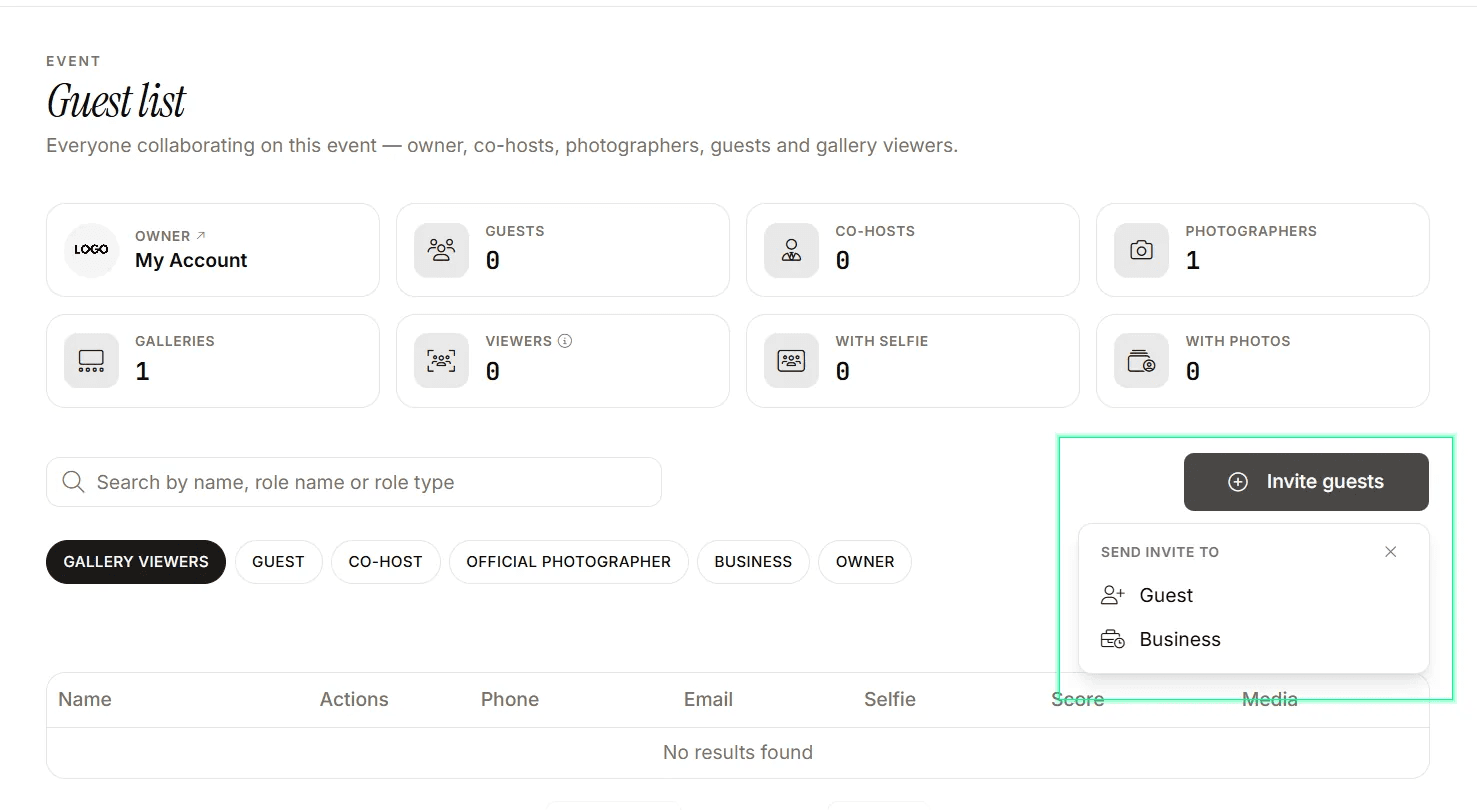
Invite individually by email or bulk upload via CSV.
Add your second shooter as an Official Photographer, the couple or event host as a Guest, and a coordinator or studio partner as a Co-host. Co-hosts can manage the gallery without having access to your full account.
Step 6: Set Up Albums (Favourite Lists)
Go to Albums in the left sidebar. This feature is designed to help photographers share the gallery with their clients and let them select which photos they want printed for a physical album. Instead of managing selections over email or WhatsApp, clients open the shared favourite list link and mark their picks directly inside the gallery, all in one place.
Photographers can generate multiple favourite list links and share them with different stakeholders, such as the couple, the family, or the studio. You can also place a cap on the maximum number of selections allowed per list, which keeps the process organised and prevents over-selection.
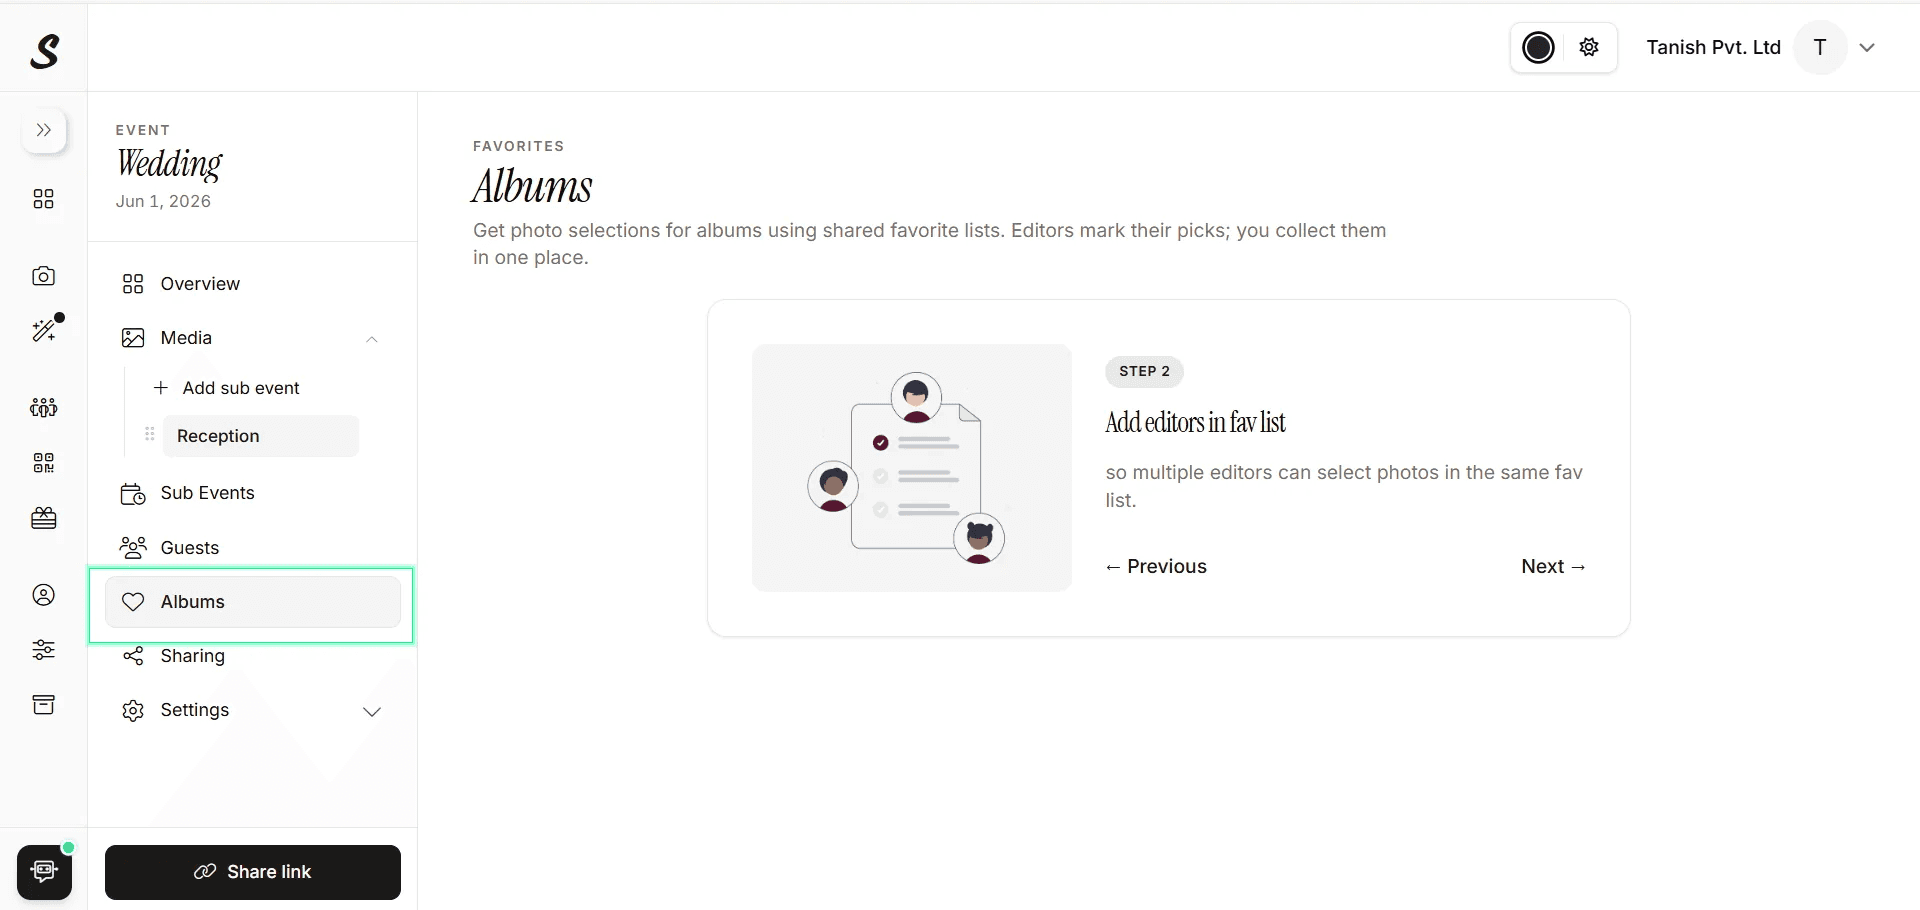
Favourite lists let clients mark their album selections directly inside the gallery.
Click Add favourite list, give it a name such as Highlights or Long Album, set the gallery it applies to, and add a maximum selection count. Once created, share the link with whoever is doing the photo selection.
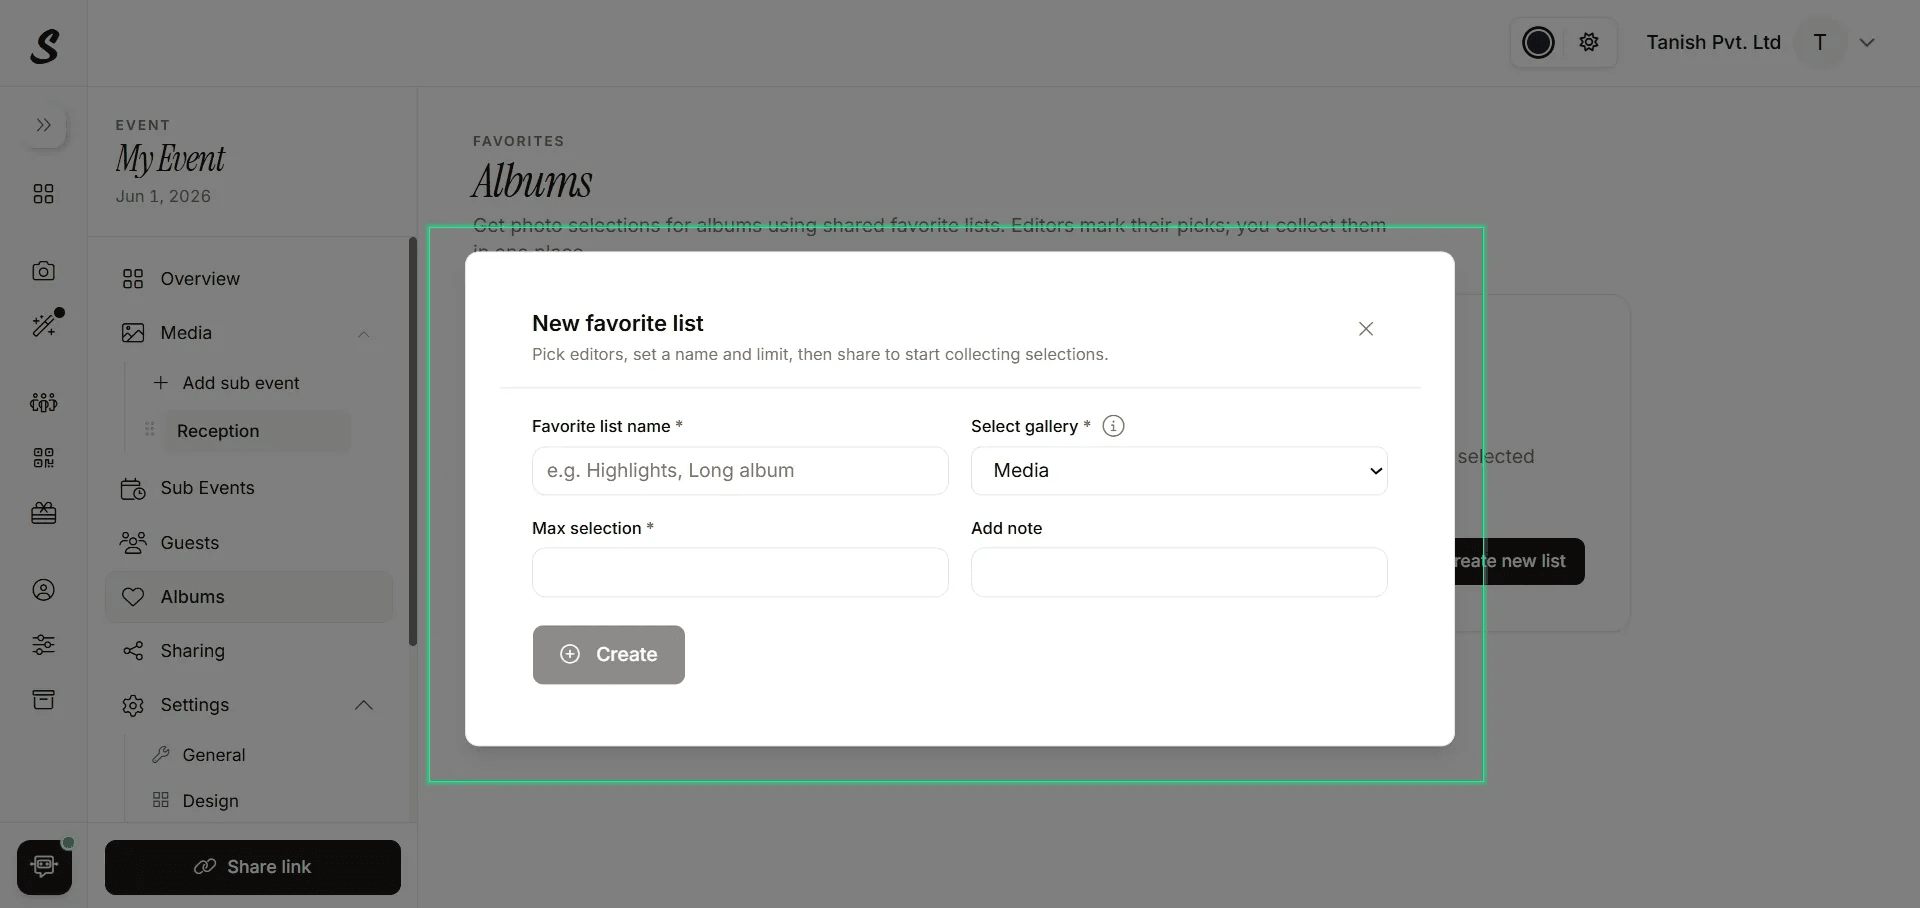
Name the list, set the max selection count, assign a gallery, and share the link.
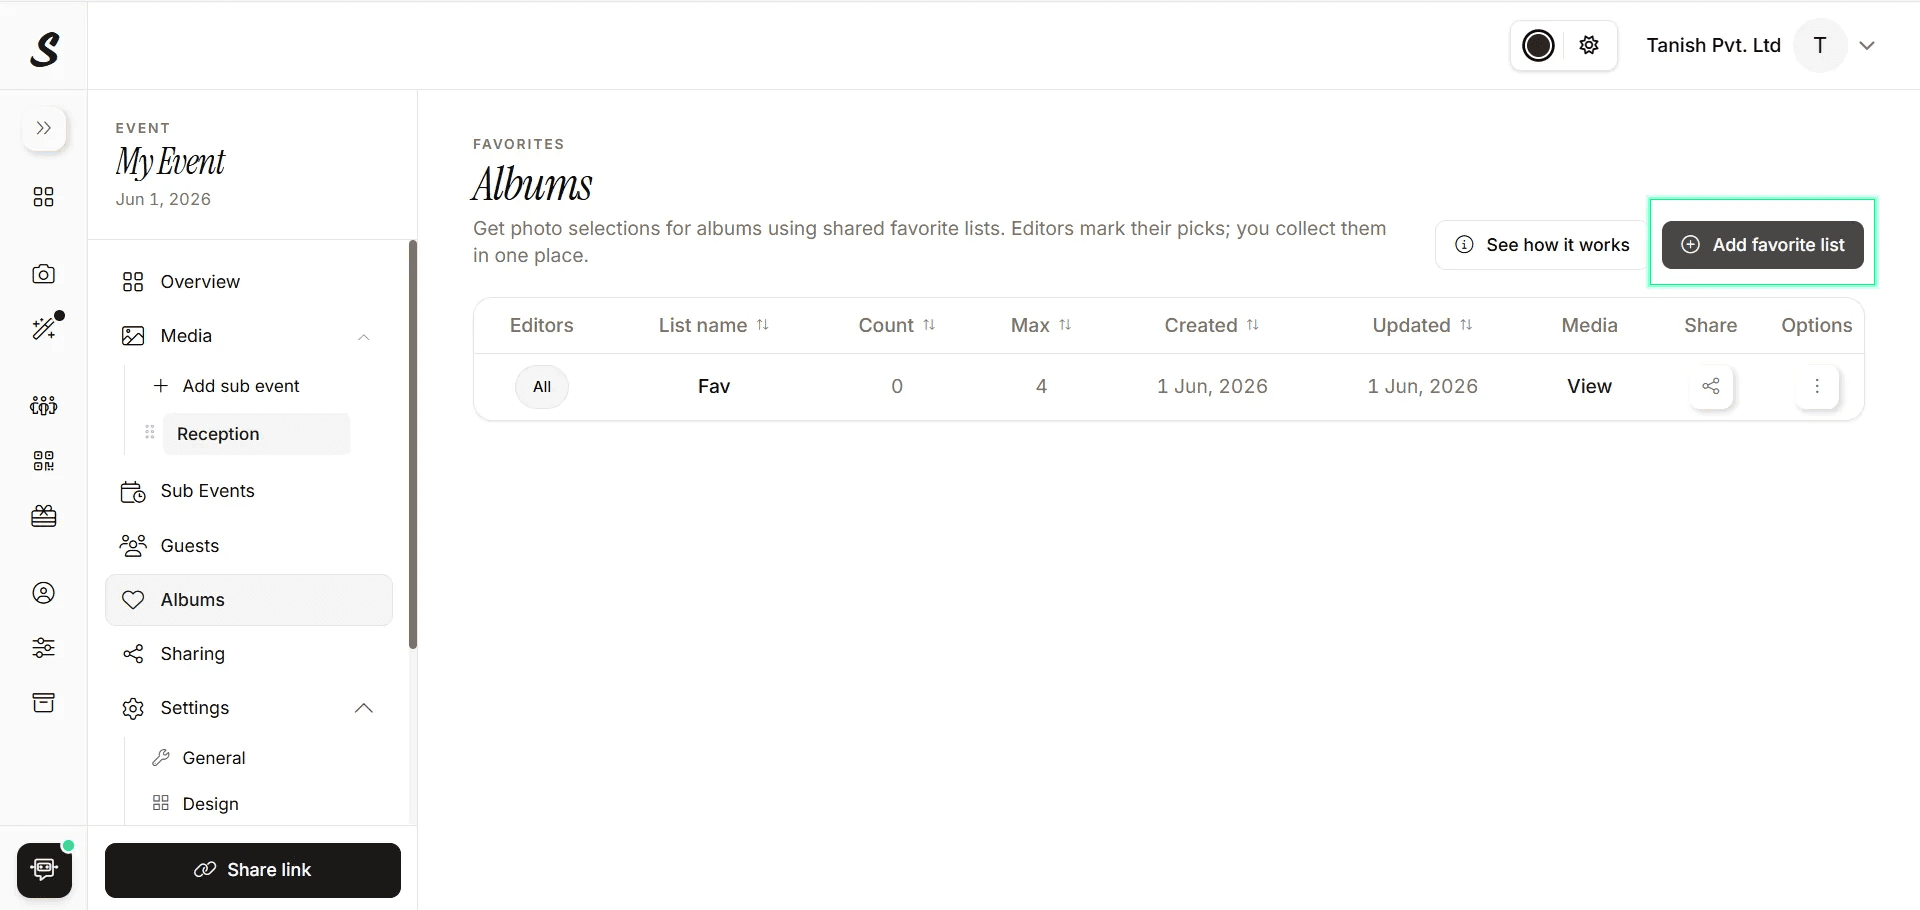
All your favourite lists in one table. Share or manage them any time.
Step 7: Share the Gallery How to Share Event Photos with Clients
This is the core of what makes Samaro a powerful tool for how to share event photos with clients. Click Sharing in the left sidebar. Start by confirming your Event URL, which is the permanent link used in every QR code, WhatsApp message, and invite. Then set the Gallery language so the interface appears correctly for international clients.

Set your event URL and gallery language before sharing anything.
Expand the gallery panel to access three tabs: Share, Customize, and Privacy and access.
Under Share, you get three link types: Public Gallery (open access with watermarked previews), Guest Access (for invited guests), and All Access Gallery. There is also a pre-written WhatsApp message ready to send, an Access PIN for bulk downloads, and a branded QR code you can download or print for the venue. Guests scan the QR code and land directly in the gallery.
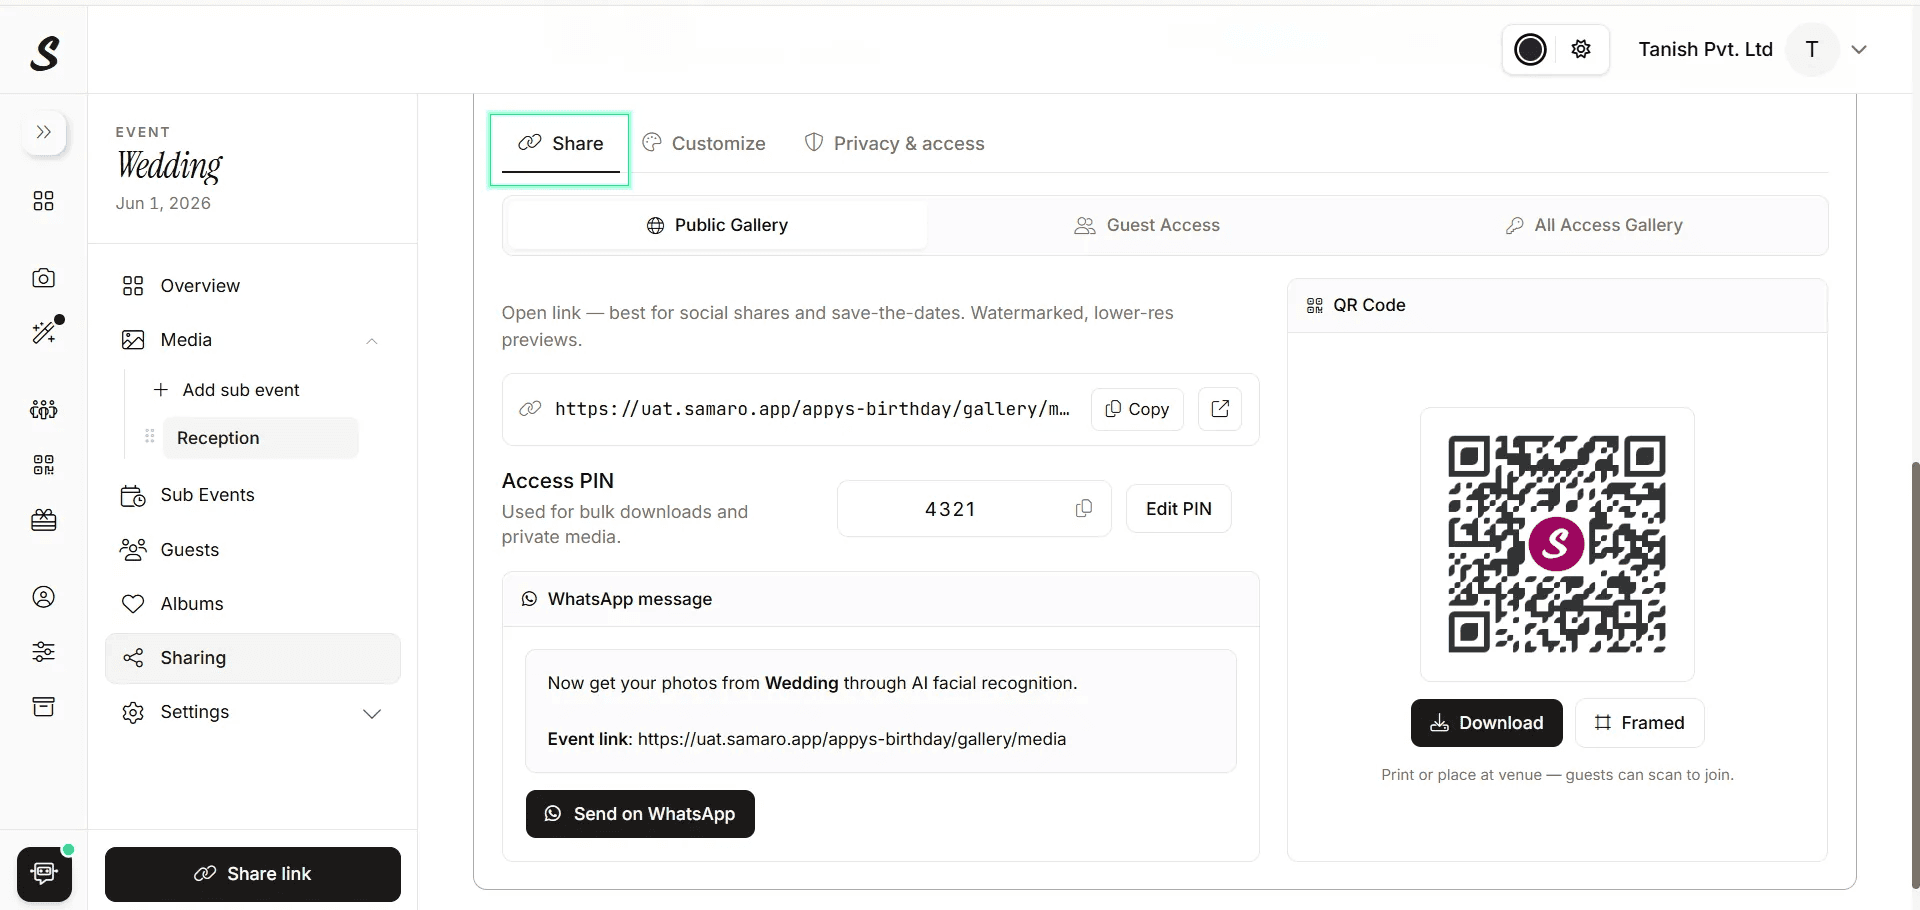
Print the QR code and place it at the venue. Guests scan and land directly in the gallery.
Under Privacy and access, you set who can open the gallery, whether a PIN is required, what guest information to collect such as email address and WhatsApp number, and whether to enable guest uploads through the AI selfie feature.
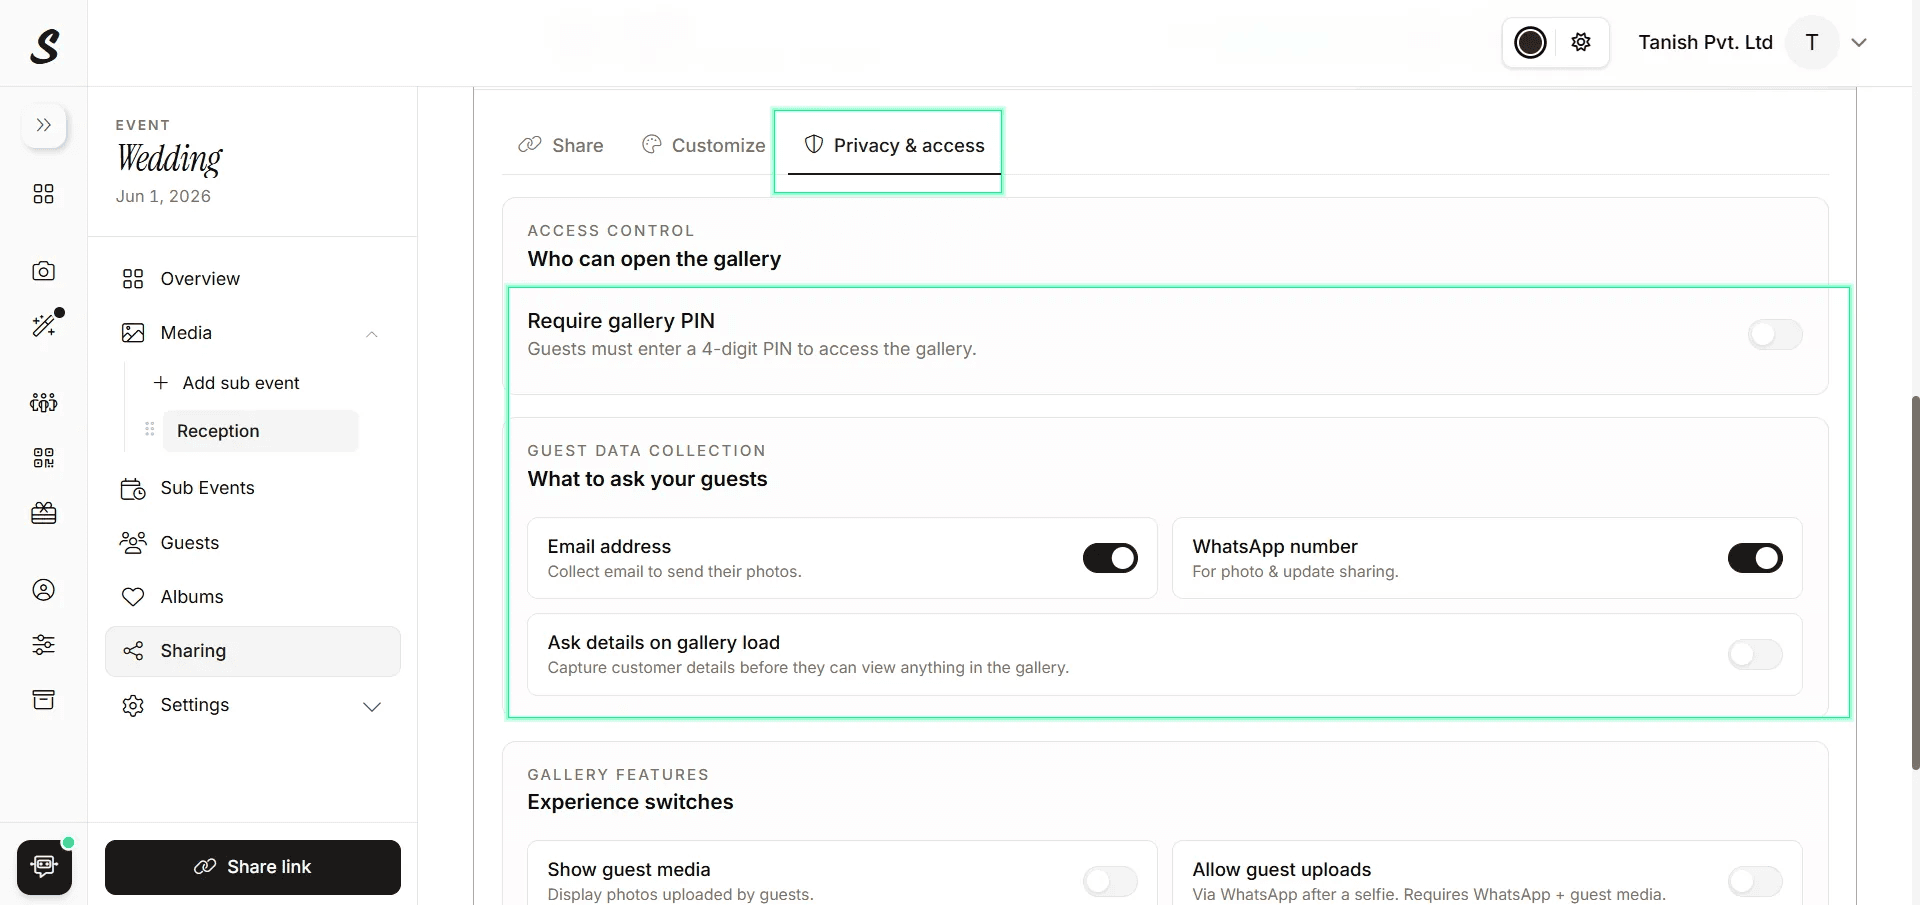
Control access, collect guest data, and toggle gallery features from one screen.
Step 8: Create a New Gallery (Gallery 2.0)
Samaro lets you create up to 5 independent galleries per event, each with its own share link, design, and access settings. This is where the platform goes beyond basic event photography gallery software Gallery 2.0 gives you editorial-level design control that most gallery platforms do not offer. To create a new gallery, go to Sharing in the left sidebar and click Add gallery.
You will be prompted to choose between two gallery experiences: Classic and Gallery 2.0.
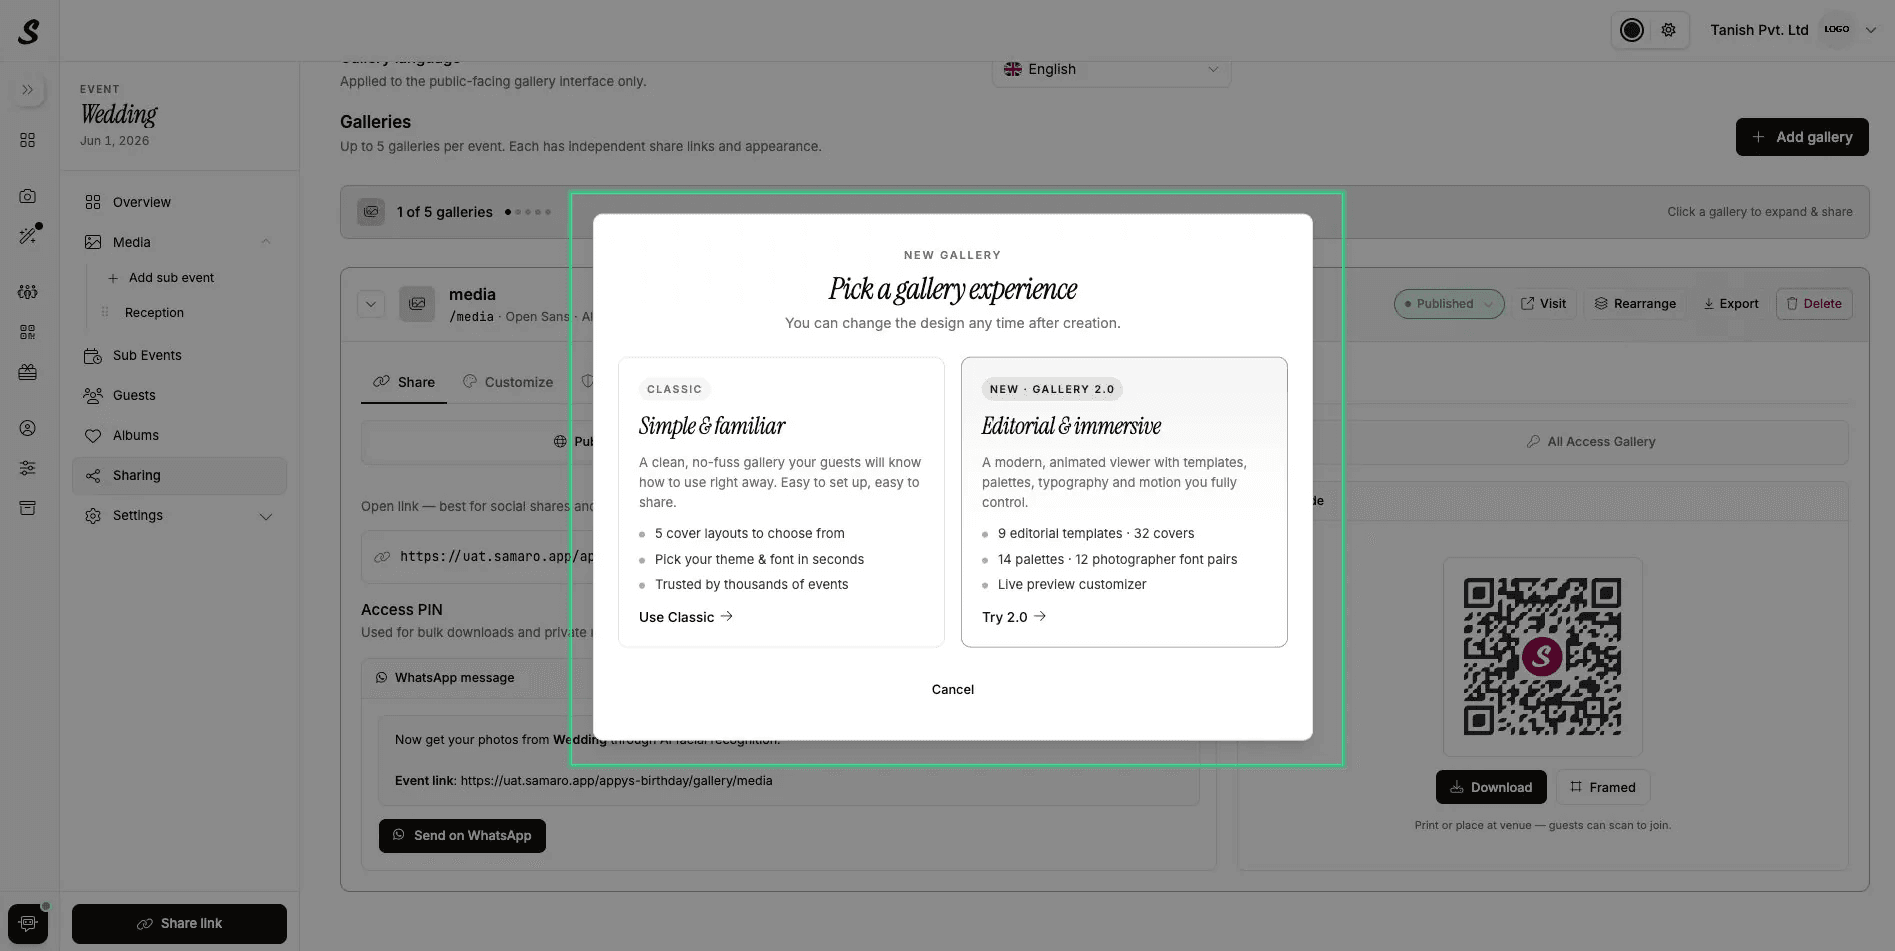
Classic is clean and familiar. Gallery 2.0 is editorial and immersive with full design control.
Classic is a clean, no-fuss gallery your guests will know how to use right away. It offers 5 cover layouts, quick theme and font selection, and is trusted across thousands of events. Gallery 2.0 is a modern, animated viewer with 9 editorial templates, 32 cover compositions, 14 palettes, 12 photographer font pairs, and a live preview customiser. Choose Classic for simplicity, or Gallery 2.0 for full creative control.
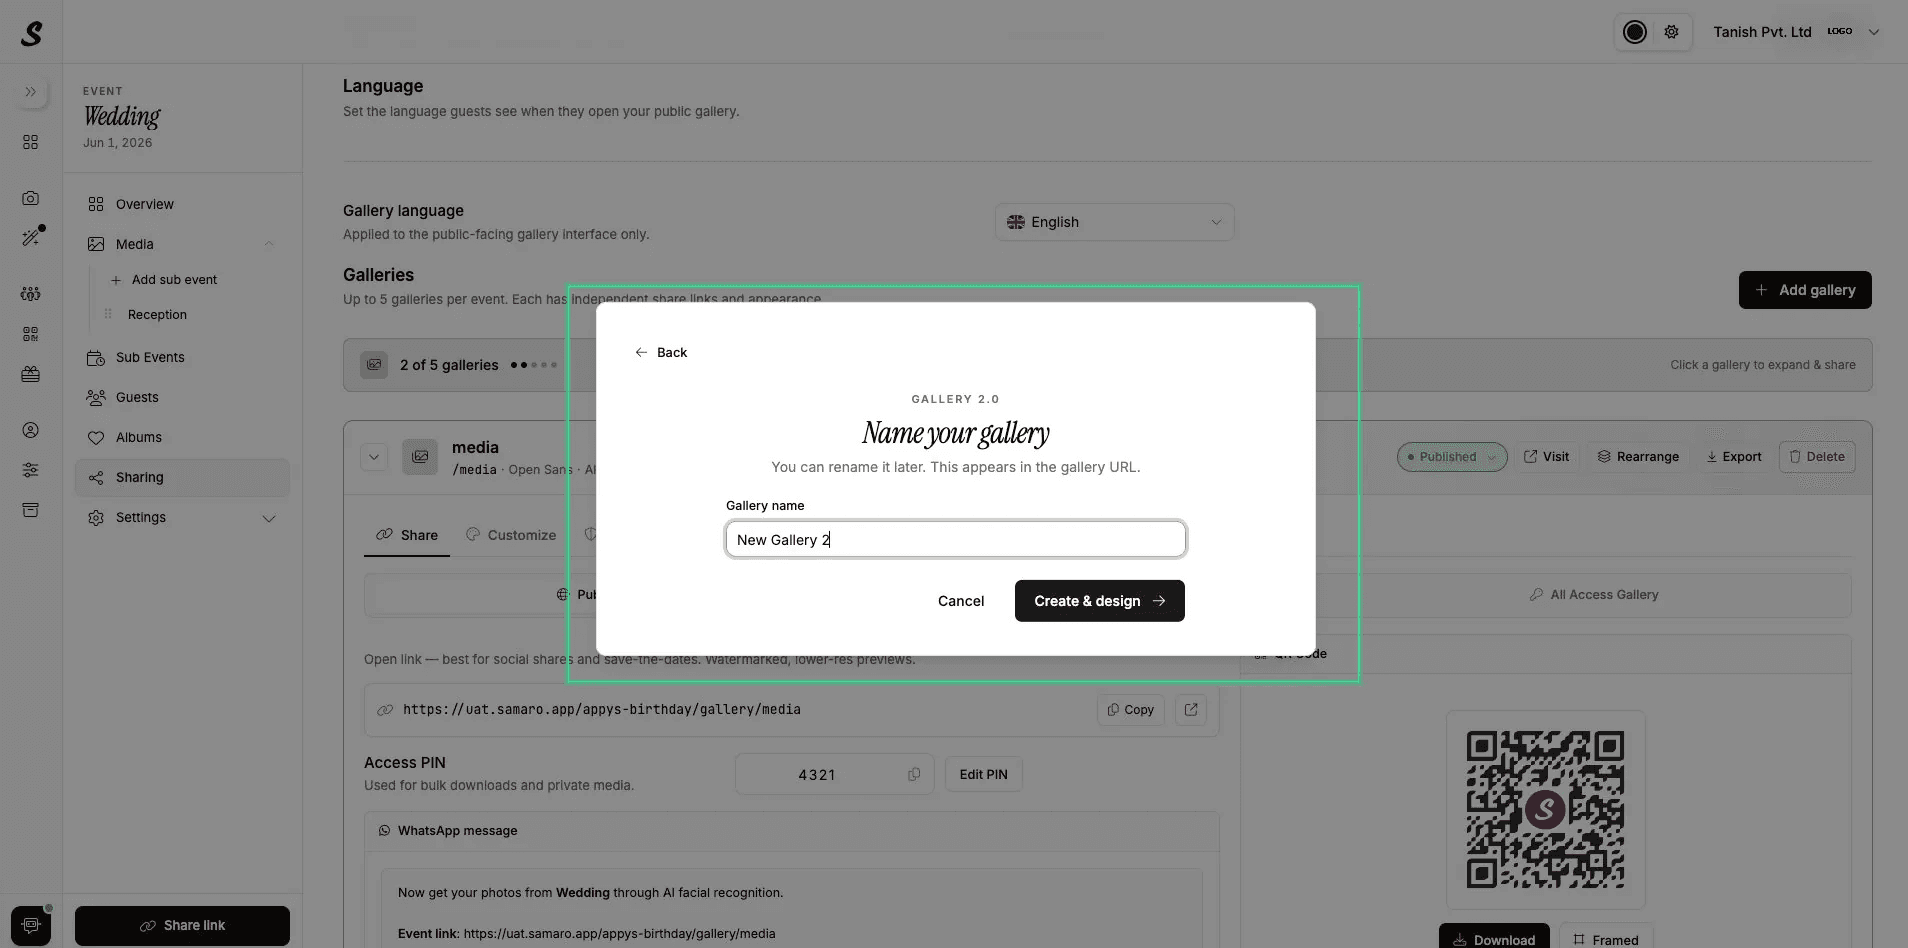
Give your new Gallery 2.0 a name. This appears in the gallery URL and can be changed later.
After choosing Gallery 2.0 and entering a name, you land on the gallery design editor. The editor walks you through 7 design parameters in a guided flow.
1. Look and Feel
Pick the editorial template that sets the overall tone of the gallery. Hover any card to see a quick preview, then click to apply. Options include Heirloom, Broadsheet, Atelier, Daylight, Imprint, Masthead, Bento, Pressed, and Bloom, each with a distinct editorial character. You can also set the Element shape for buttons, filter chips, and navigation elements choose from Rectangle, Rounded, or Pill.
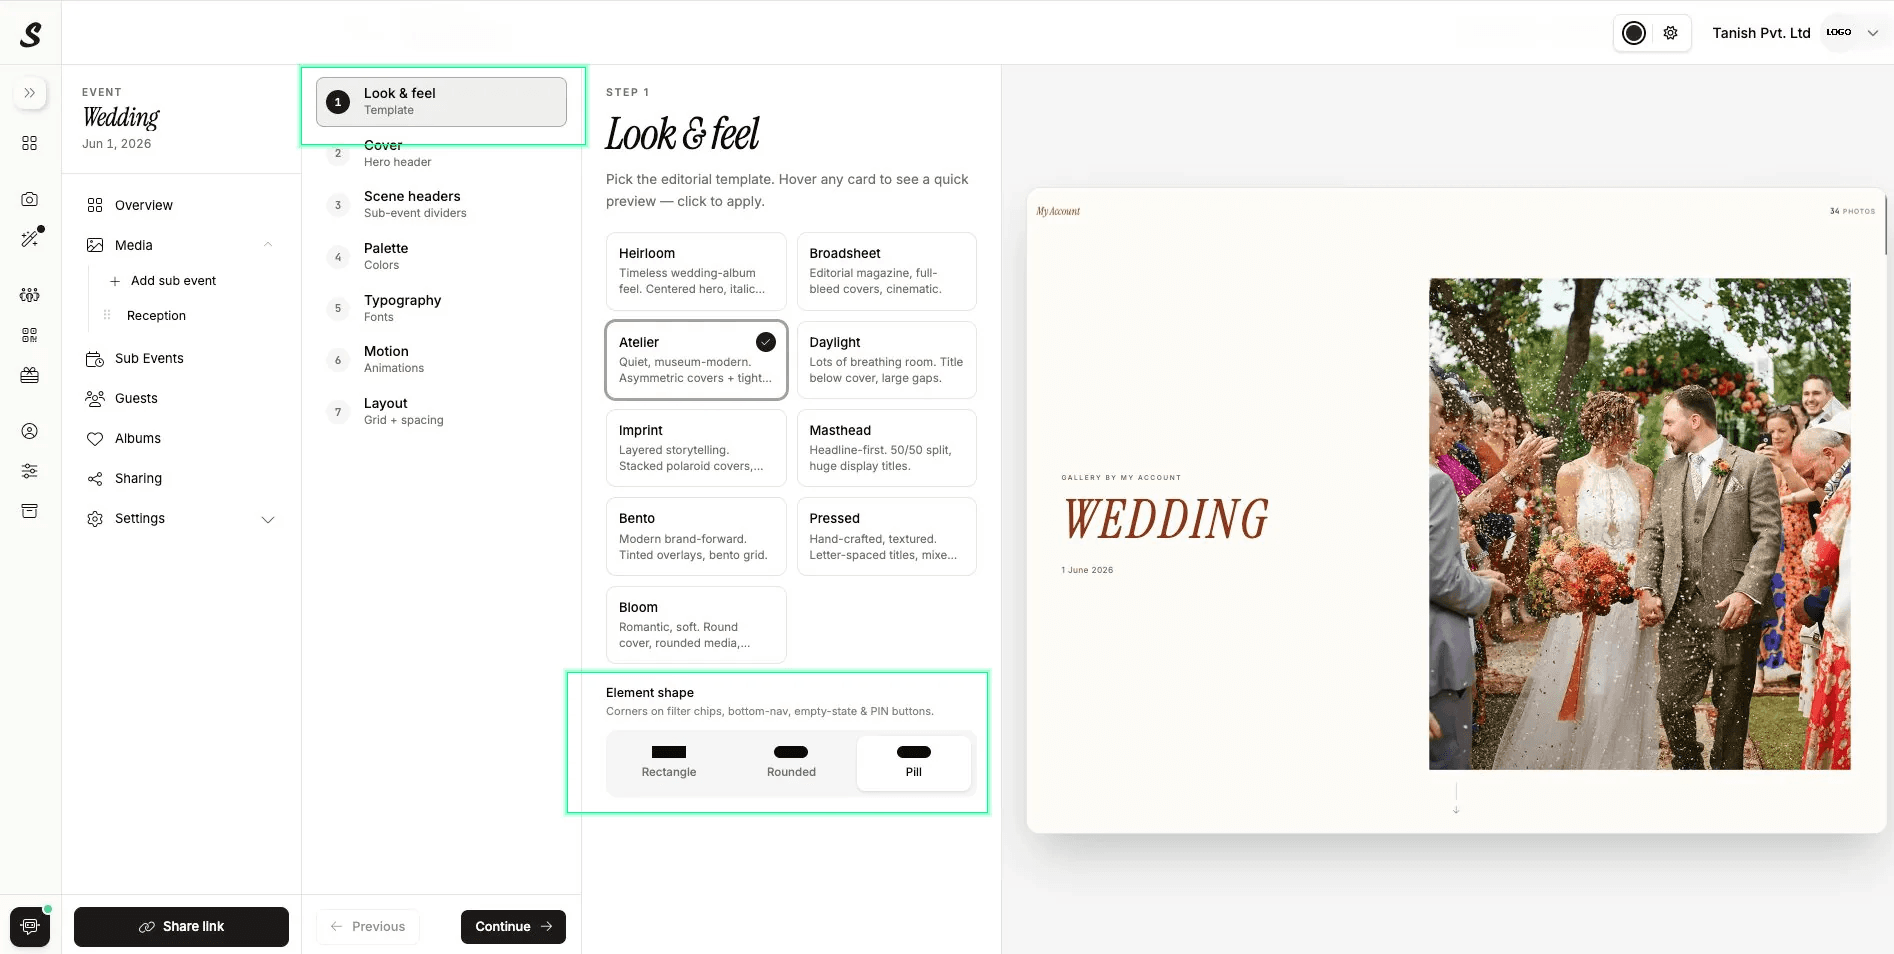
9 editorial templates to choose from. Hover to preview, click to apply.
2. Cover
The cover is the first thing your clients see. Pick a composition from options including Centered Card, Full-Bleed Center, Block-Left / Image-Right, Stack of Five, Masthead Split, Diptych Side-by-Side, Thin Frame, Tinted Overlay, Hero + Sidekick, Round Inset, Full-Bleed Hairline, and Window-Cut. You can also customise the cover title with colour and text overrides, and toggle studio attribution and the scroll-down arrow on or off.
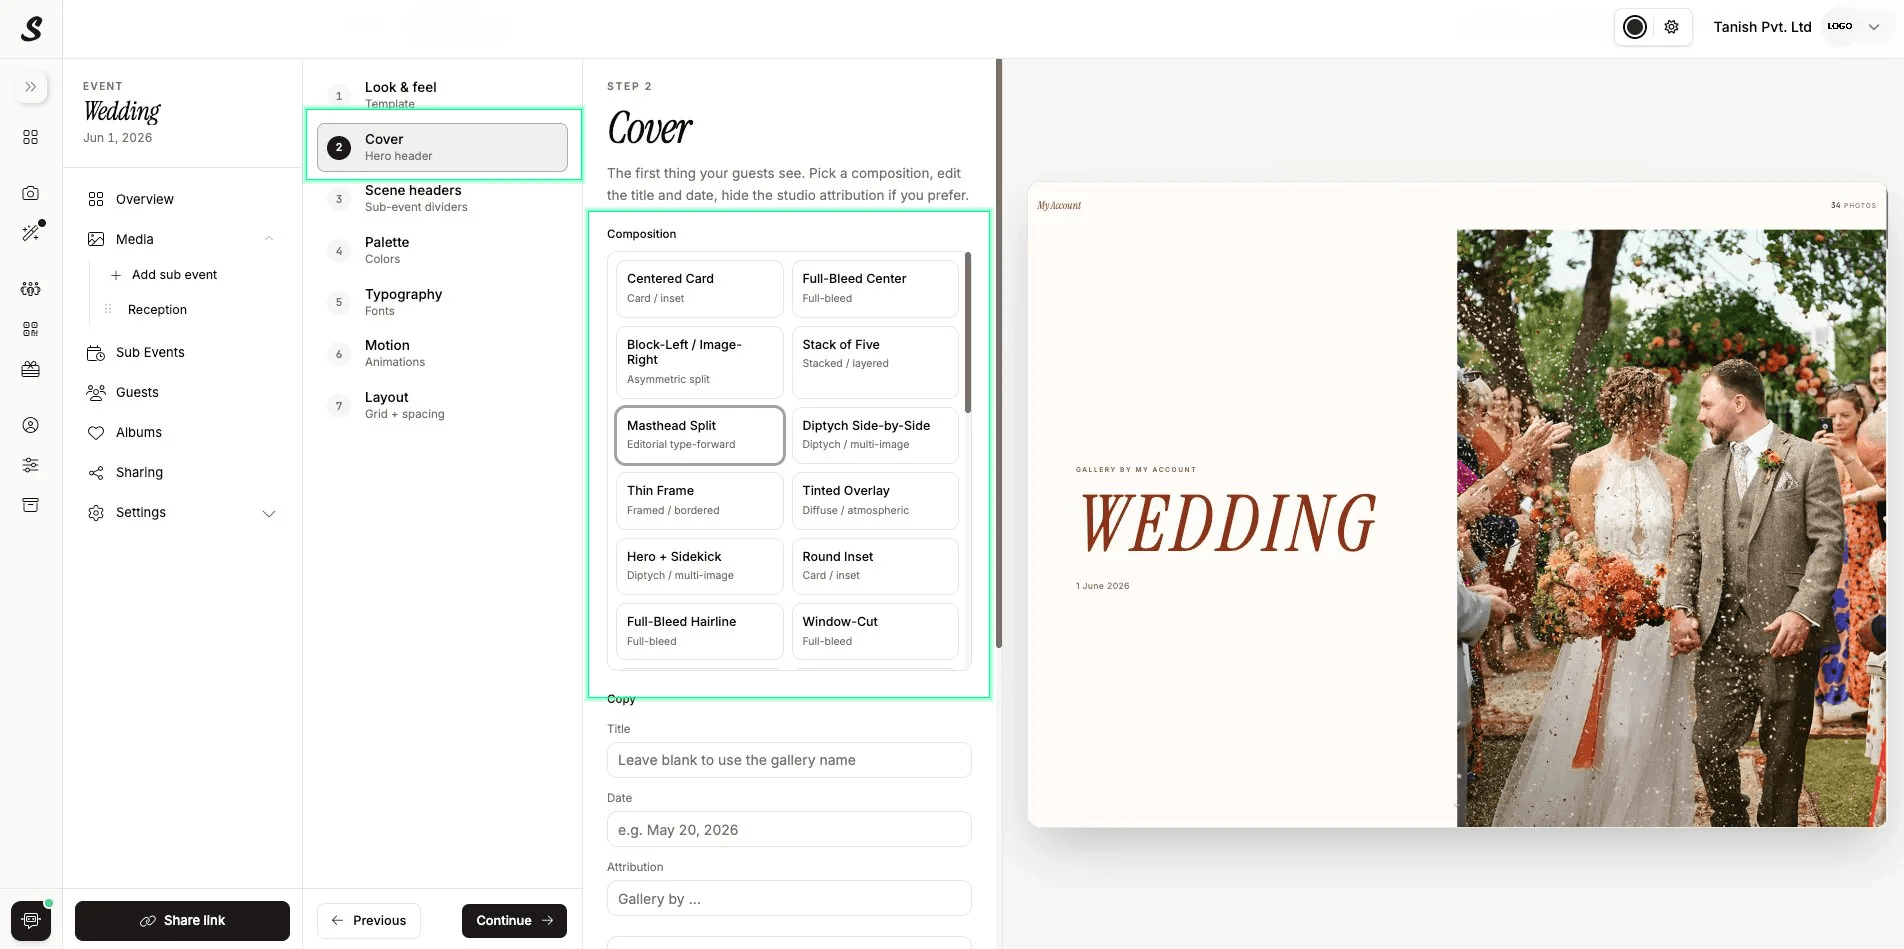
12 cover compositions. Pick one and customise the title, date, and attribution.
For compositions that support multiple images such as Stack of Five, you can select up to 5 cover photos to create a layered collage rather than a single hero image.
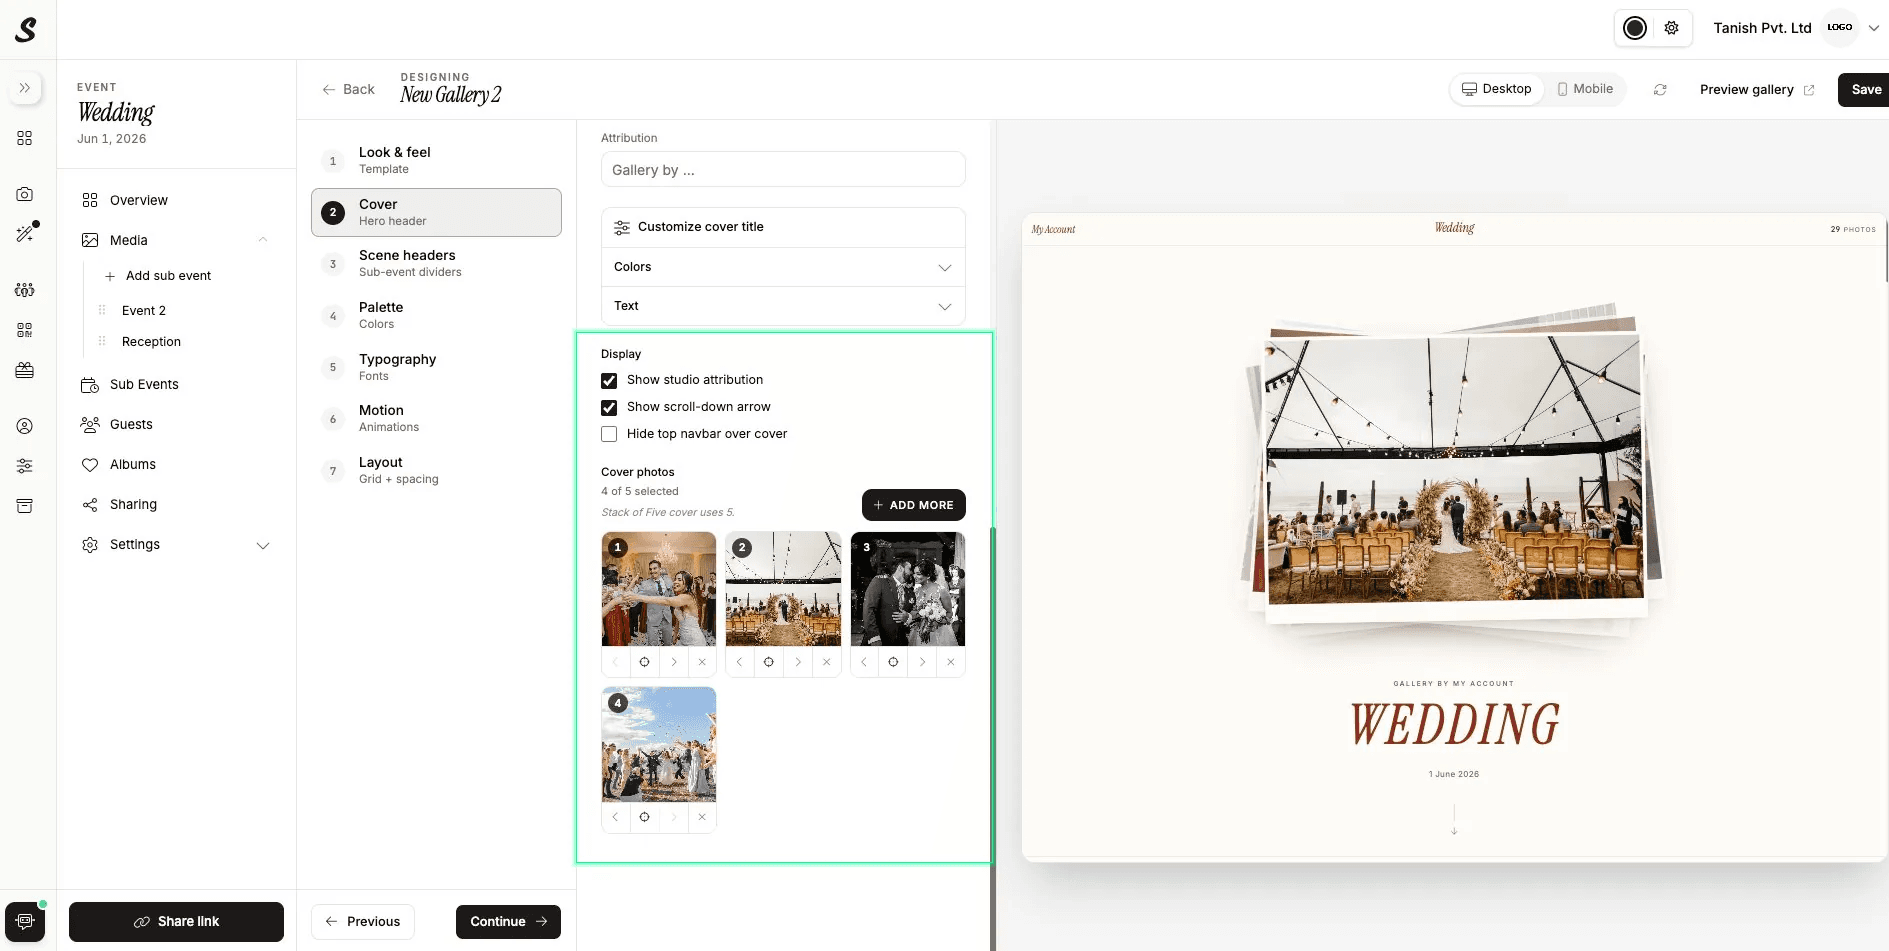
Select up to 5 cover photos for stacked and collage-style cover compositions.
3. Scene Headers
Scene headers are the dividers placed between sub-event groups in the photo wall. Choose from 10 styles including Hairline, Hairline + dot, Slash prefix, Vertical bars, Framed box, and Double rule. You can also override the colour and text for these headers independently of the rest of the gallery design.
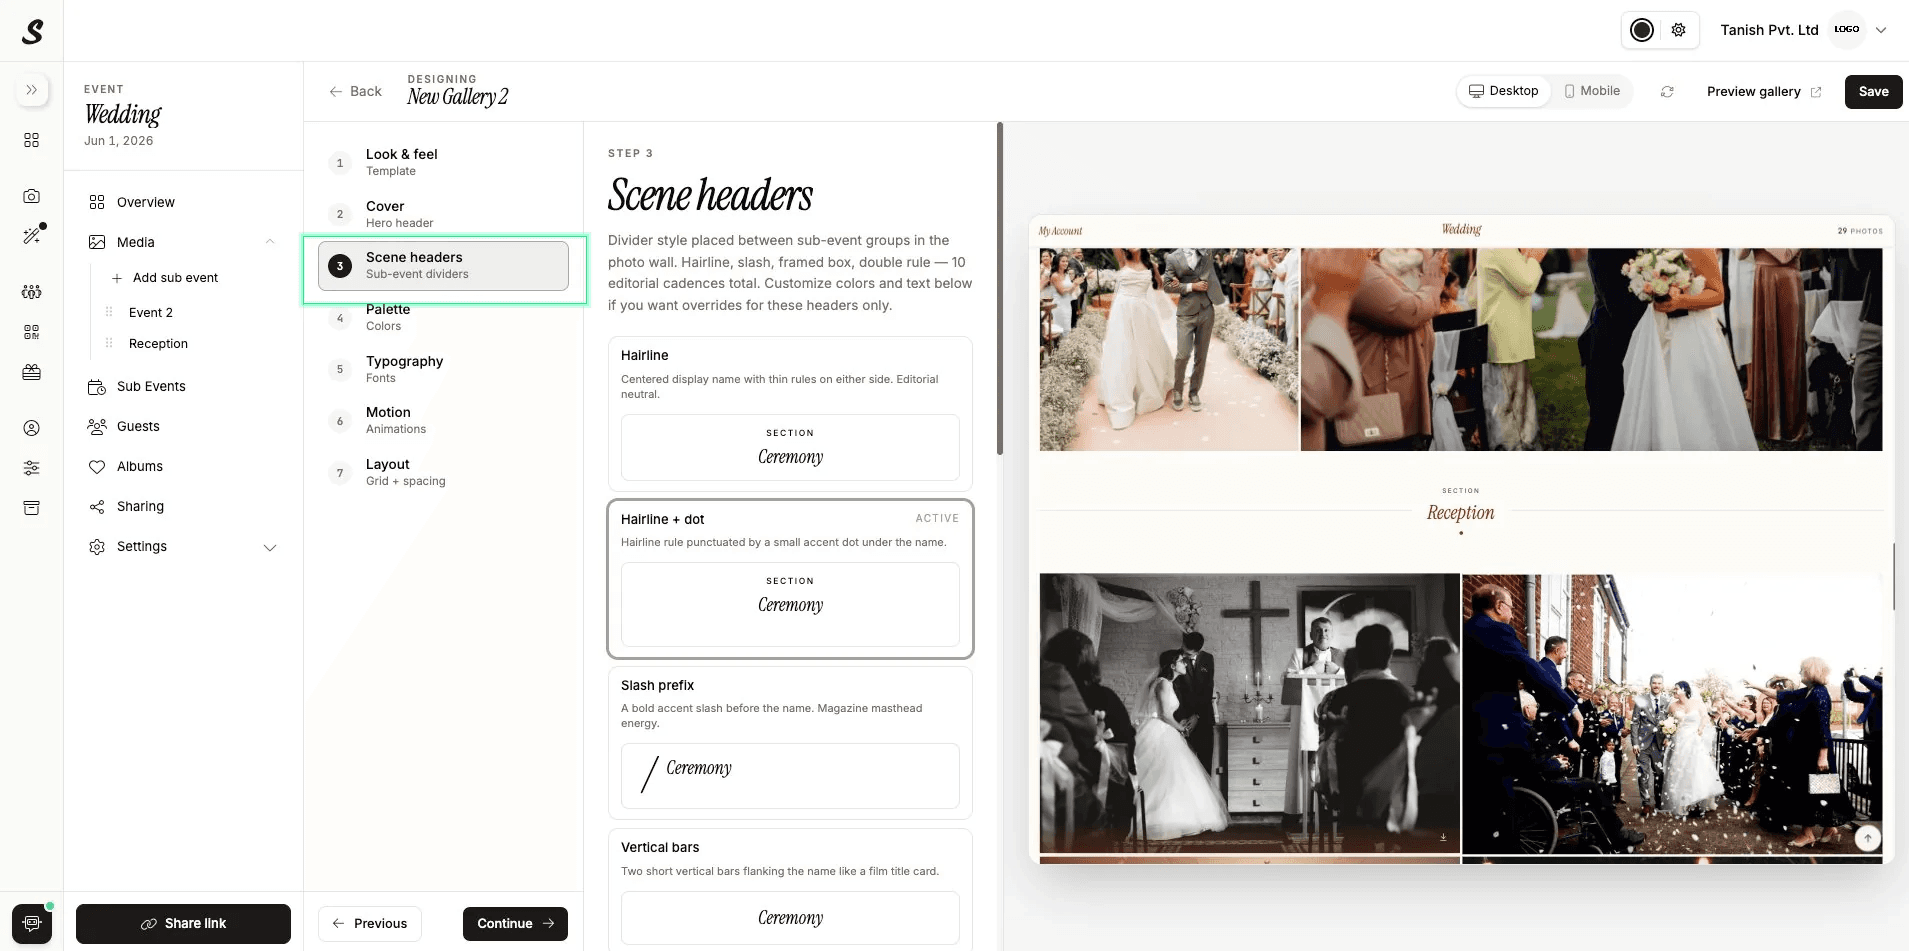
10 editorial divider styles to separate your sub-events in the photo wall.
4. Palette
Each palette pairs a canvas colour with an accent that drives display headings and key emphasis text. Light and dark variants are included in every palette toggle between modes to preview both. Choose from presets including All White, Ivory, Stone, Sand, Sage, Wine, Plum, Forest, Slate, Charcoal, Midnight, Espresso, Olive, Rust, and Linen. You can also build a fully custom palette by setting your own Background, Foreground, and Accent colours.
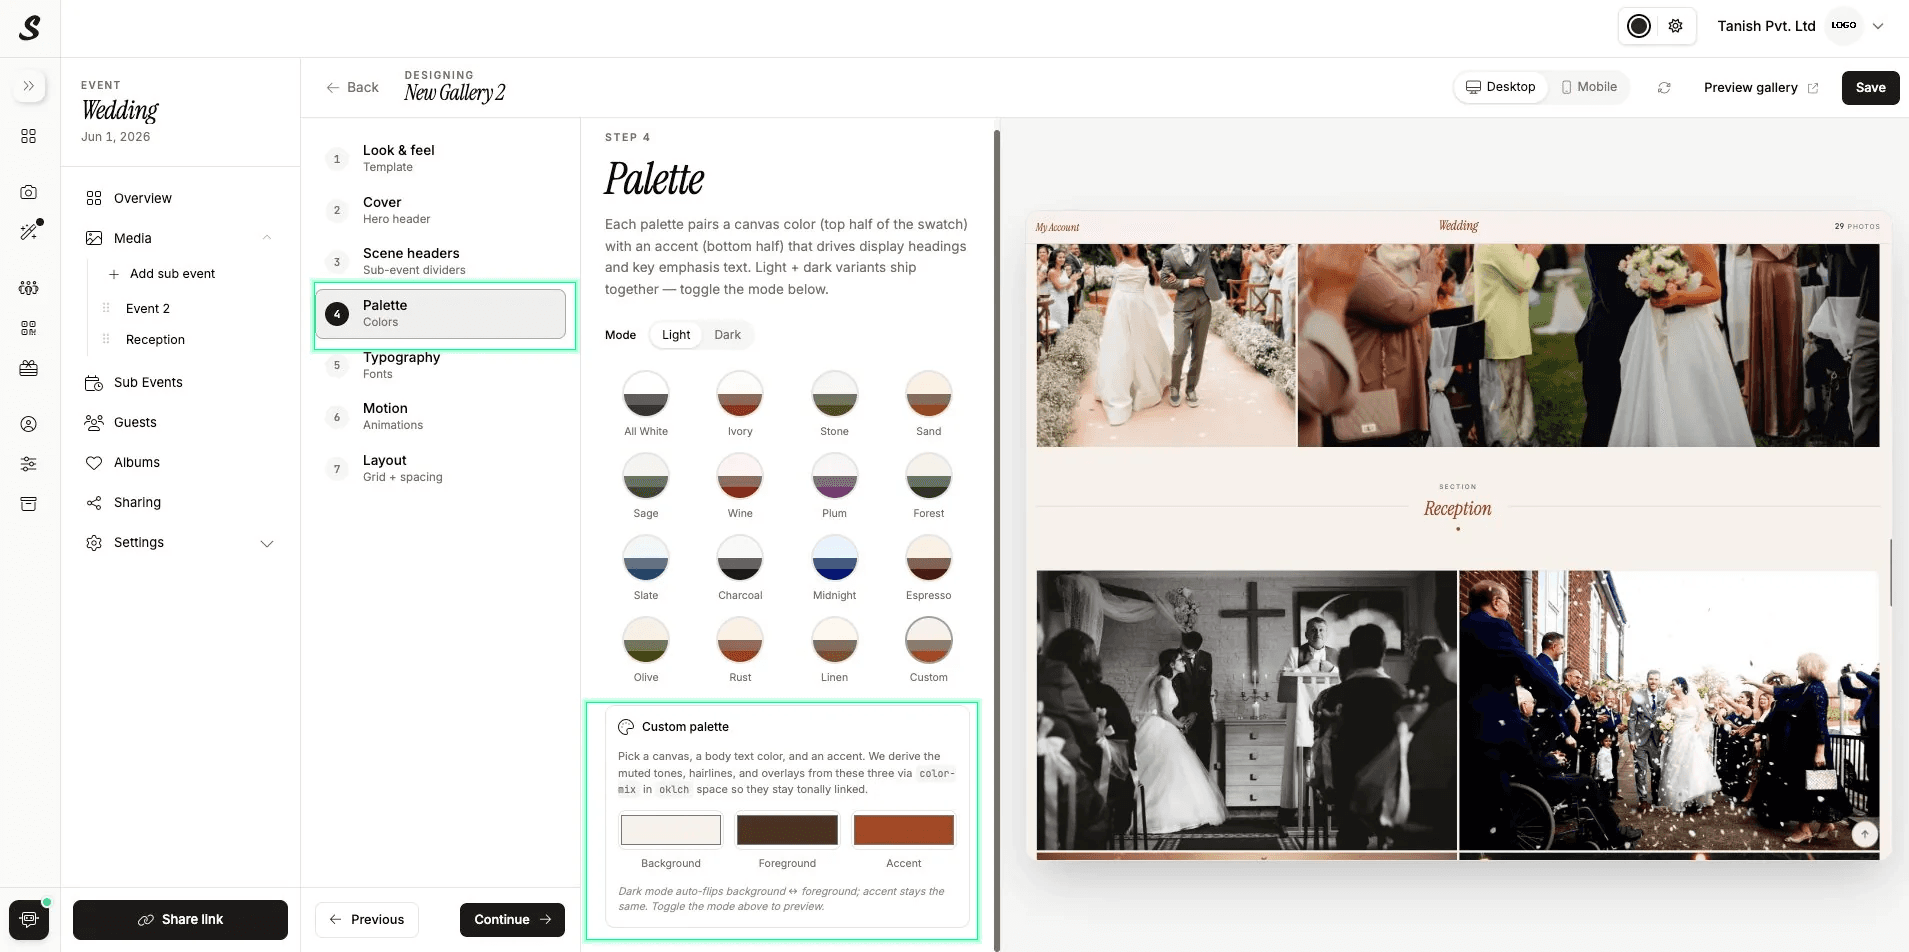
14 preset palettes plus a fully custom option. Toggle light and dark modes to preview both.
5. Typography
Choose a display and body font pair from 12 curated combinations including Editorial, Folk, Mono, and Statement, or pick your own from approximately 80 photographer-favoured Google Fonts. You can also set font weight and italic styling for the display font independently of the body font.
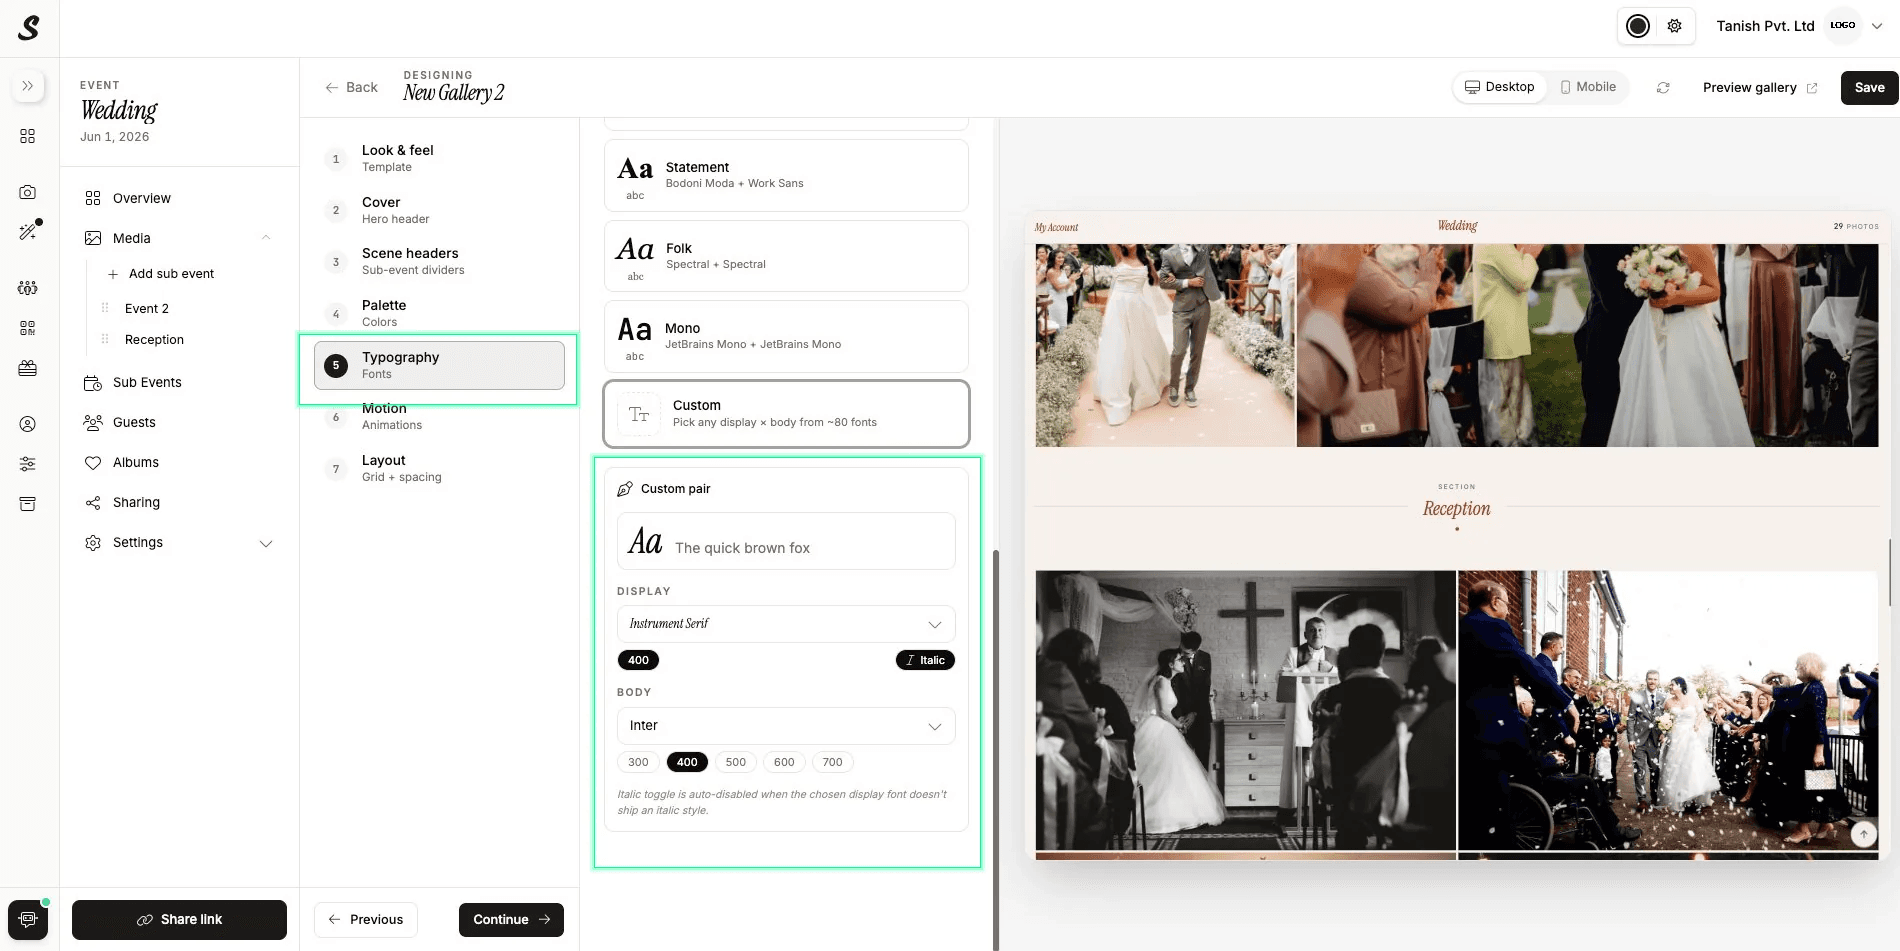
12 curated font pairs or build your own from approximately 80 Google Fonts.
6. Motion
Motion controls the level of animation across covers, scene headers, grid reveals, and the lightbox. Choose from three levels: Subtle uses opacity reveals only with no parallax or stagger, Balanced adds parallax, mask reveals, and grid stagger, and Cinematic uses longer durations and larger parallax for the most dramatic effect. All motion respects the viewer's system accessibility settings automatically.
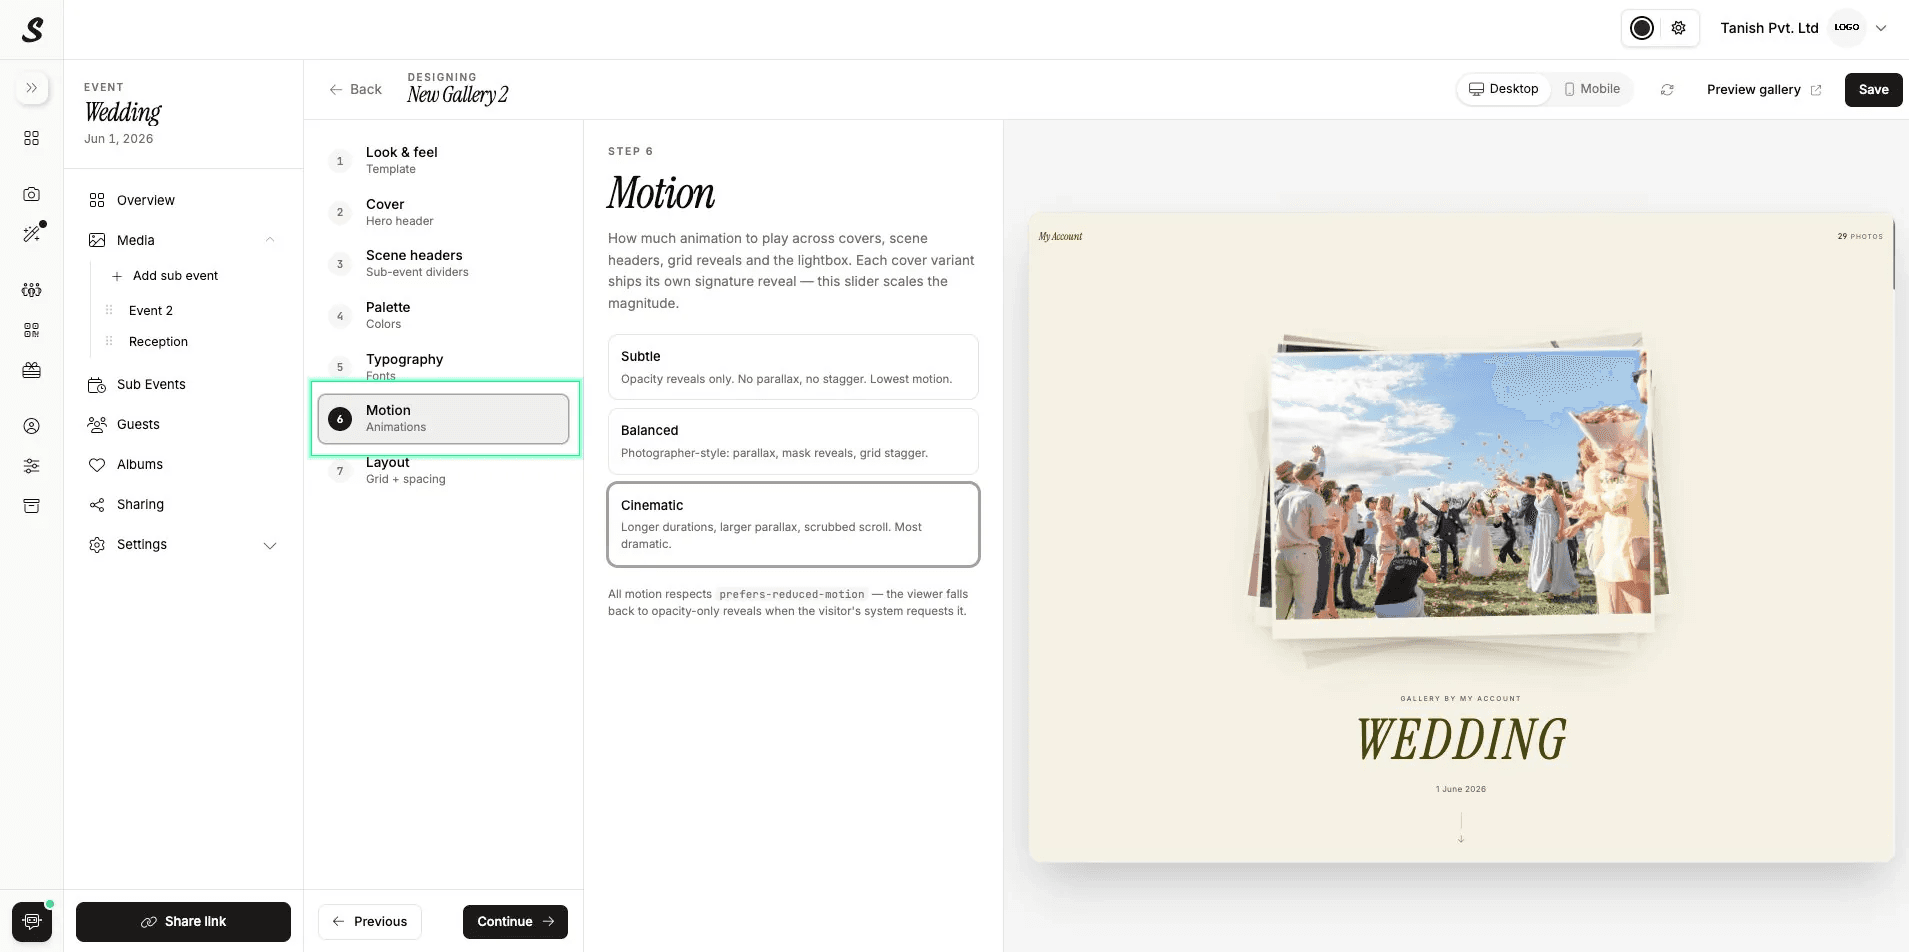
Three motion levels. Subtle keeps it clean. Cinematic goes all in.
7. Layout
Layout controls how the photo wall flows. First choose a Grid type: Justified fills horizontal rows evenly, while Masonry creates a more organic, variable-height arrangement. Then set Density to control tile size Compact, Standard, or Spacious. Finally set the Gap between tiles from Tight, Snug, Roomy, Airy, to Lofty. Once you are happy with the layout, click Finish to save the gallery.
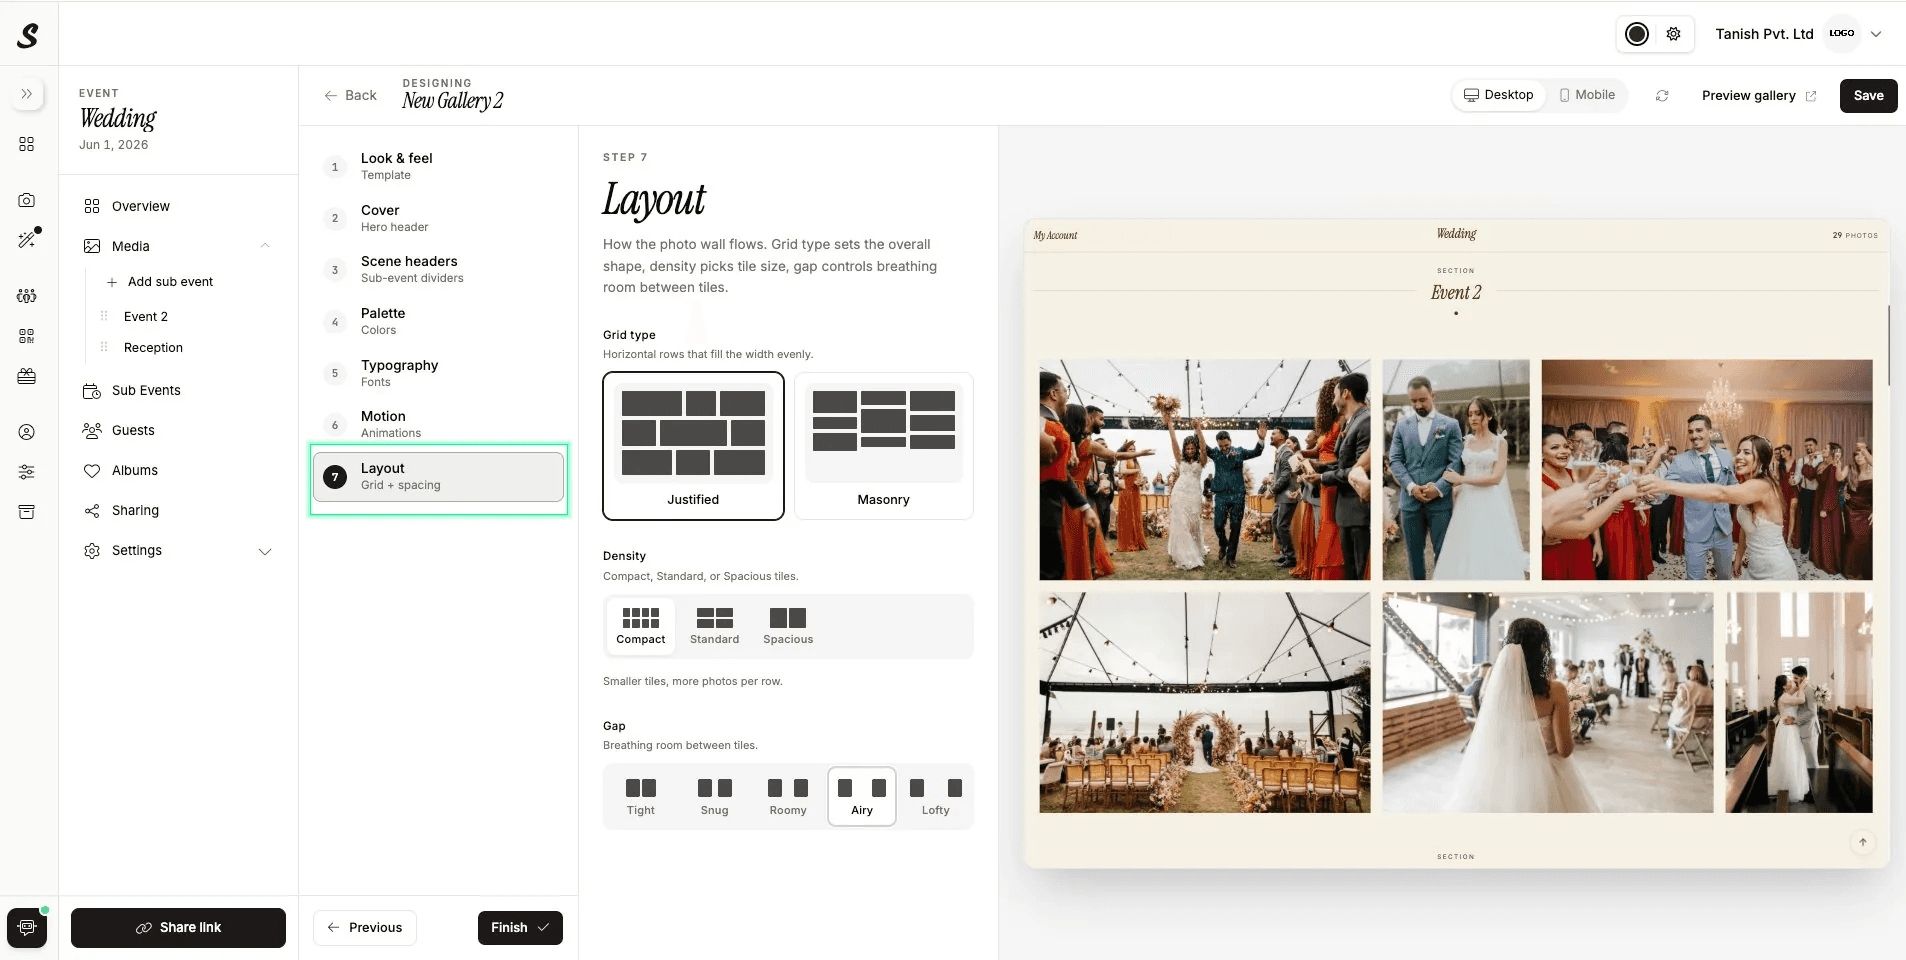
Justified or Masonry grid, three density levels, and five gap options.
Step 9: Gallery Customisation for Photographers
Inside the Sharing section, click the Customize tab on the gallery panel. This is where gallery customisation for photographers happens full control over how the gallery looks for your clients, from font to colour theme to the cover layout.
Gallery name sets what clients see as the title when they open the gallery link. Display font lets you choose from multiple typefaces including Open Sans, Playfair Display, Poppins, Oswald, Raleway, Merriweather, and EB Garamond. Color theme gives you a selection of preset colour palettes to match your brand. Cover theme controls the layout of the gallery cover image and title, with options including Classic, Center, Left, Center-Bottom, and Border.
A live preview on the right side of the screen updates as you make changes, showing exactly what your clients will see before you save.
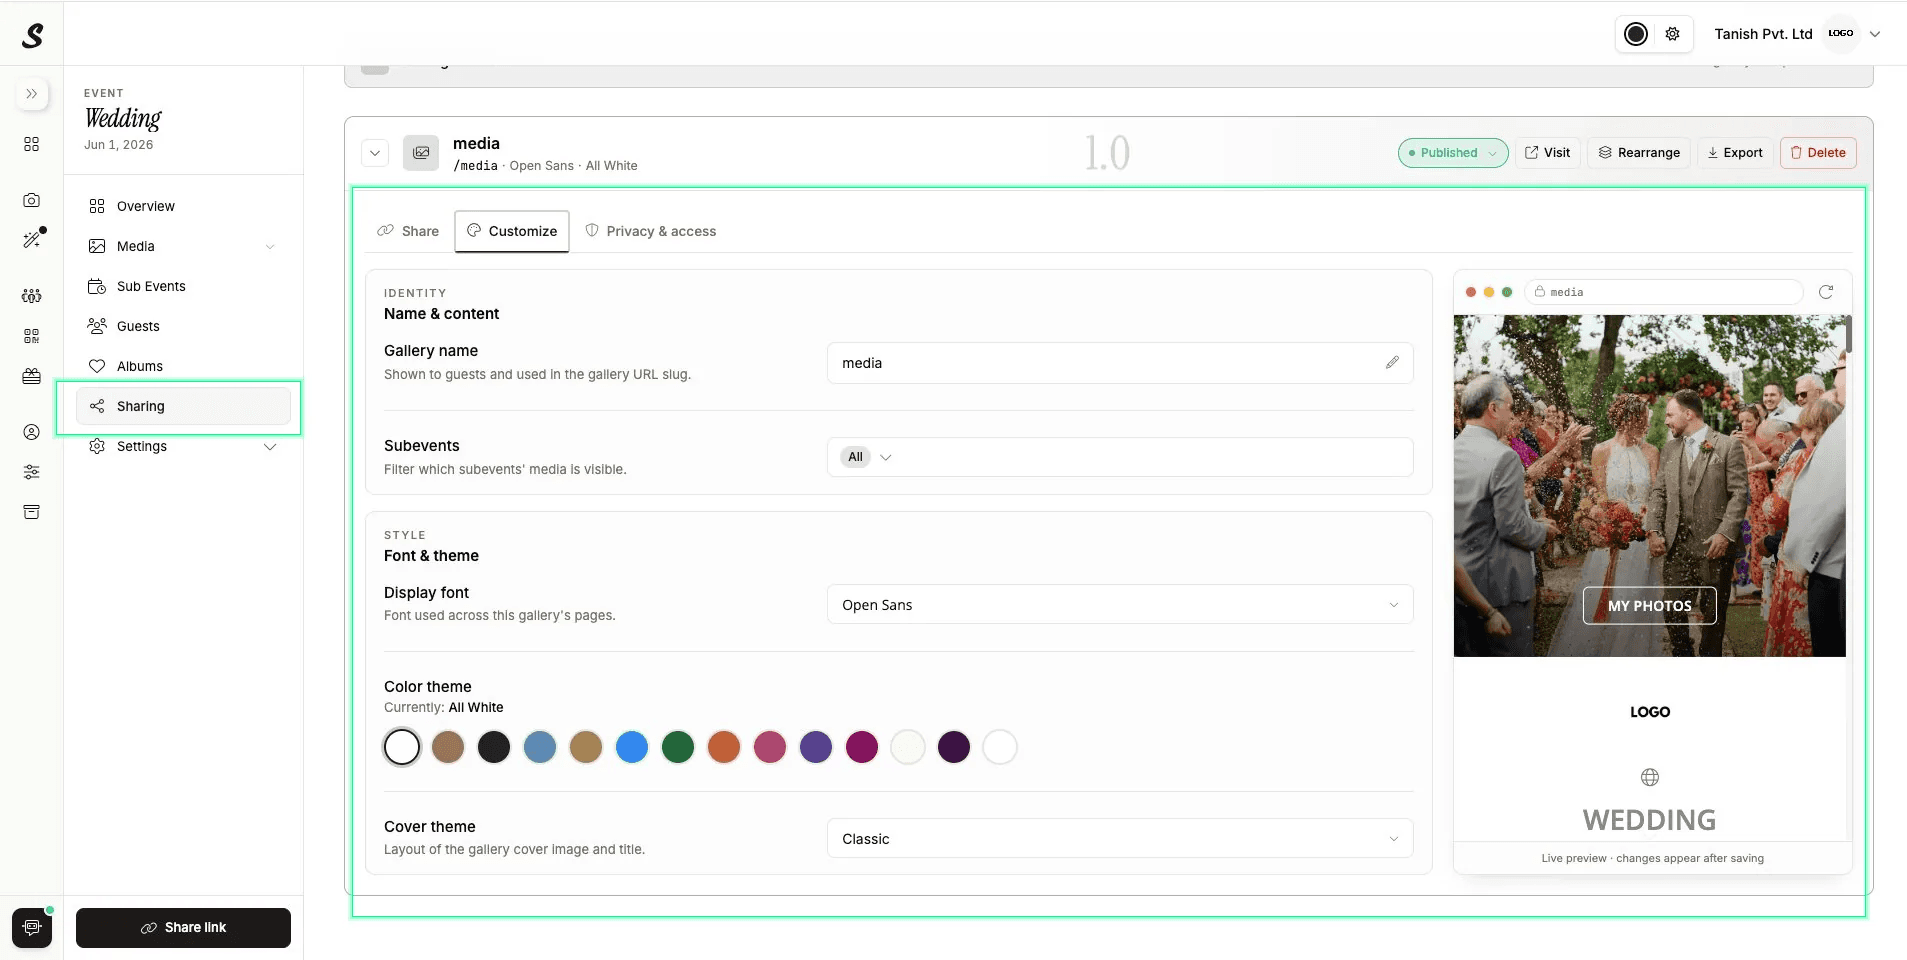
Font, colour theme, cover theme, and a live preview all in one screen.
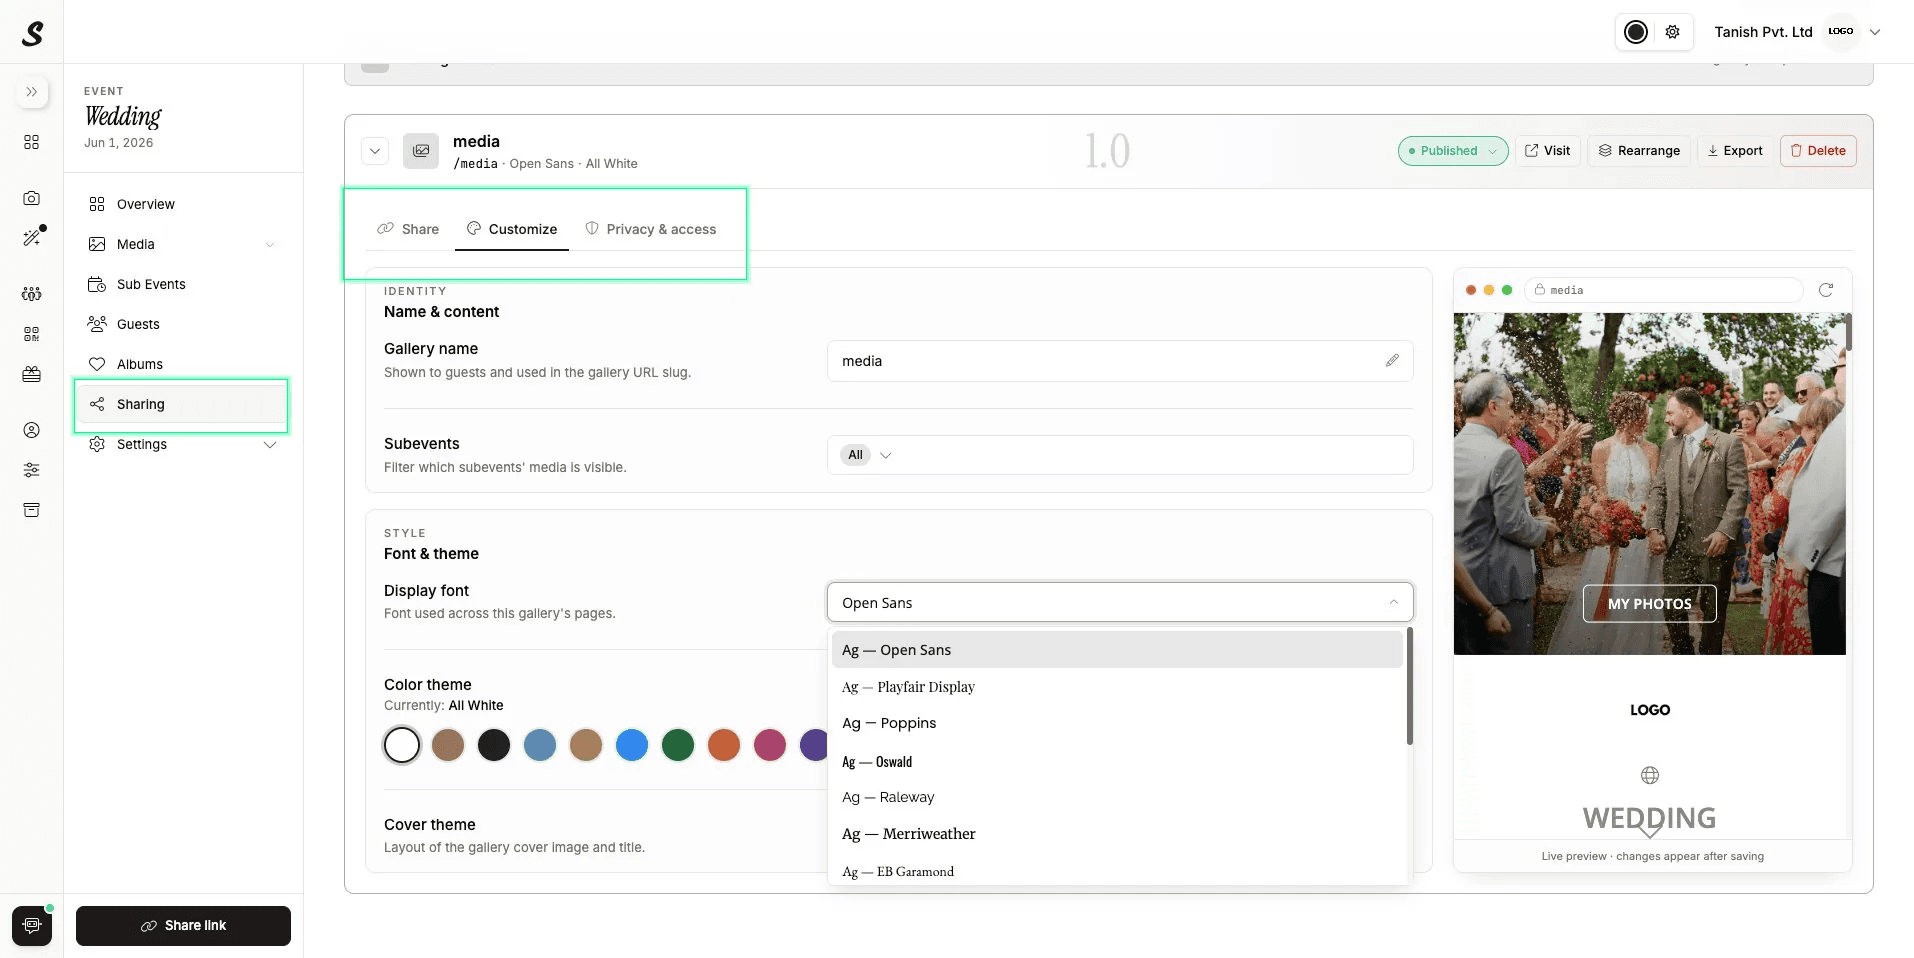
Multiple font options available to match your brand identity.
[Image: step09_img3.webp]
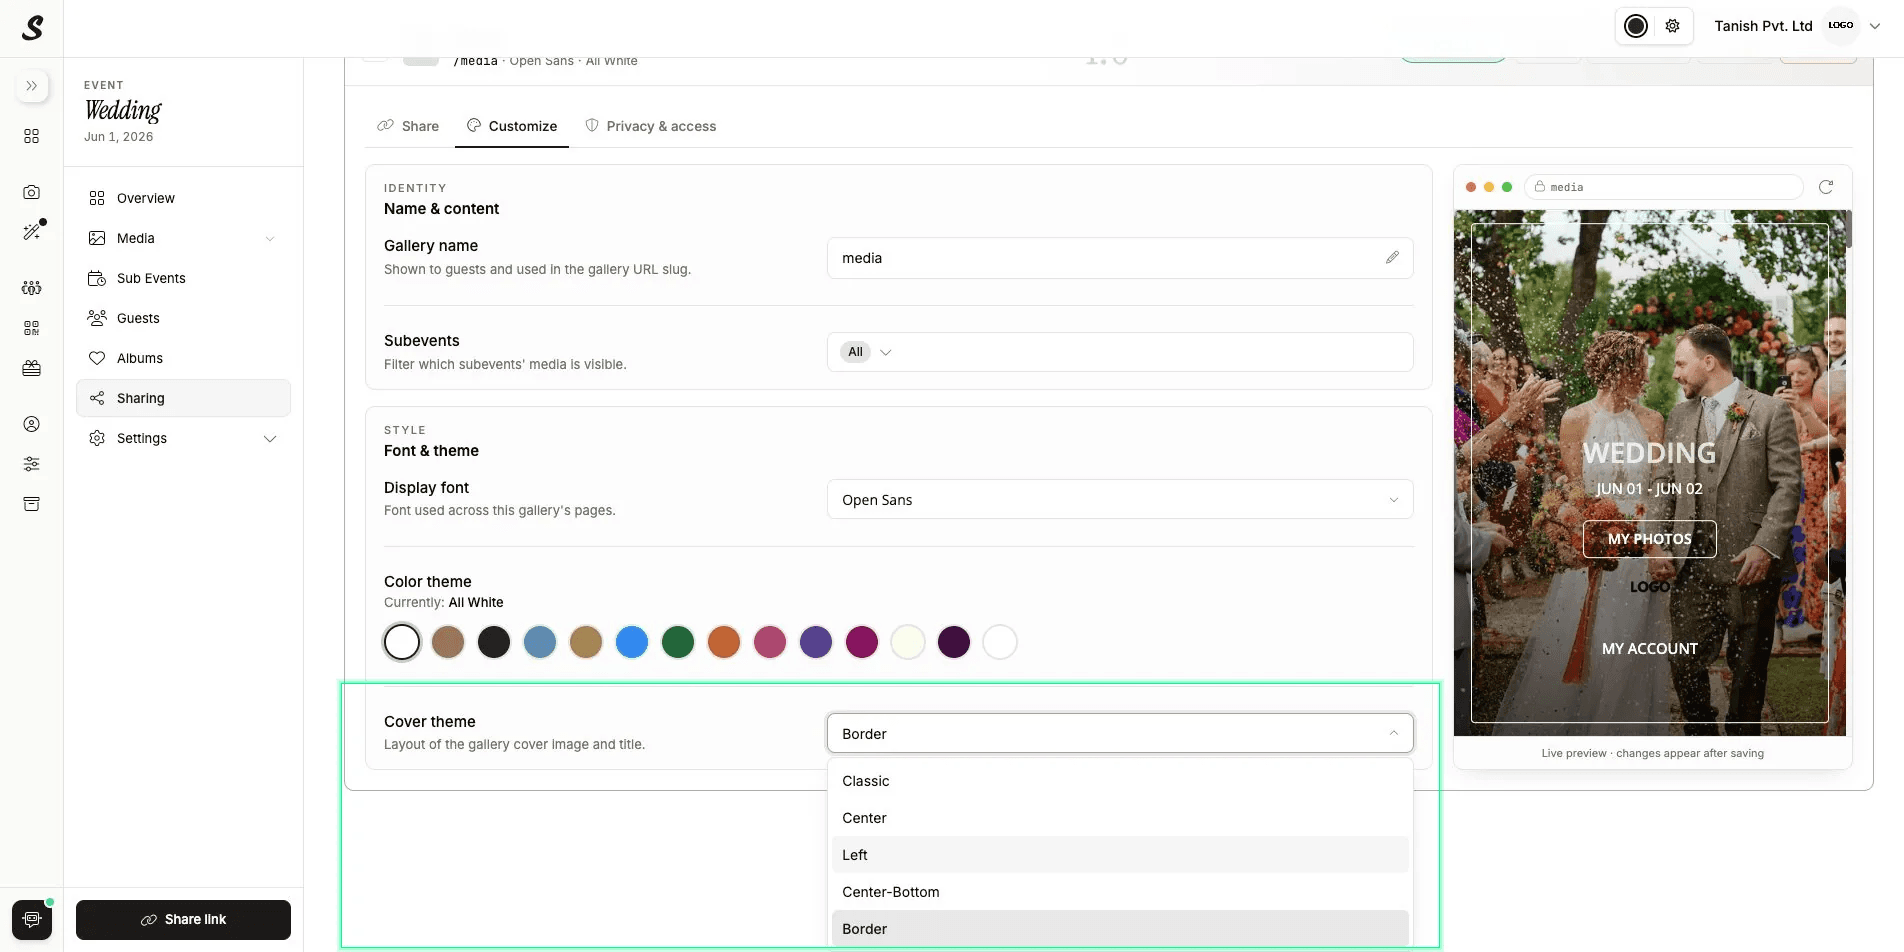
Cover theme controls the layout of your gallery cover image and title.
Step 10: Set a Cover Photo
To set the cover photo for your gallery, go to the Media section and browse through your uploaded photos. Hover over any photo you want to use as the gallery cover and click the Set cover button that appears on the image. This photo will appear as the hero image on your gallery cover page.
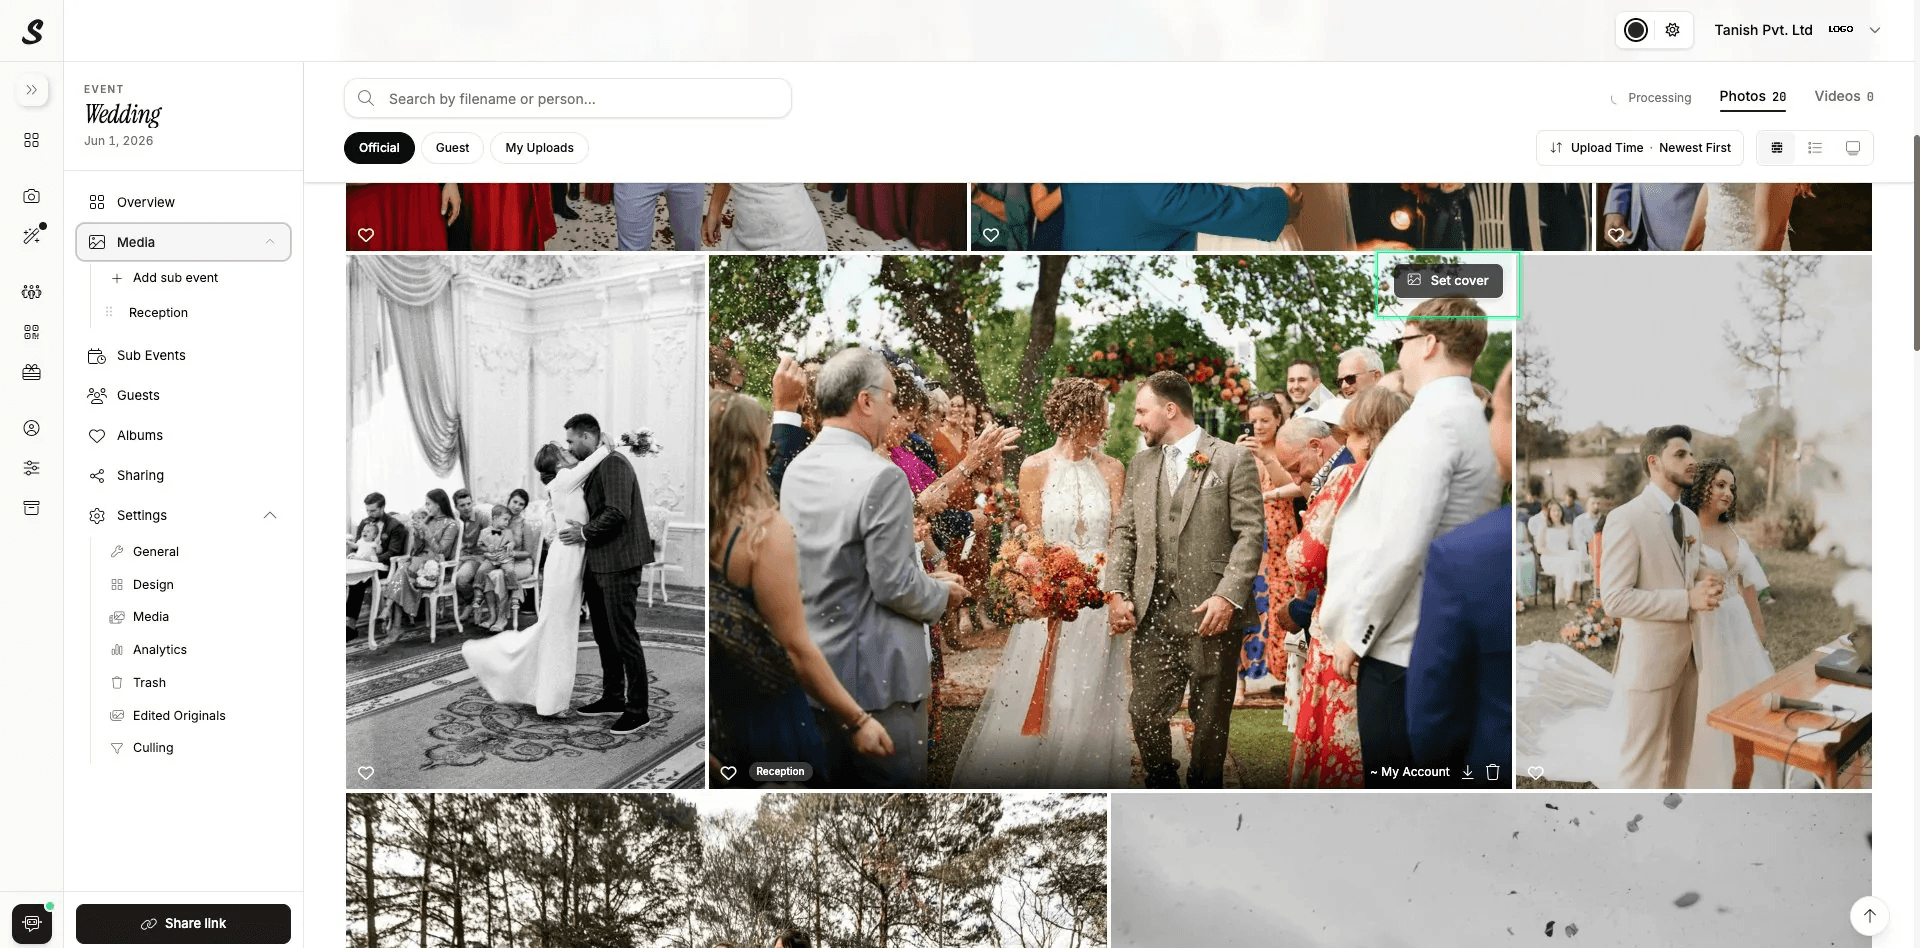
Hover over any photo and click Set cover to make it the gallery cover image.

You are halfway through. Take a breath before we continue.
Step 11: AI Editing
Samaro's AI editing feature lets you edit photos directly inside the platform without exporting to a third-party tool. To use it, go to the Media section, select the photos you want to edit using Ctrl or Cmd, and click Auto edit from the bottom action bar. You can select an editing tone and the AI processes the photos in the background.
Once editing is complete, the edited version replaces the original in your gallery. The original photo is automatically moved to the Edited Originals section under Settings, where you can view it, restore it to the gallery, or move it to trash once you no longer need it.
Select photos, then click Auto edit from the action bar to trigger AI editing.
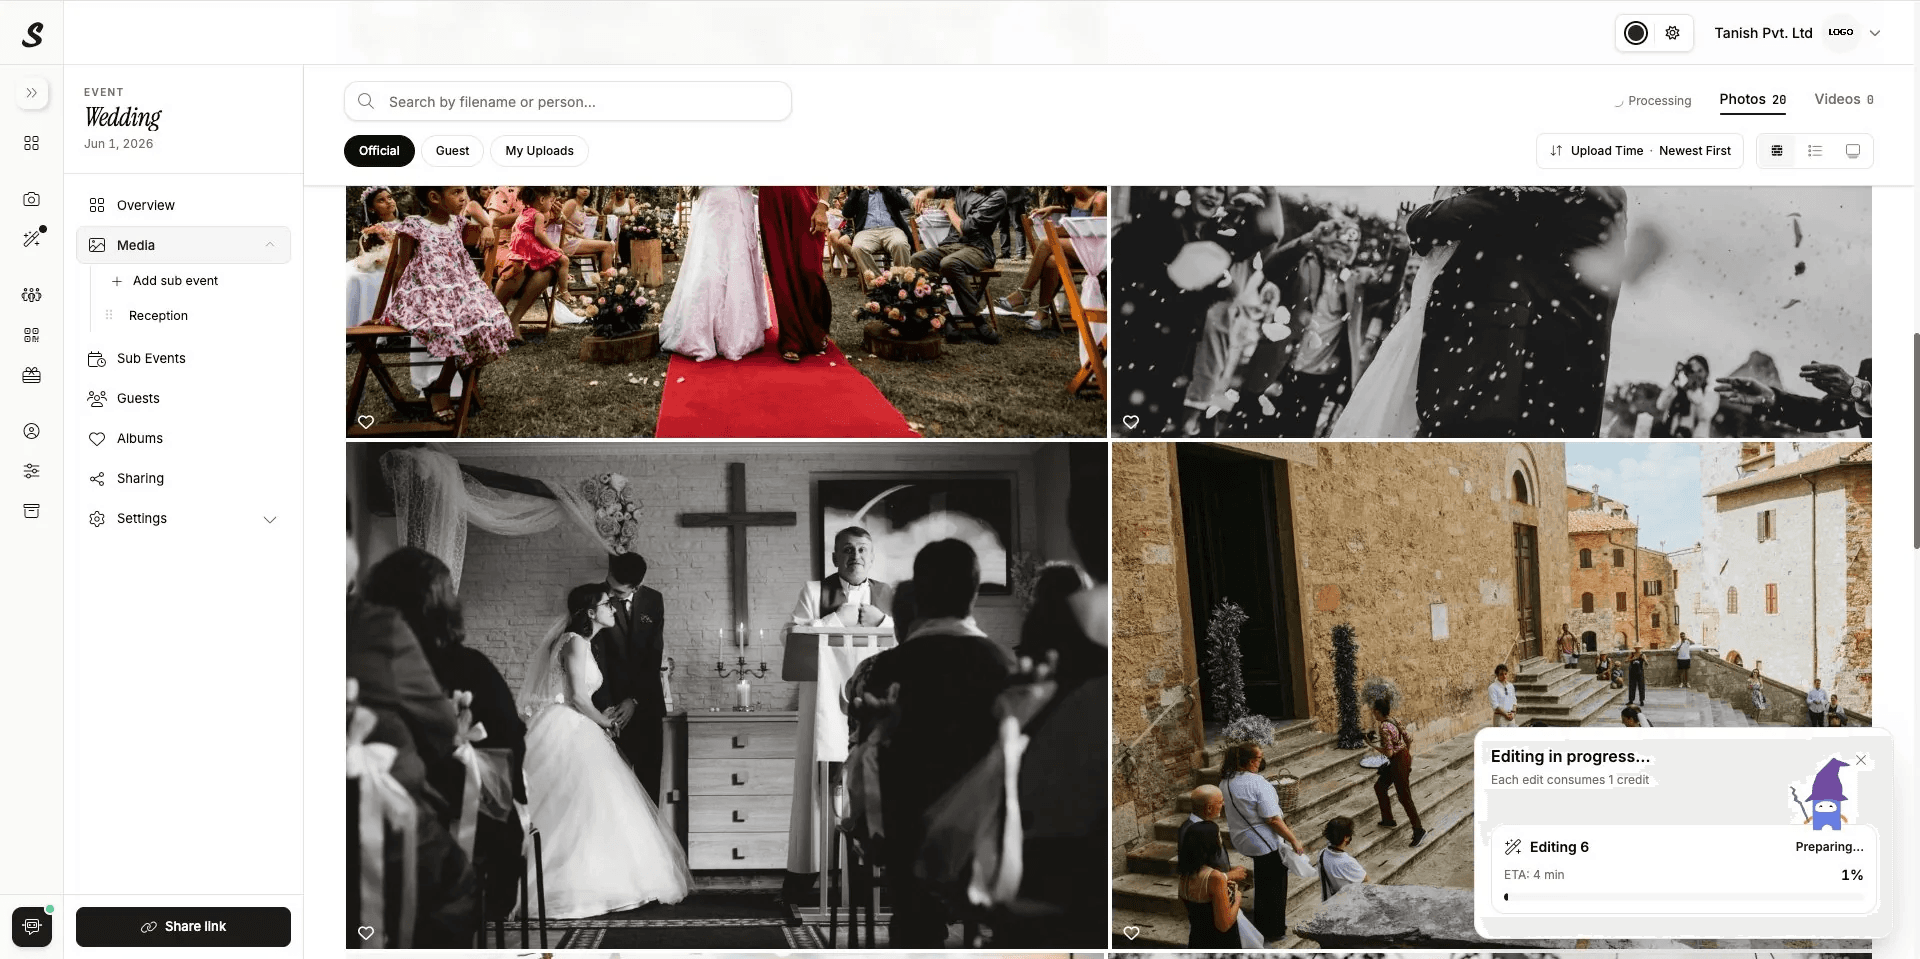
Editing runs in the background with a progress notification. Each edit consumes one credit.
A dedicated guide to Samaro's AI editing feature is coming soon. You can read the Samaro AI Editing comparison in the meantime.
Step 12: Configure Event Settings
The Settings tab in the left sidebar expands into seven sub-sections: General, Design, Media, Analytics, Trash, Edited Originals, and Culling.
General lets you update the event name, type, description, location, and dates at any point after creation.
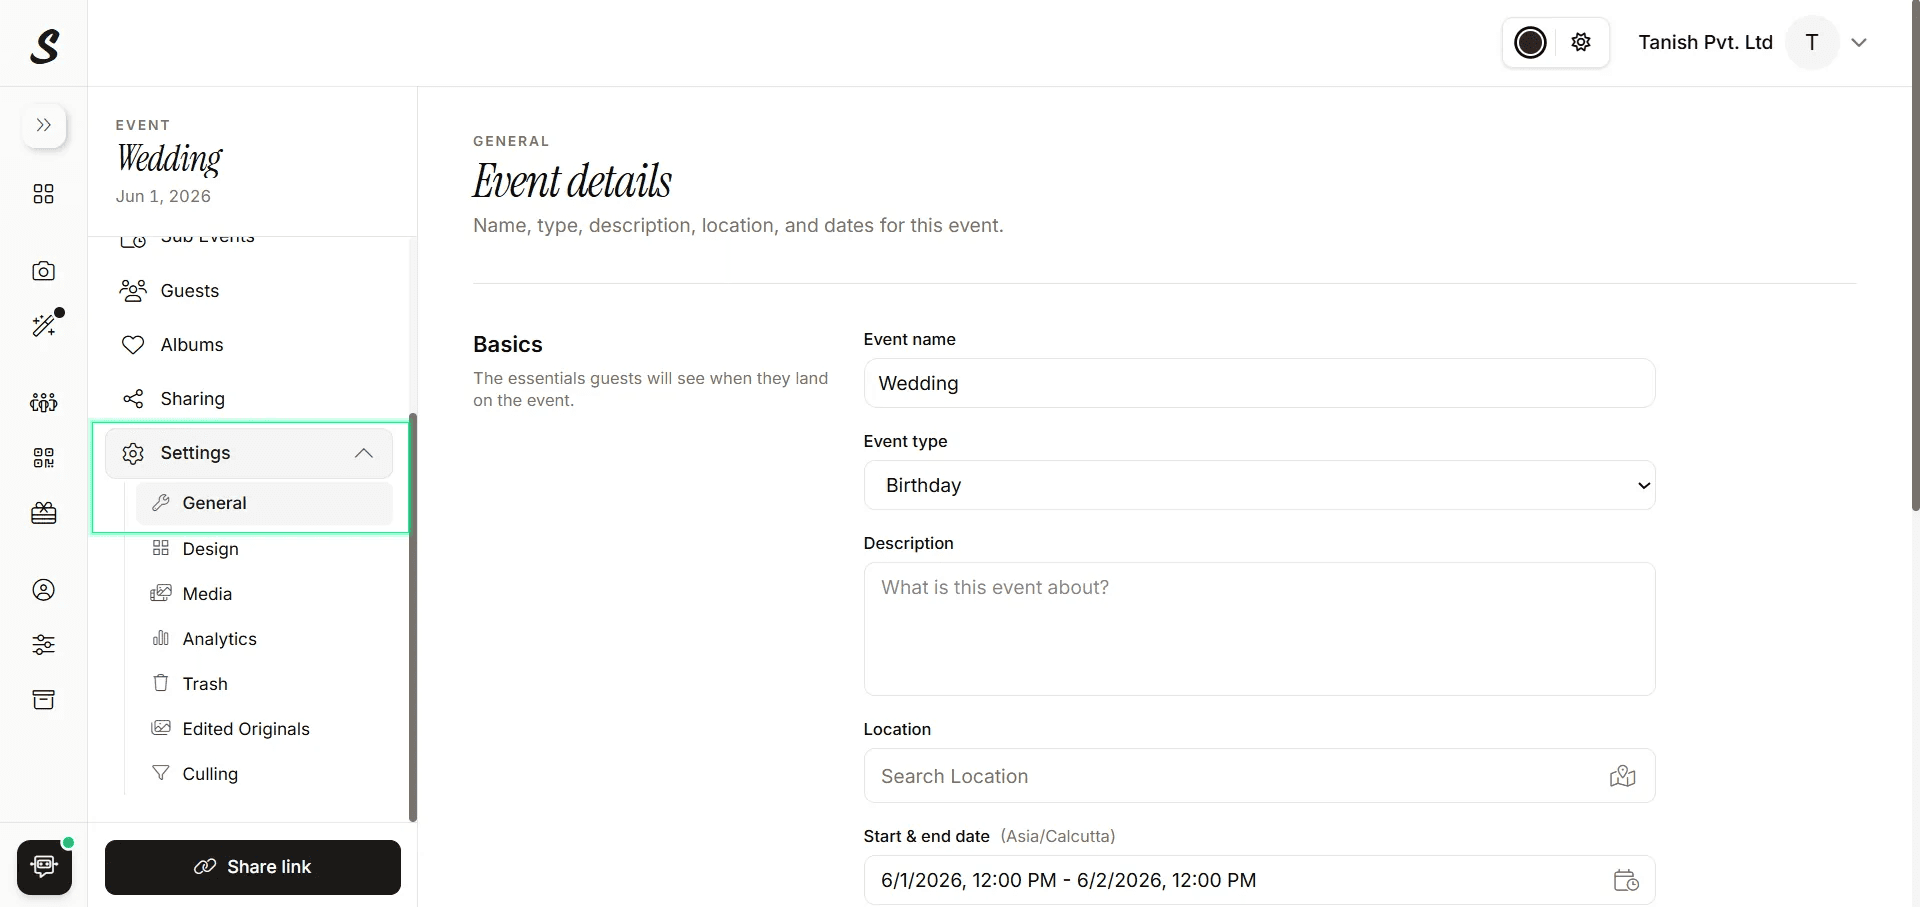
Event basics. Update these any time after the event is created.
Design controls the gallery layout for the public-facing gallery. Choose between a horizontal or vertical grid, set the tile size, and adjust the spacing. A live preview shows the result before you save.
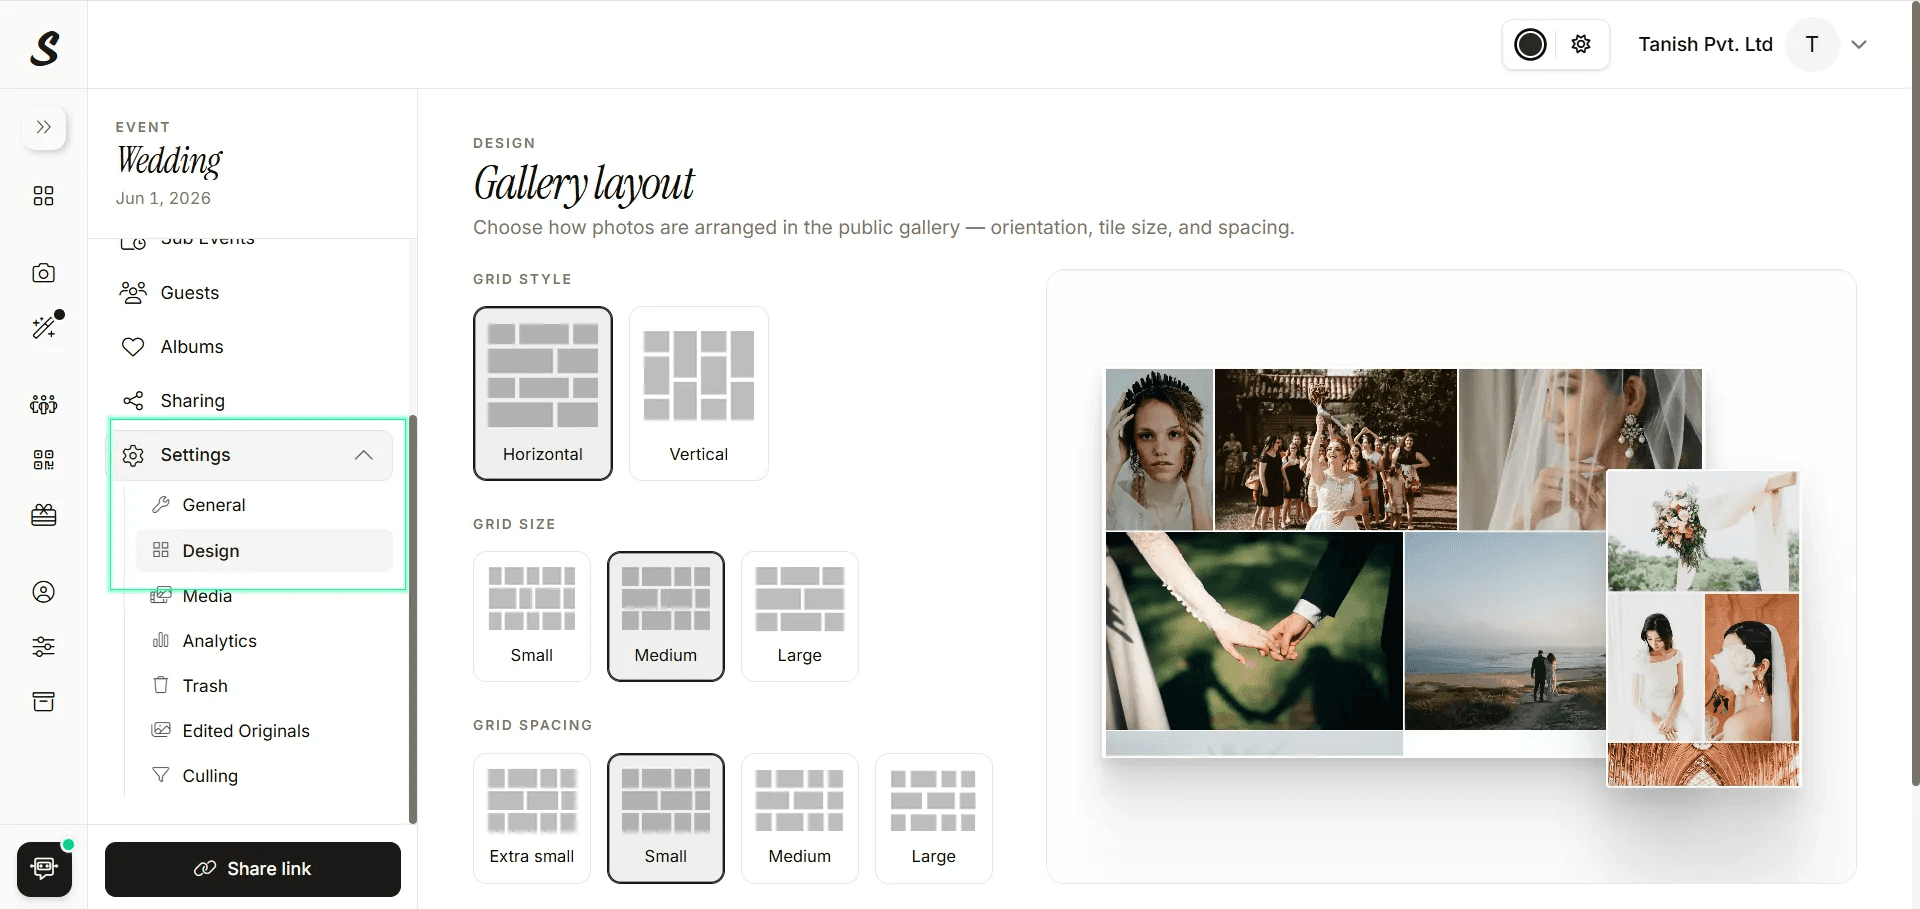
Horizontal or vertical grid, tile size, and spacing, all with a live preview.
Media controls privacy and download settings. Set media visibility to Public or Private. Private mode means guests only see photos where they appear personally. You can configure download quality separately for owners and co-hosts versus public guests. This section also includes Watermark and Frames settings where you apply your saved watermark preset and sponsor frame preset, with individual toggles for applying on viewing and on download.
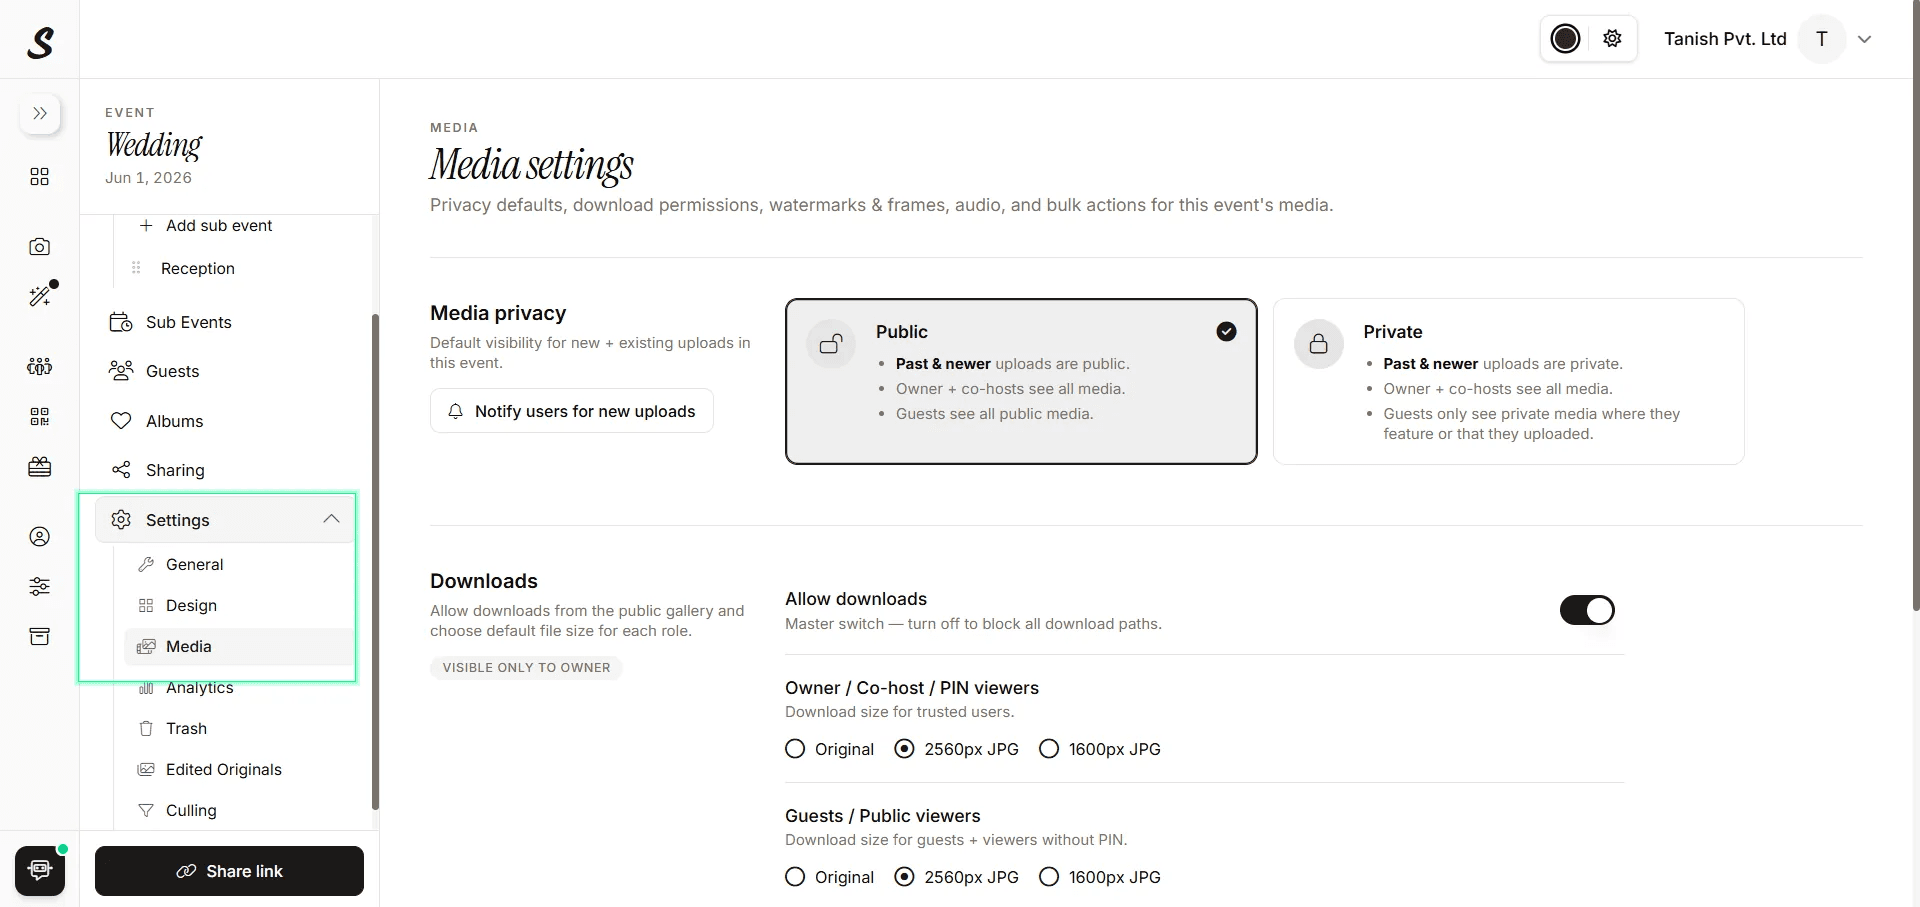
Public or private visibility, per-role download quality, and watermark application settings.
Analytics gives you a summary of everything happening in the event: total photos, videos, guests, gallery viewers, sub-events, and storage used versus your plan limit.
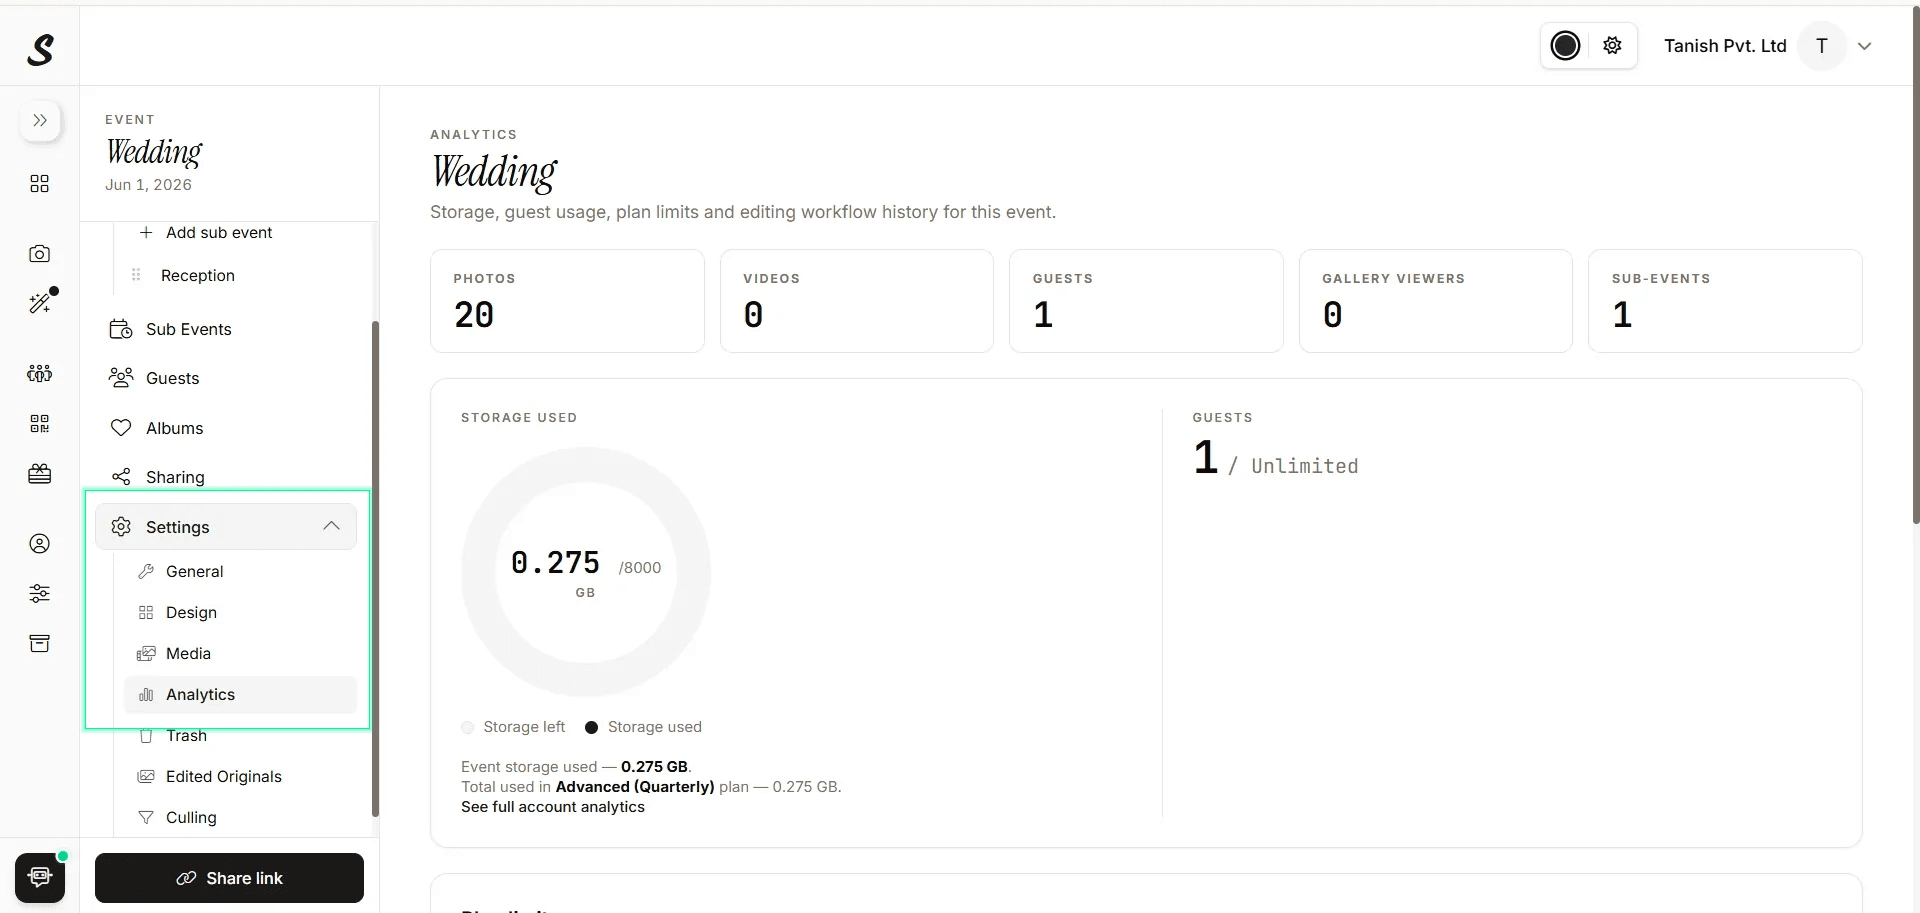
Photos, storage, guests, and viewers at a glance.
Trash holds deleted photos for seven days before they are permanently removed. Use Empty trash to free up storage, or Restore all to recover everything if something was deleted by mistake.
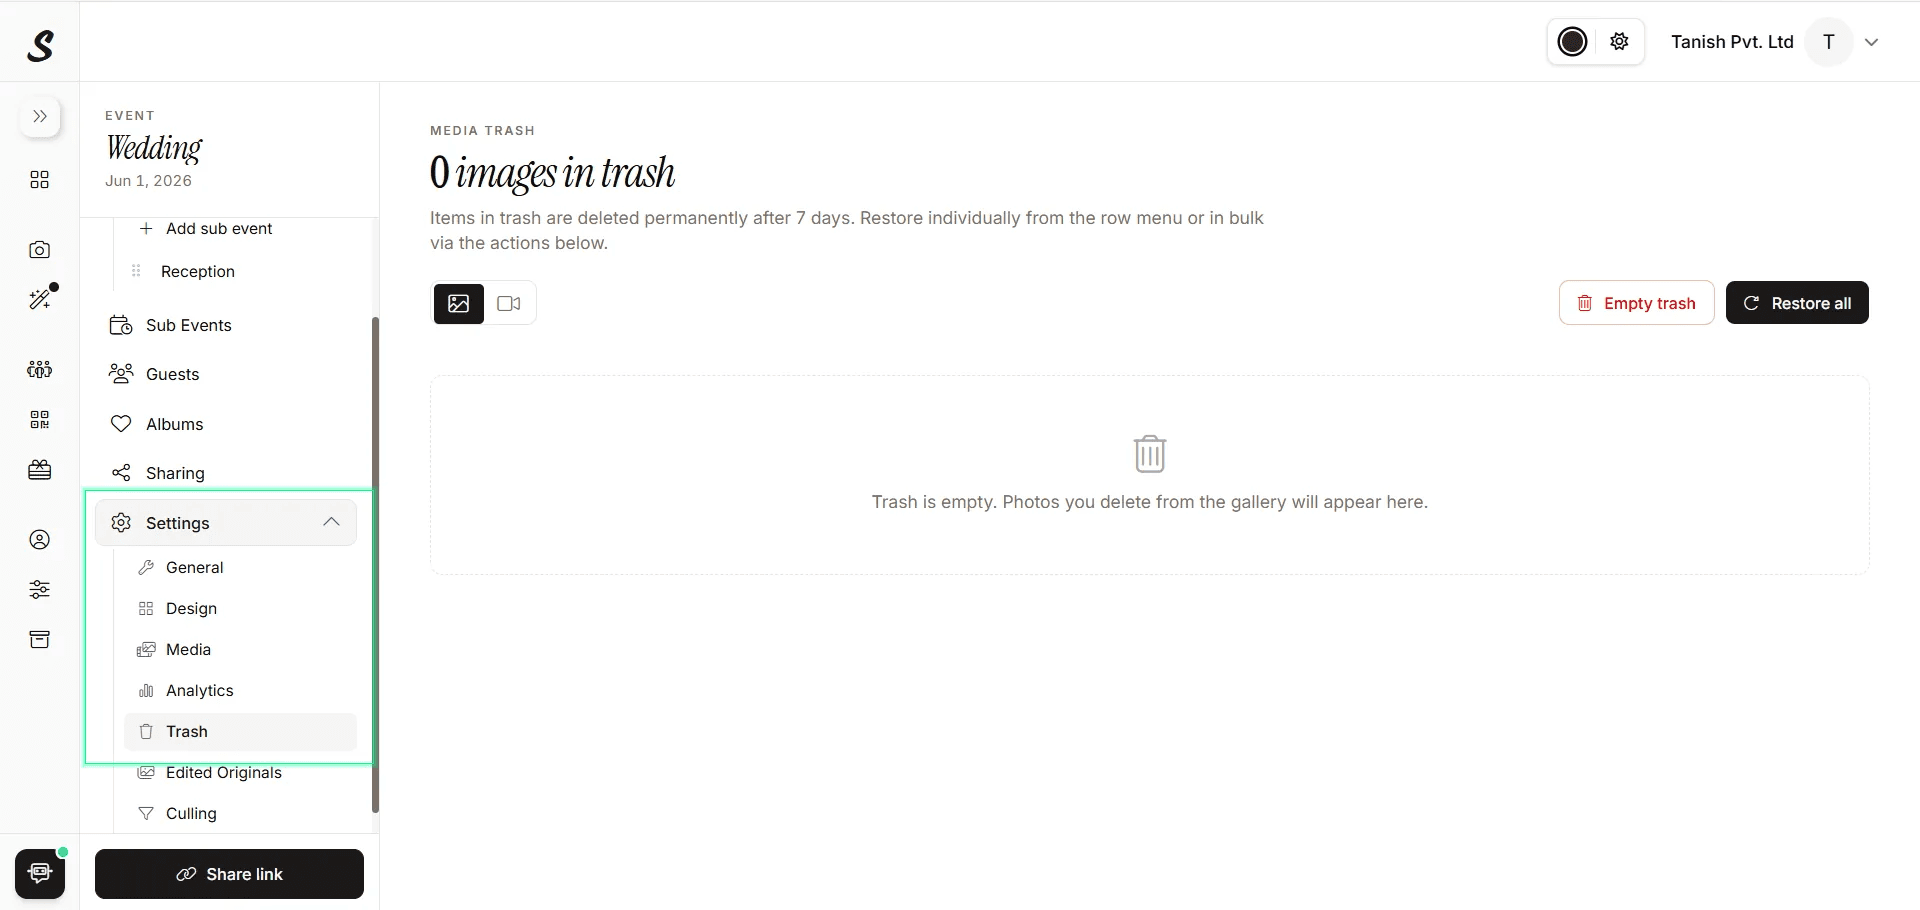
Deleted photos stay here for seven days before permanent removal.
Edited Originals is directly linked to the AI editing workflow. When you use AI editing on a photo, the edited version is placed back in the gallery and the original is automatically moved here. You can view both versions, restore the original to the gallery, or move it to trash once you are done with it.
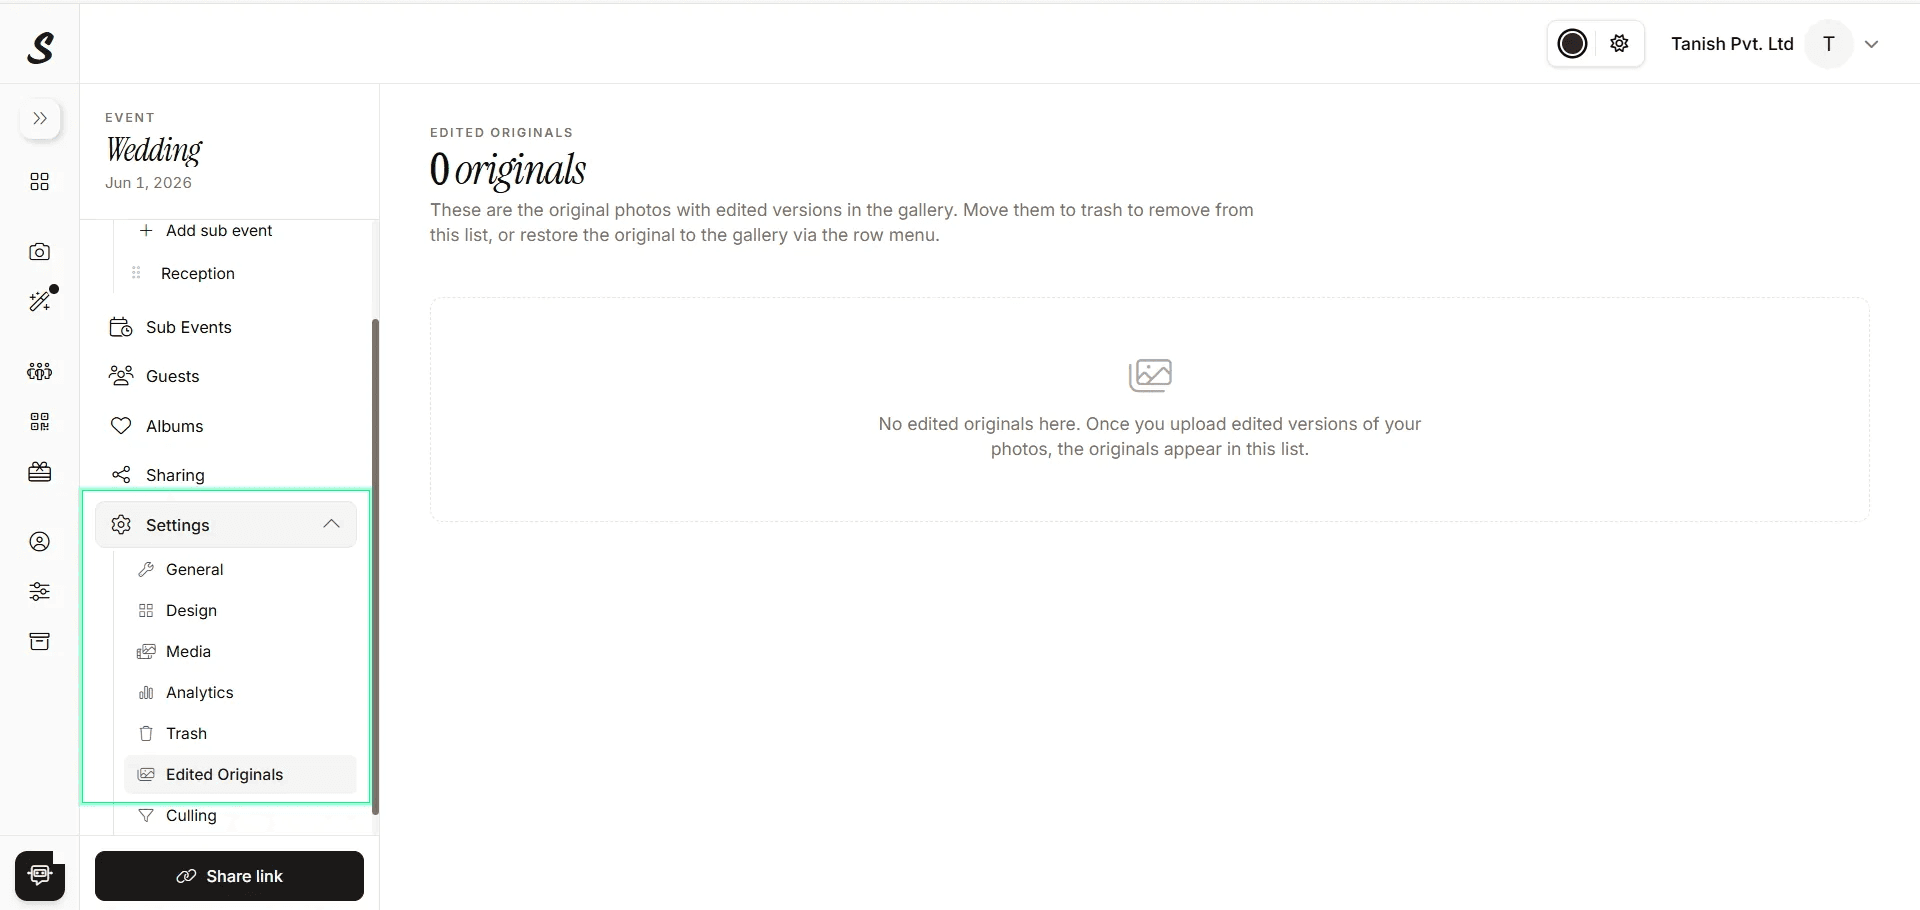
Original photos from AI-edited images are stored here automatically.
Culling (AI) this is where AI photo culling for weddings and events happens inside Samaro. Run a culling job on any sub-event and the AI scans your images to identify the best frames, filtering out duplicates, blurry shots, and closed-eye photos automatically. For a 2,000-image wedding shoot, this can cut your culling time from hours to minutes. Every culling run is logged here so you can open the results and take final action on the suggested selections.
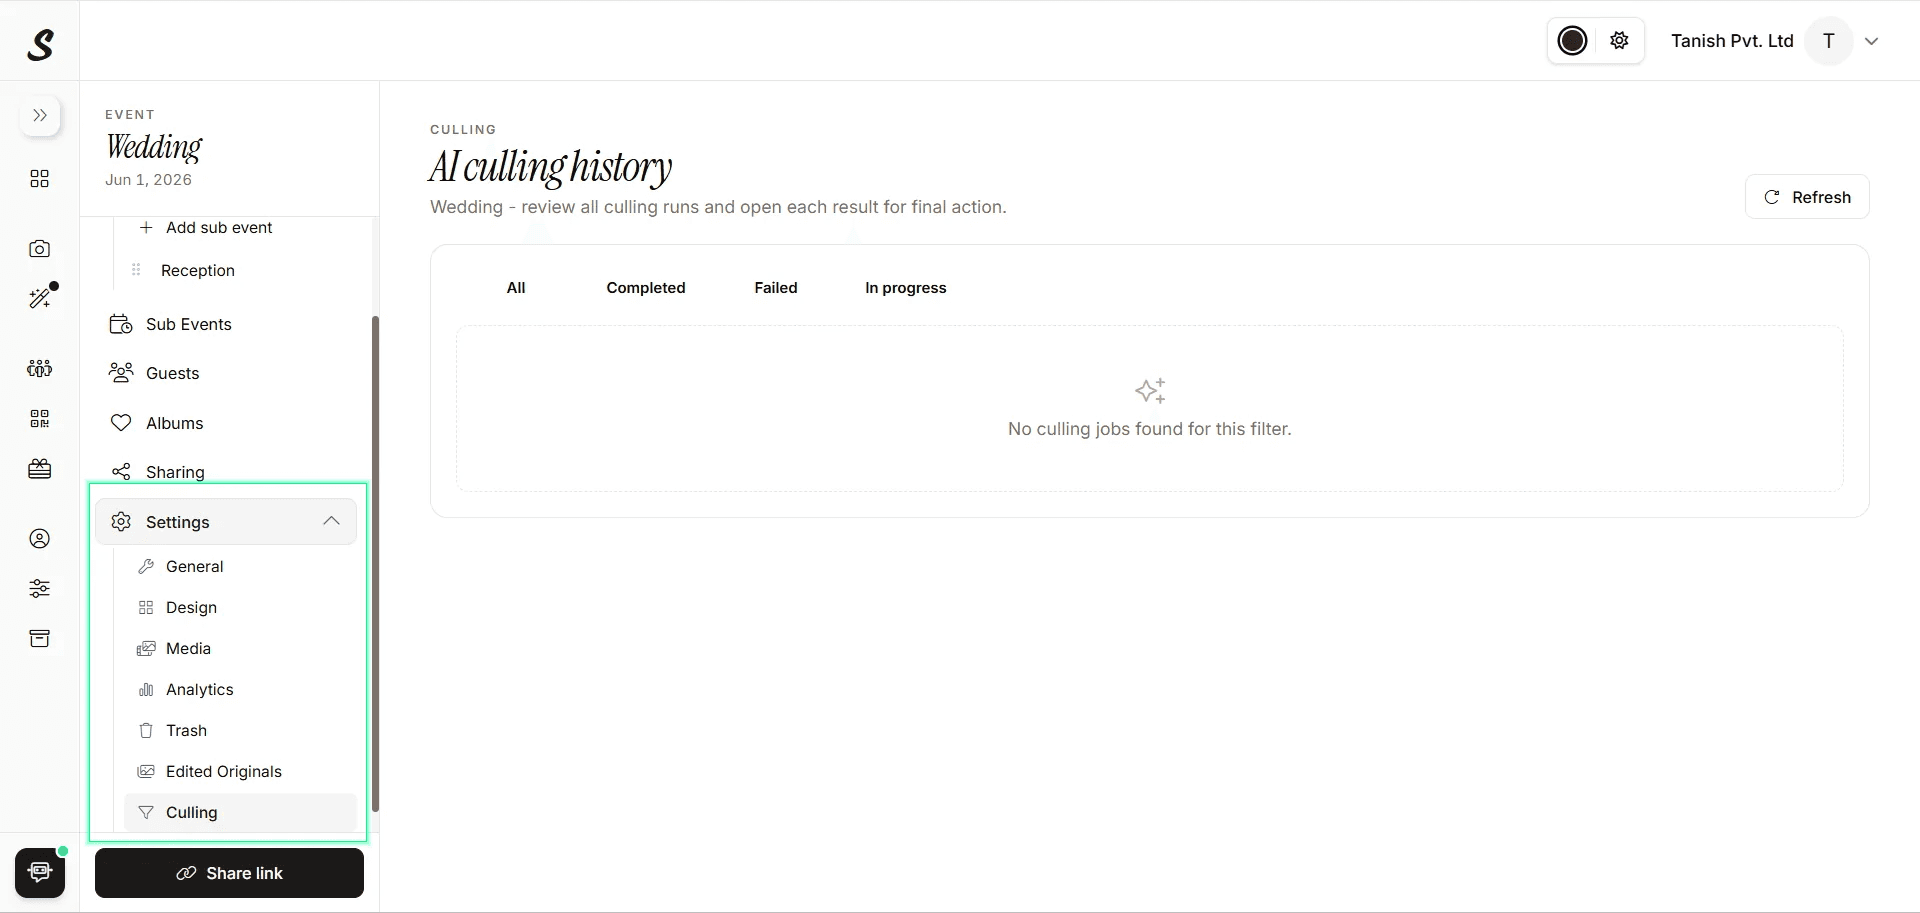
Every AI culling run logged here. Open the result to review and take final action.
Step 13: Dynamic Watermarking and Sponsor Frames
To set up watermarks, click on your profile name in the top right corner of the dashboard, then select Settings. In the left sidebar, click Watermark Presets.
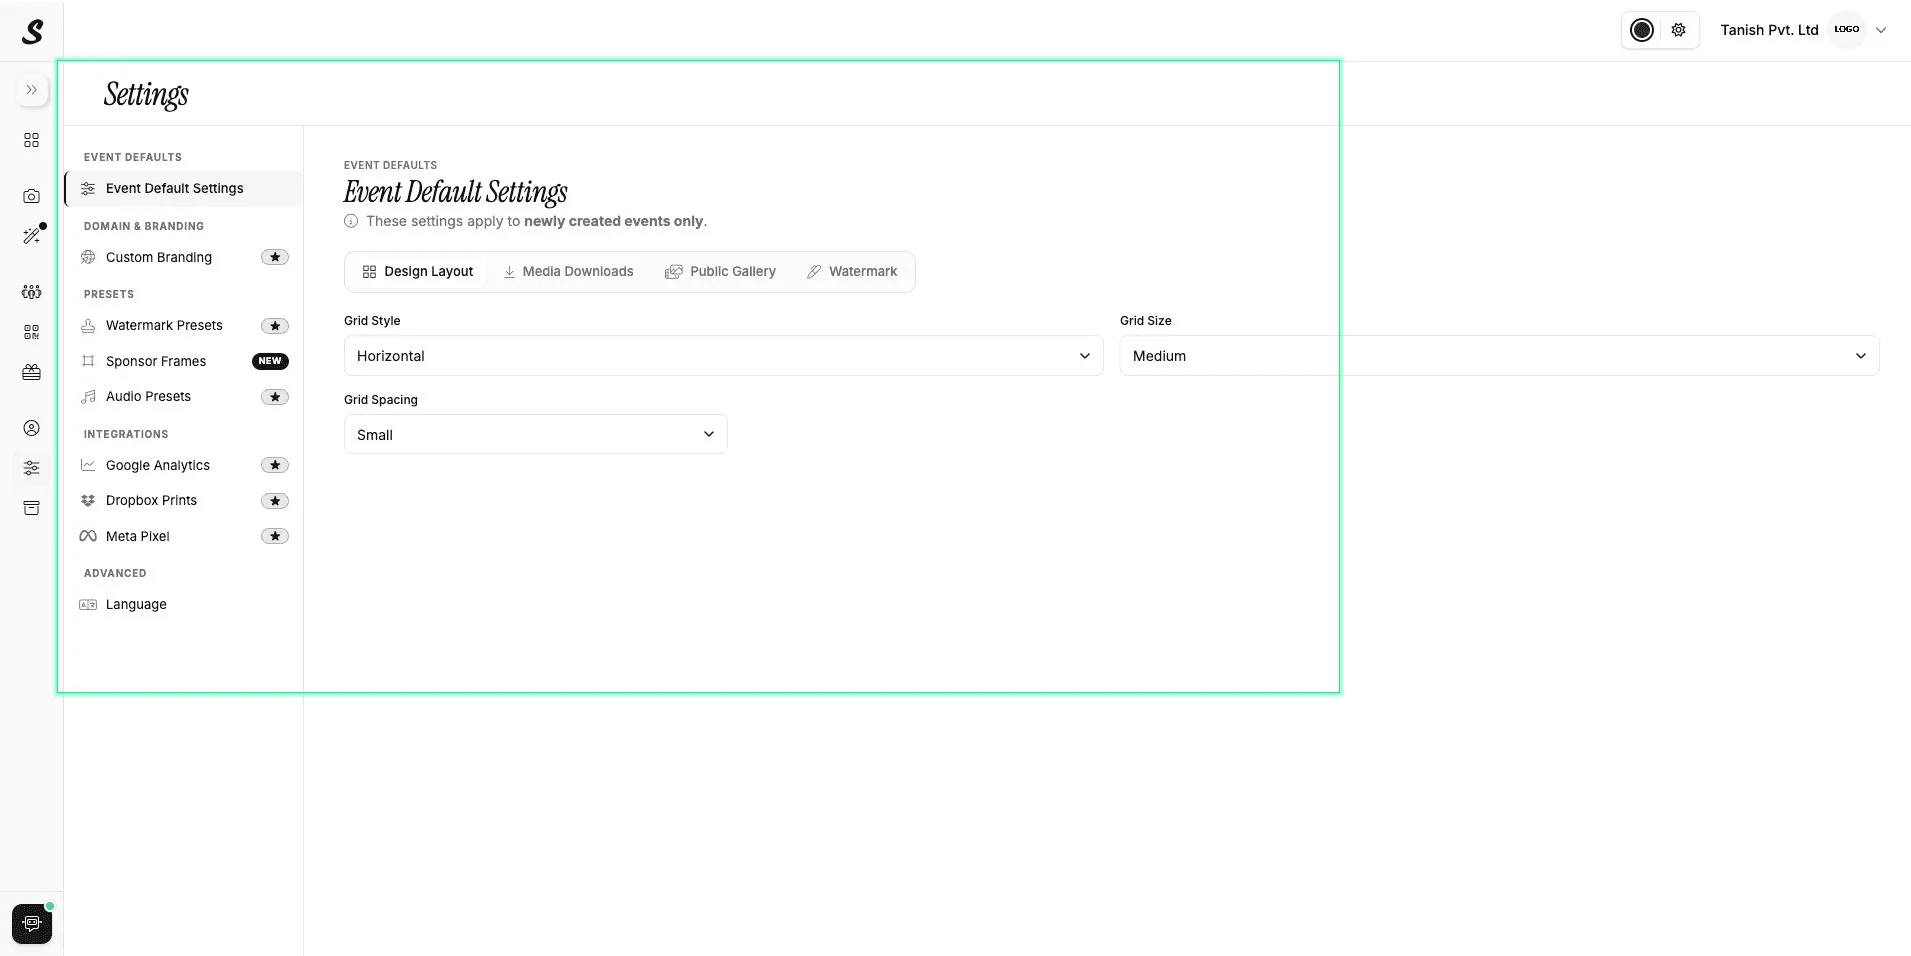
Watermark Presets and Sponsor Frames are both accessible from the Settings sidebar.
Click Add Watermark, enter a preset name, select the type (Logo or Text), upload your PNG file or enter your text, and adjust the position, size, opacity, and offset using the controls. Click Save preset when done. You can save up to 20 unique watermark presets.
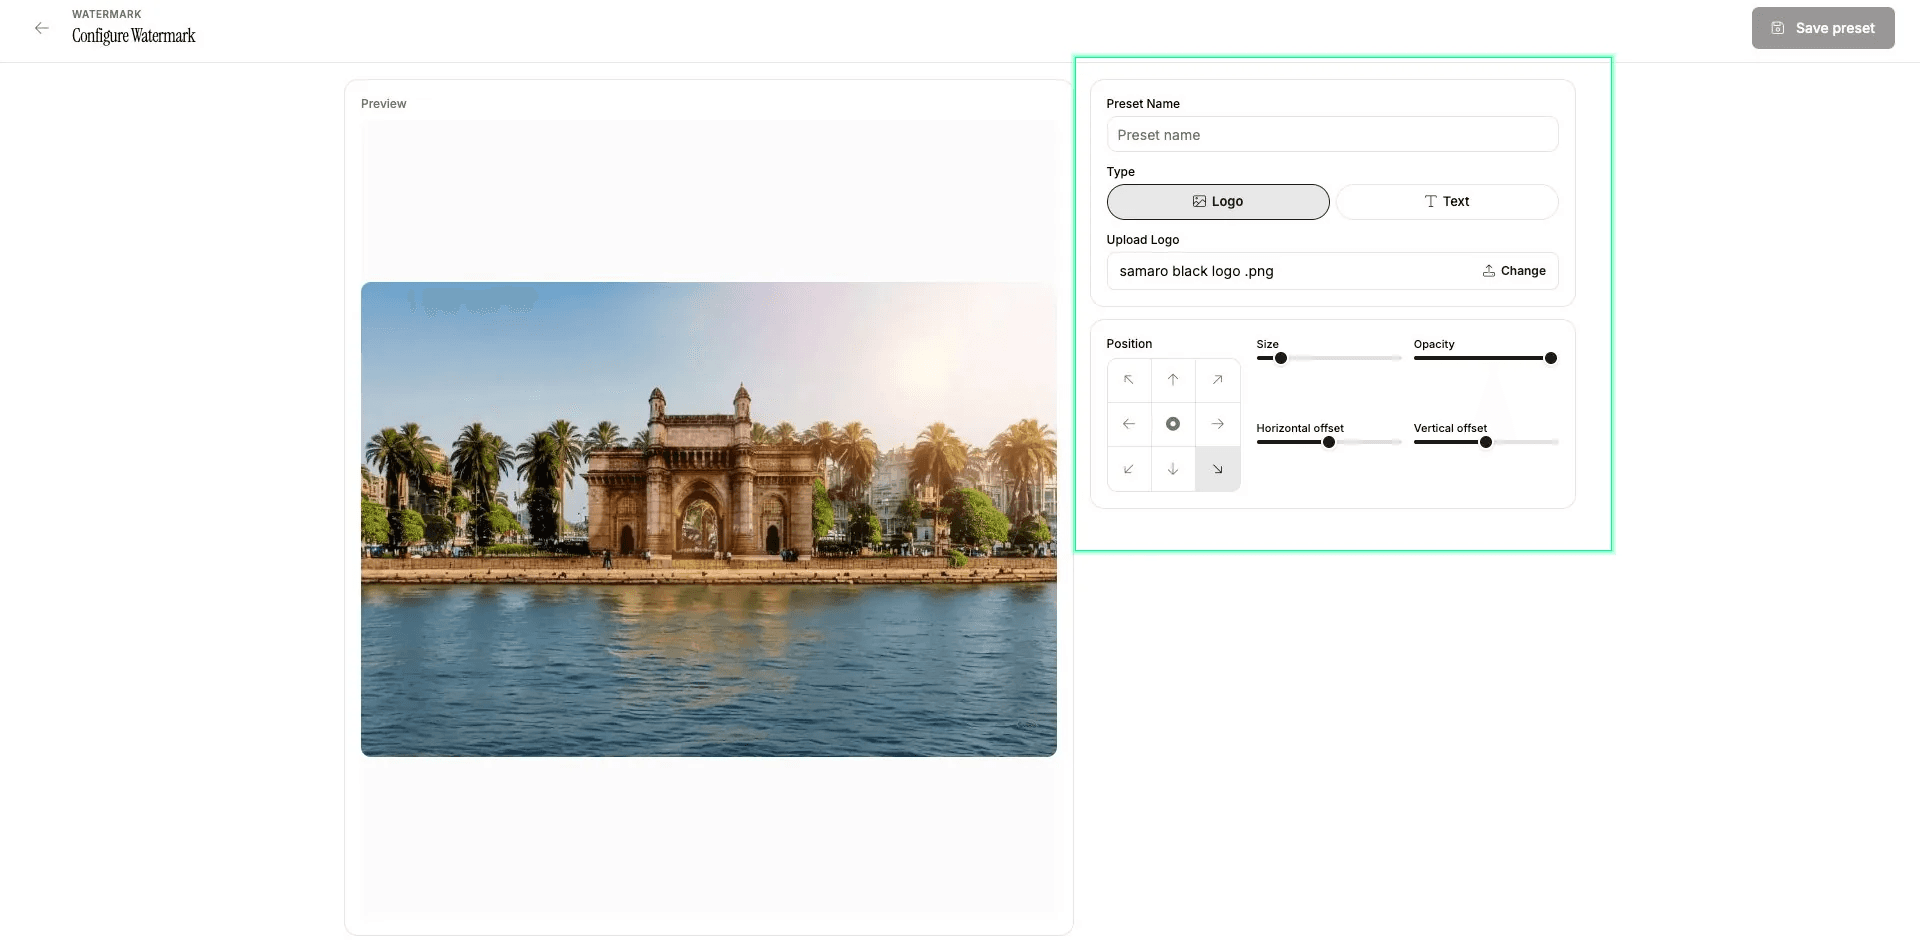
The watermark preset configuration screen where you set position, size, and opacity.
Set position, size, and opacity with a live preview before saving the preset.
To apply a watermark to an event, go to that event's Settings, click Media, and scroll to the Watermark and Frames section. Select the preset you want to apply and toggle on Apply on viewing or Apply on download depending on your preference.
Samaro also supports Sponsor Frame Presets. These let you add branded frames around photos for vertical and horizontal orientations, ideal for sponsored events or brand partnerships. You can save up to 4 frame presets and apply them the same way through the Media settings of each event.
Step 14: Google and Meta Integration
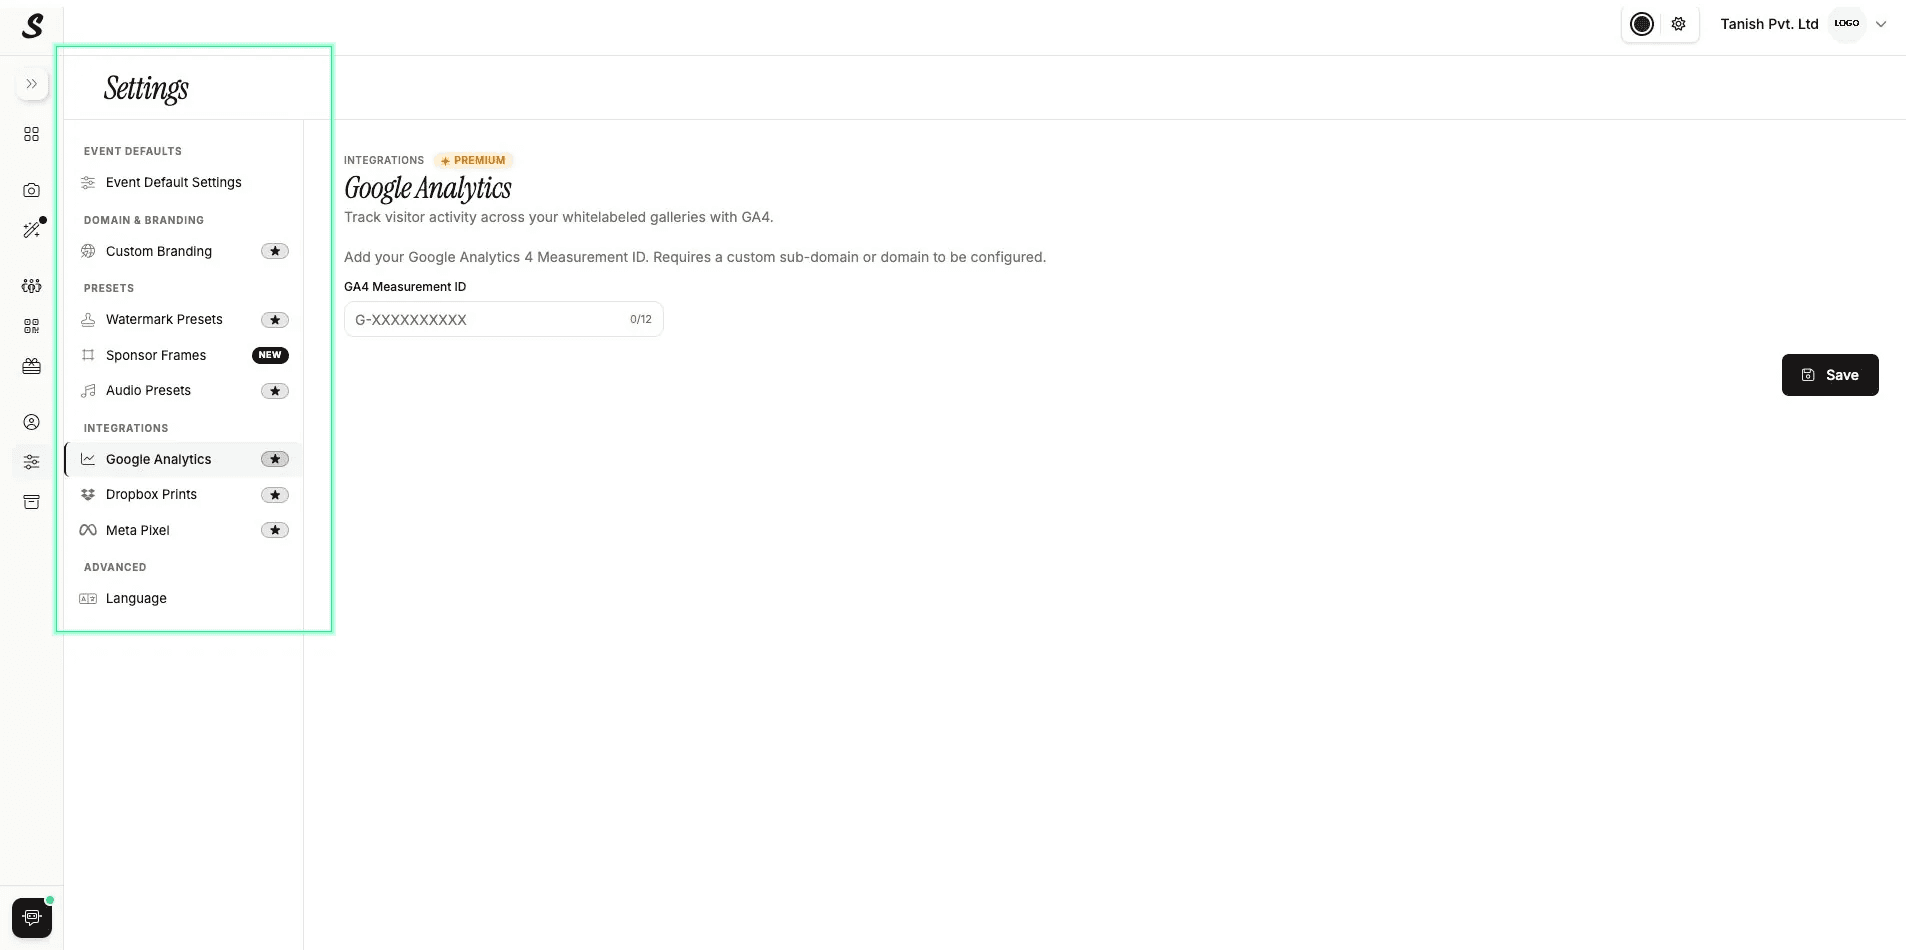
Inside Settings, the left sidebar includes an Integrations section with three available connections: Google Analytics, Dropbox Prints, and Meta Pixel.
Connect your GA4 Measurement ID to track visitor activity across your whitelabeled galleries.
Google Analytics lets you connect a GA4 Measurement ID to track visitor activity across your whitelabeled galleries. This requires a custom subdomain or domain to be configured and is a Premium feature. Dropbox Prints connects your Dropbox account to enable print fulfilment directly from your galleries. Meta Pixel lets you connect your Facebook Pixel ID to track gallery visitor behaviour for advertising and retargeting purposes.
Step 15: My Account: Public Profile and Portfolio
Click on your account name in the top right corner and select My Account. This section is where you build your public-facing photographer profile, which works like a portfolio website you can share with prospective clients.
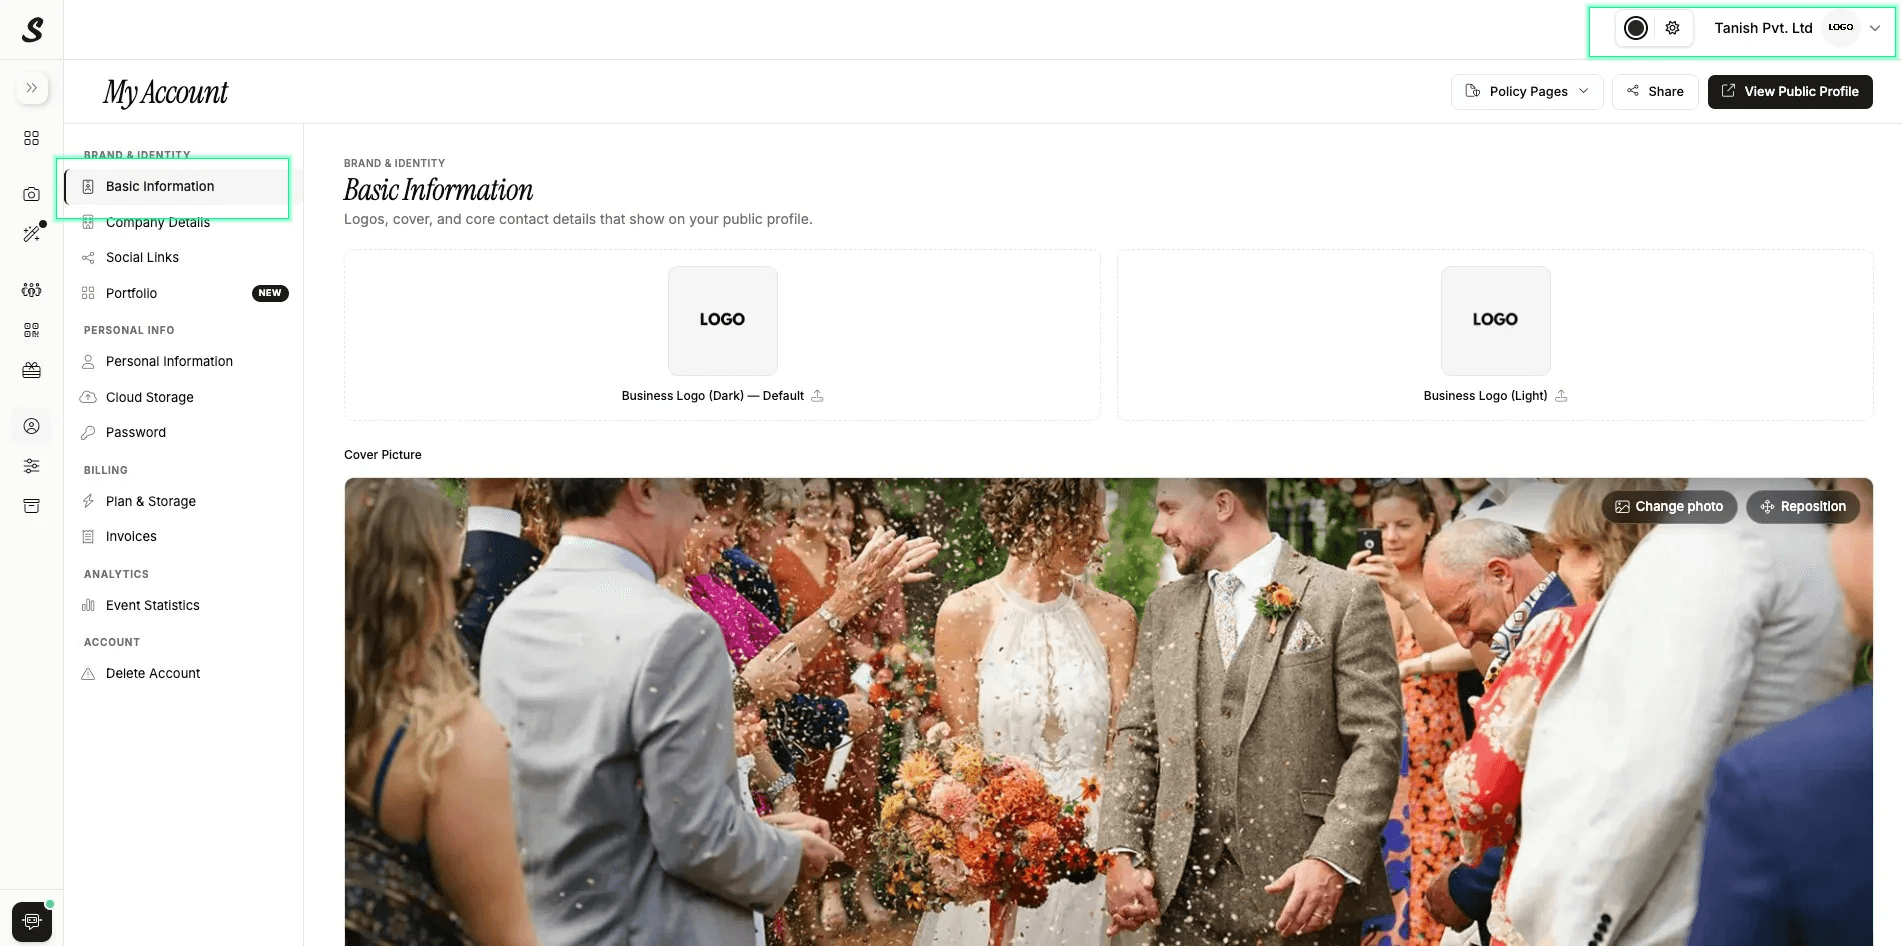
My Account is your control centre for brand identity, billing, cloud storage, and analytics.
Under Basic Information, you can upload your business logo (dark and light versions) and set a cover photo for your public profile. Under Company Details, you can add your Business Name, Business URL, Business Email, Official Business Phone Number, Business Website, and Business Address with map point integration.
Under Social Links, you can connect your Instagram, Facebook, YouTube, Vimeo, LinkedIn, and X accounts. All of these appear on your public profile page and are visible to anyone you share the profile link with.
Under Portfolio (marked as NEW), you can link your best galleries to your public profile so prospective clients can browse your work directly. You can link up to 30 projects. This section also lets you customise the Theme and Typography of your public profile to match your brand identity. The Portfolio is directly connected to your public profile page.
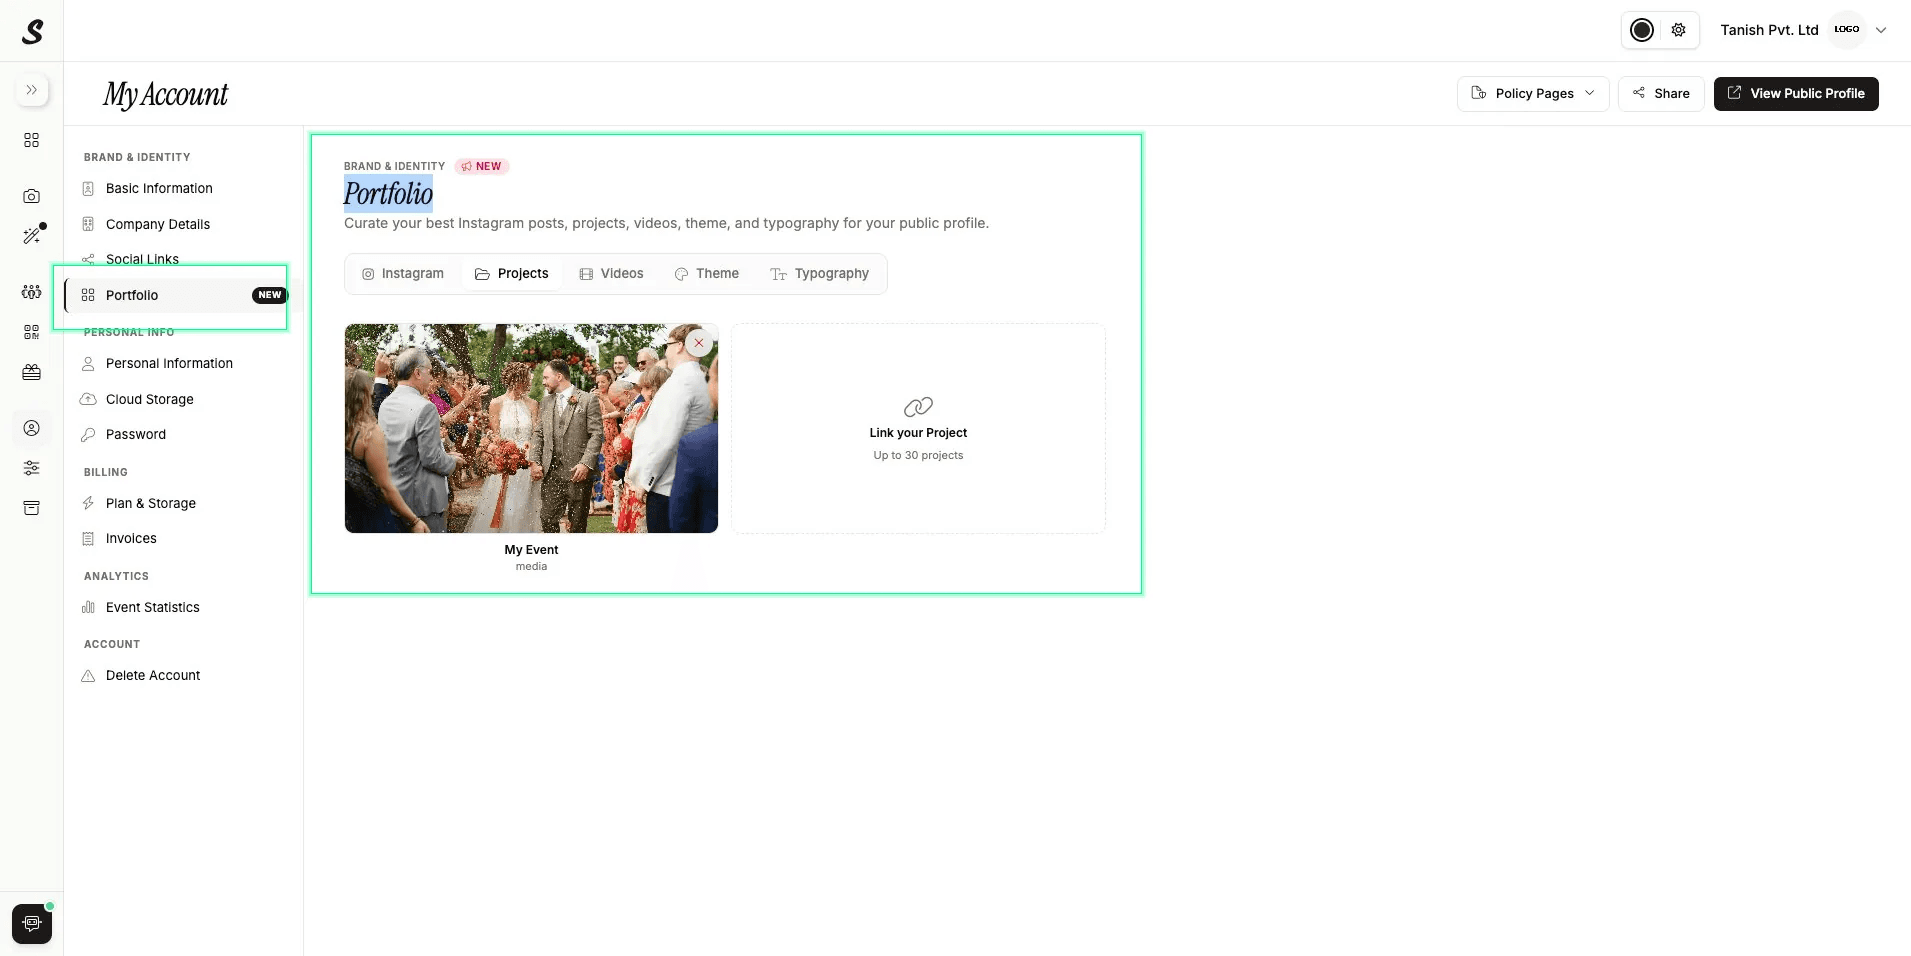
Link your best galleries to your public profile. Up to 30 projects supported.
To view your public profile as a client would see it, click View Public Profile in the top right of the My Account page.
Step 16: My Account: Cloud Storage
Under My Account, click Cloud Storage in the left sidebar. This is where you connect your Google Drive or Dropbox account to import photos and videos directly into your events with high-performance sync reliability. Each team member connects their own cloud storage account independently as connections are personal and not shared across the business account.
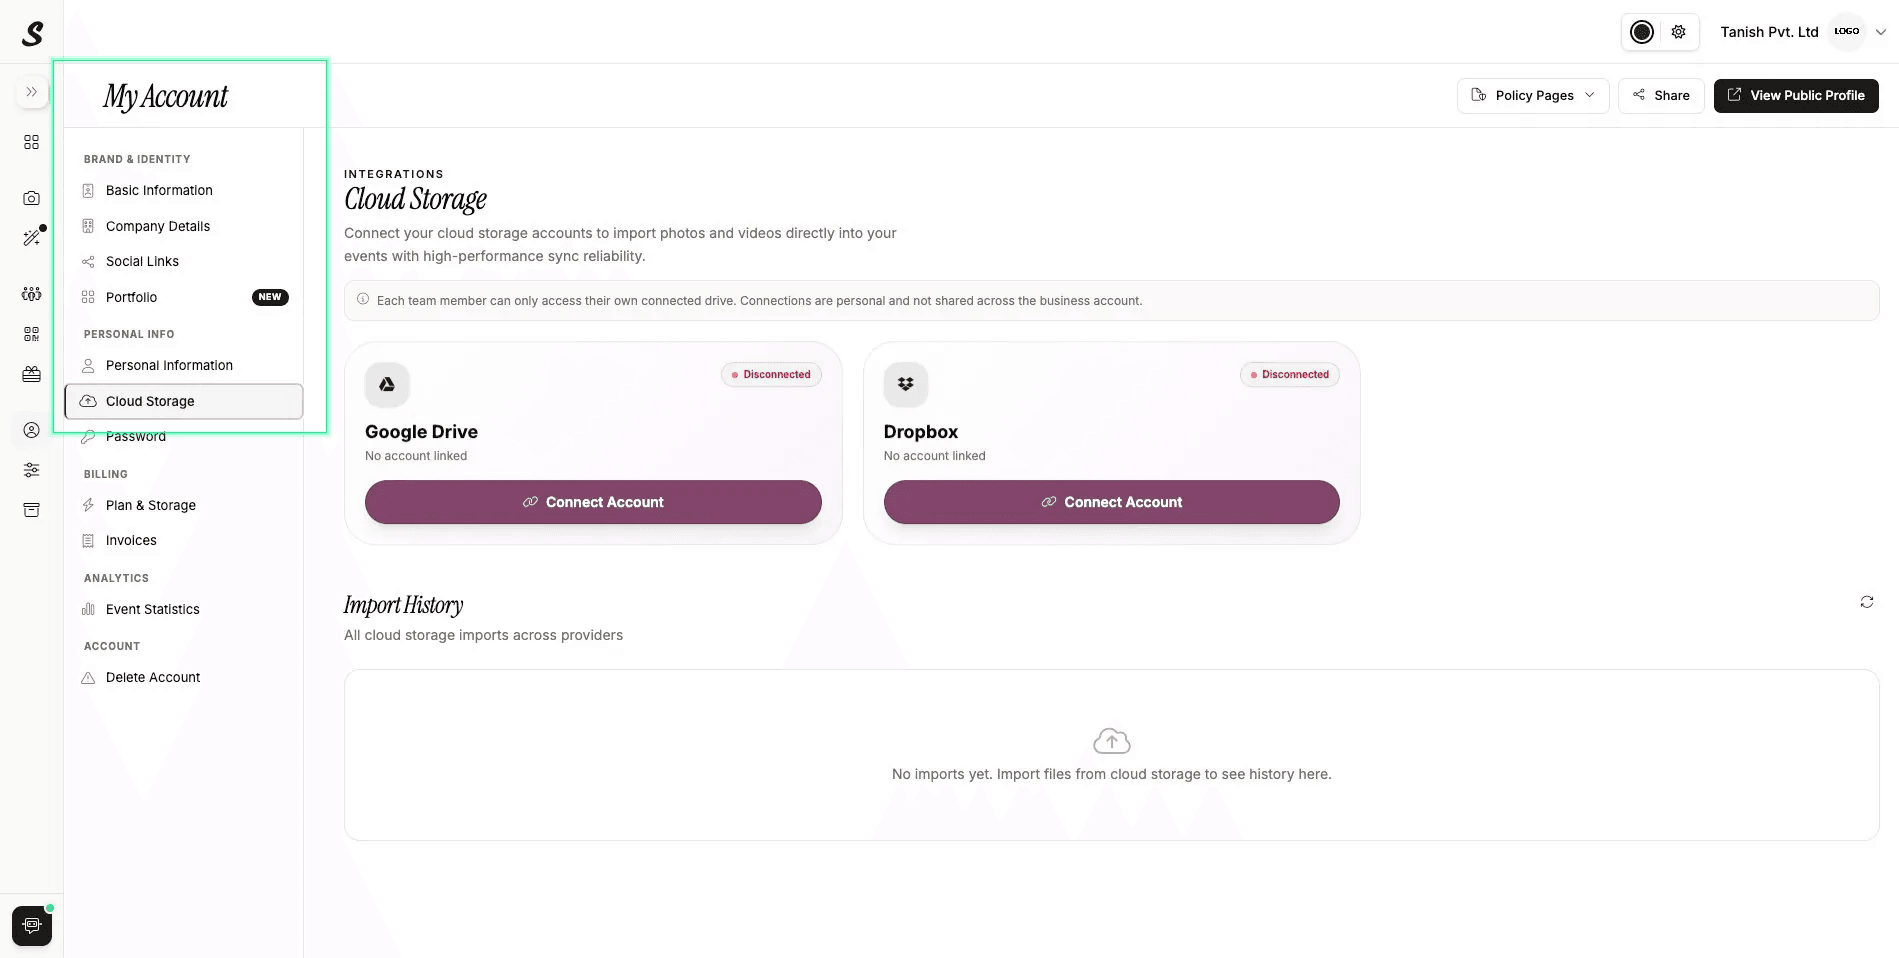
Connect Google Drive or Dropbox to import media directly into your Samaro events.
Once connected, you can initiate cloud imports from the Add Media option inside any event, and all past import history across providers is visible in this section.
Step 17: My Account: Plan and Storage
Under My Account, click Plan and Storage in the left sidebar. This page shows your current active plan, the storage you have used versus your plan limit broken down by event, your next scheduled payment date, and the total number of events created against your plan allowance. It also shows a full breakdown of what your current plan includes such as total events, guest limits, cloud storage, and plan validity period.
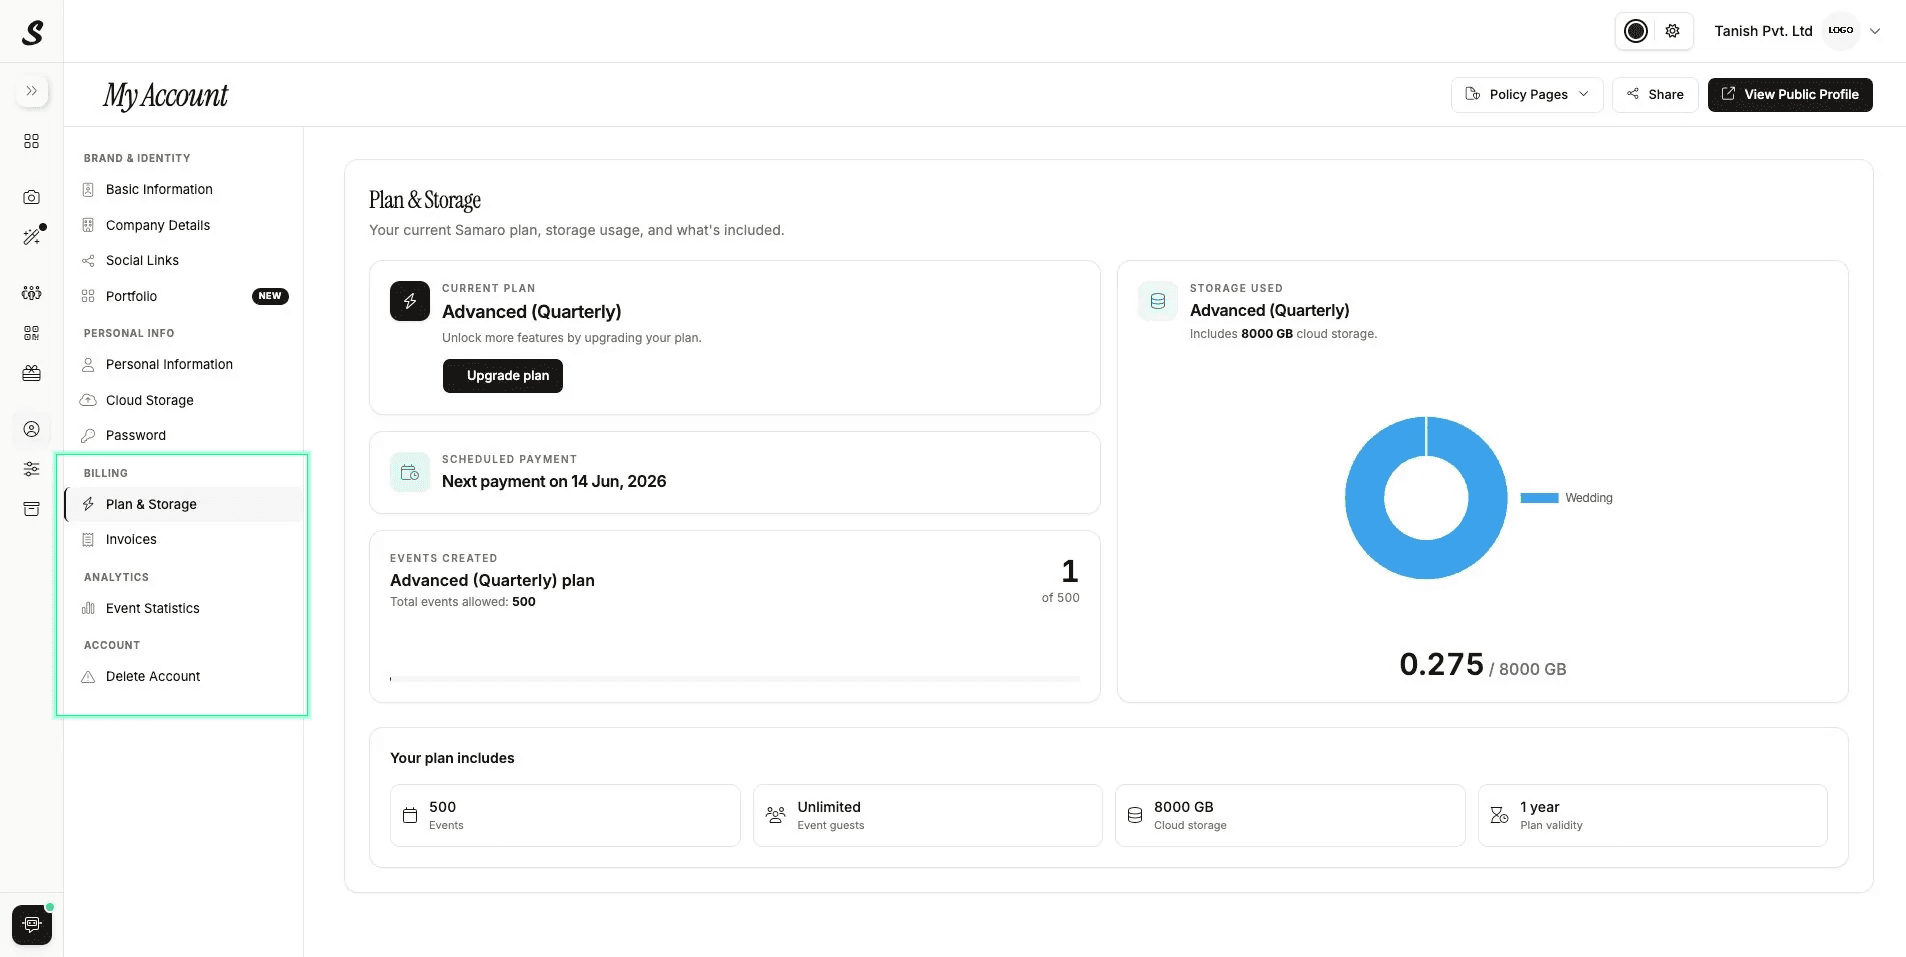
Your plan details, storage usage by event, and next payment information all in one view.
Just below Plan and Storage in the sidebar, you will find Invoices. This is where you can view and download all past invoices generated against payments made for your Samaro subscription.
The Full Workflow at a Glance
Sign up and verify your account. Create an event with a name, type, and URL. Add sub-events for each ceremony segment. Upload your photos or use Camera2Cloud photography to stream them live from camera to gallery during the shoot. Invite guests, co-hosts, and photographers. Create favourite lists for album selection. Configure sharing settings, generate your QR code, and share event photos with clients in minutes. Customise the gallery design, set a cover photo, and apply your watermark. Use AI editing and AI photo culling for weddings to cut post-processing time significantly. Create additional Gallery 2.0 galleries with full editorial control. Then manage your public profile, connect cloud storage, and monitor your plan from My Account.
That is the complete Samaro workflow. It is the most capable photo delivery platform for photographers and event photography gallery software built around how event photographers actually work from the moment the shoot ends to the moment the client downloads their last image. Once you have run through it for one event, every event after that takes a fraction of the time.
Guest/Host Login