Product Guide
Samaro Album Studio: The Complete Step-by-Step Guide to Designing Wedding Albums with AI
Album design has always been the part of the wedding photography workflow that eats the most hours: chasing clients for photo picks, building spreads one at a time, fielding "can you move this photo" emails, and re-exporting files for the lab. Samaro Album Studio, a new feature inside the Samaro platform, is built to collapse that entire process into a guided, AI-assisted flow that takes an event from raw photo gallery to print-ready album in a fraction of the time.
This guide walks through the full workflow end to end: collecting client photo selections, generating an album with AI, fine-tuning the design, getting client approval, and exporting print-ready files.
In a hurry? Try Samaro Album Studio now → and see your first AI-designed album before you finish this coffee. Otherwise, here's exactly how it works, step by step.
What Is Samaro Album Studio?
Samaro Album Studio is an AI-powered album design tool built into the Samaro event photography platform. It lets photographers:
Collect guest or client photo selections through a shareable link
Auto-design a complete, print-ready wedding album using AI: cover, spreads, layout, and style
Fine-tune every spread manually, or simply type an instruction and let AI make the edit
Share a view-only link for approval, or an editable link so clients can make their own changes
Export the finished album as a print-ready PDF, JPEG spreads, or a combined preview PDF
Here's what the full process looks like.
Part 1: Collecting Client Photo Selections
Before the AI can design an album, it needs to know which photos the couple actually wants included. Samaro handles this with favorite lists, shareable links guests use to pick their favorites.
Step 1: Open the event and go to Albums
From your Samaro dashboard, open the event you're building an album for. In the left-hand navigation, click Albums.
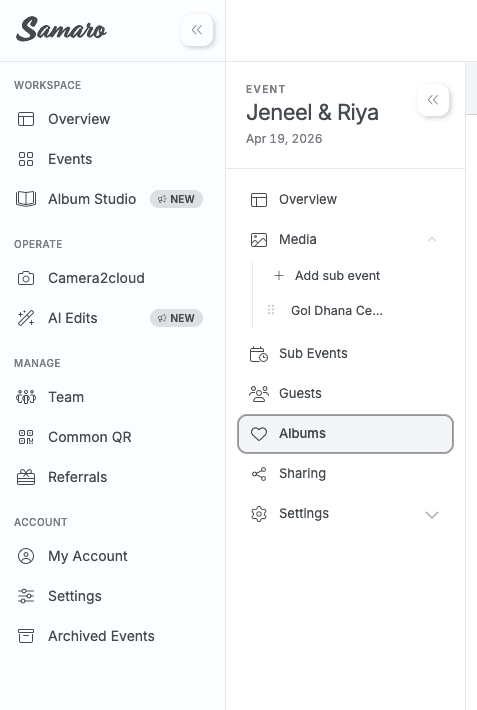
Step 2: Add a favorite list
Inside the Albums screen, click Add favorite list. This is where you set up the link you'll send to your client or guests to collect their picks.
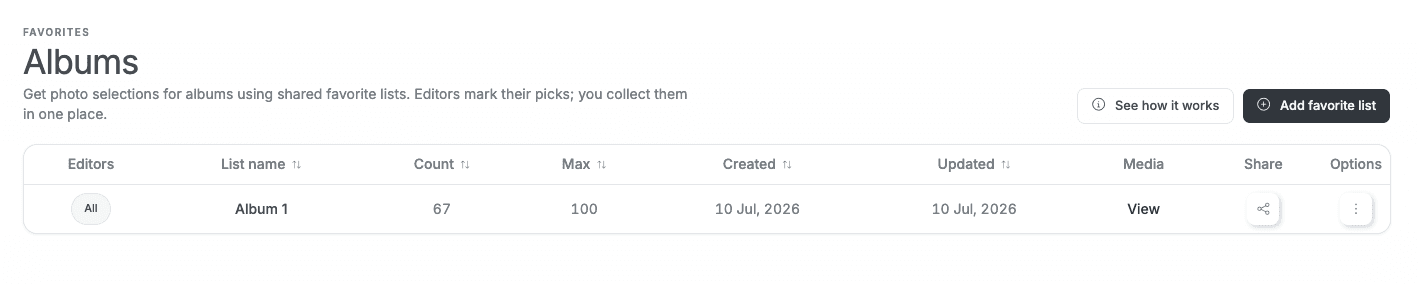
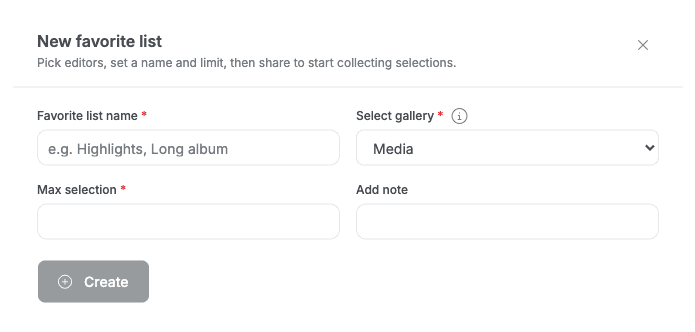
Step 3: Set up the list
Fill in:
Favorite list name: e.g. "Album 1"
Select gallery: which media/gallery the selections should come from
Max selection: the maximum number of photos the client can pick
Add note (optional): any instructions for the client
Step 4: Share the generated link
Once saved, Samaro generates a shareable link and a ready-to-send message. You can copy the album link or copy the message and send it straight to your client.

Step 5: The guest fills in their details
When the client or guest opens the link, they're asked for their name, email, and WhatsApp number before selecting photos. This is how you know exactly who made which picks, which is useful when multiple family members are choosing photos for the same album.
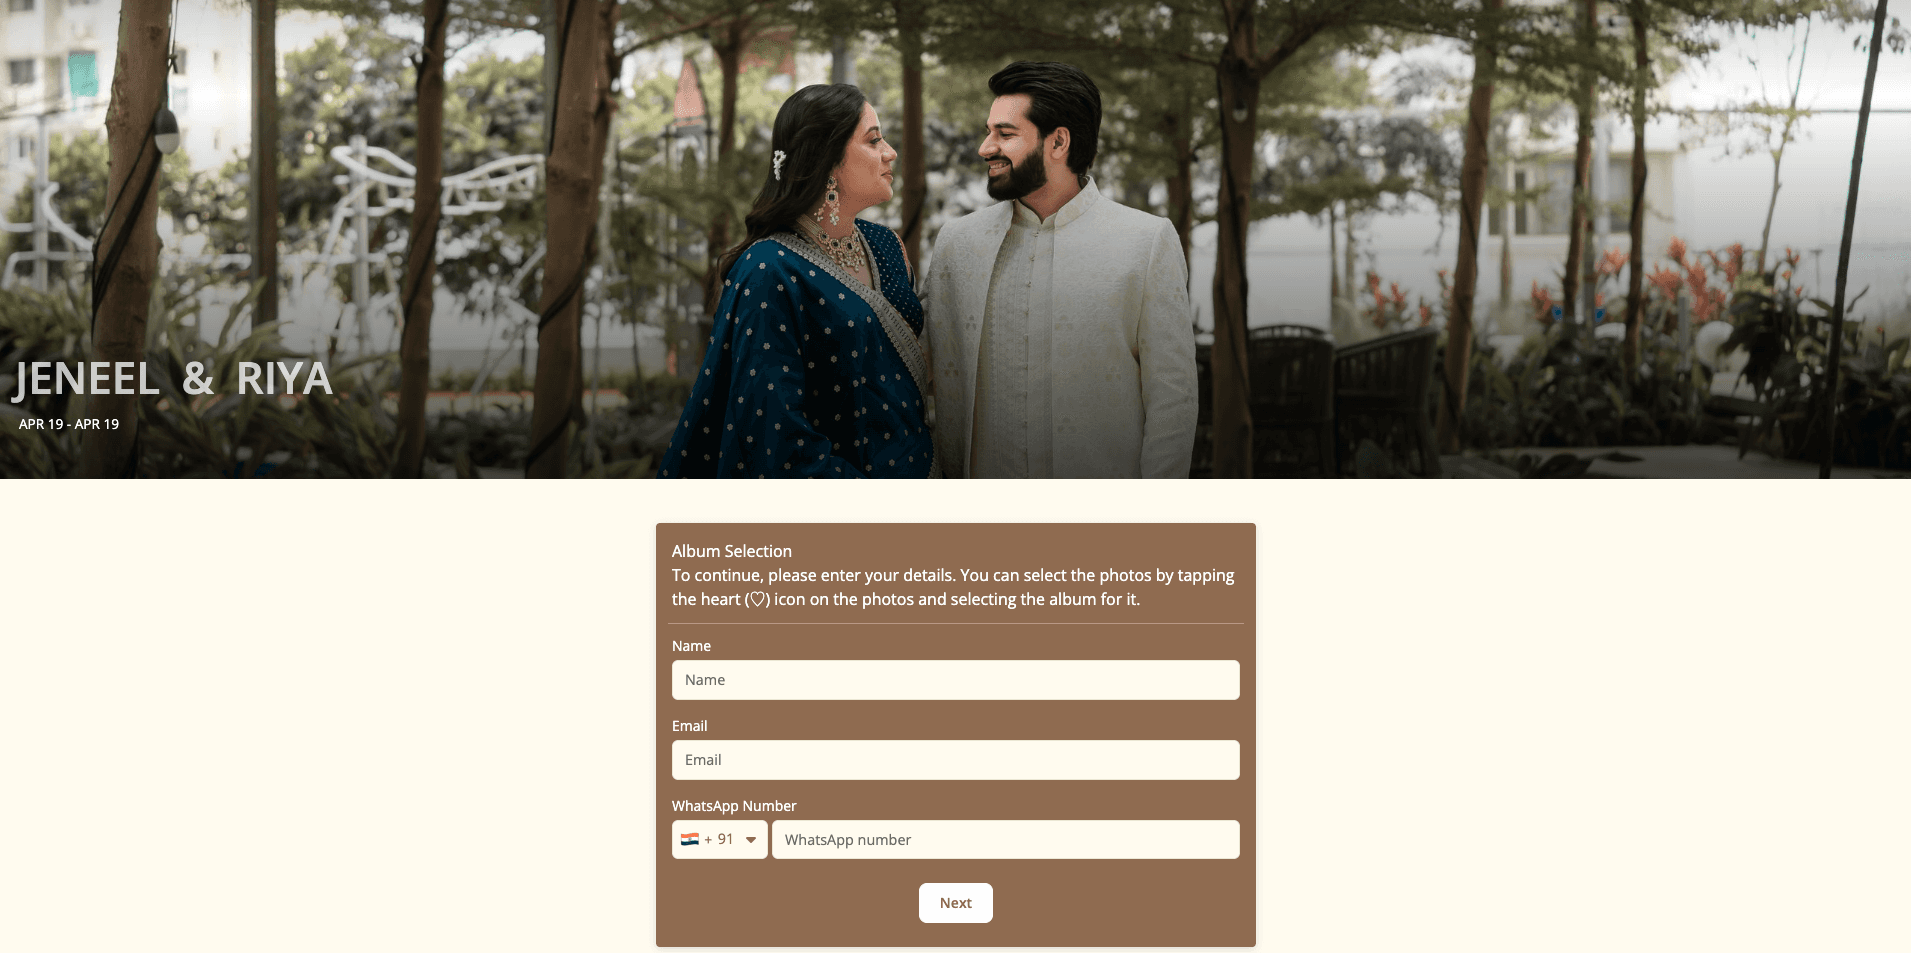
Step 6: Guests are guided through selection
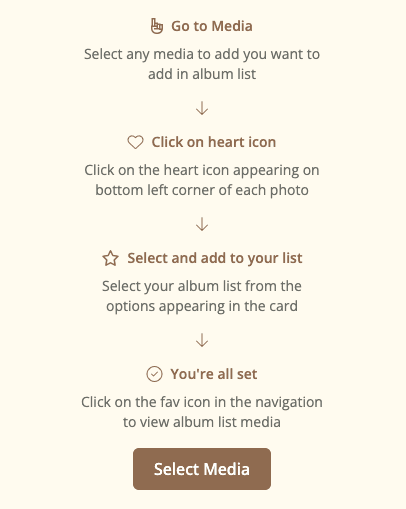
Guests get a simple on-screen guide: go to the media gallery, tap the heart icon on any photo they love, and select the list to add it to.
Step 7: Track and export selections
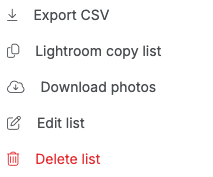
As selections come in, you can see the running count against the max limit. From the options menu you can:
Export CSV of the selections
Get a Lightroom copy list
Download photos the client picked
Edit or delete the list
Once the client's picks are finalized, you're ready to hand the whole thing to the AI.
Part 2: Designing the Album with AI
Step 8: Open Album Studio
In the left-hand navigation of your Samaro account, click Album Studio.
Step 9: Create a new album
Click Create New Album to start a fresh album project.
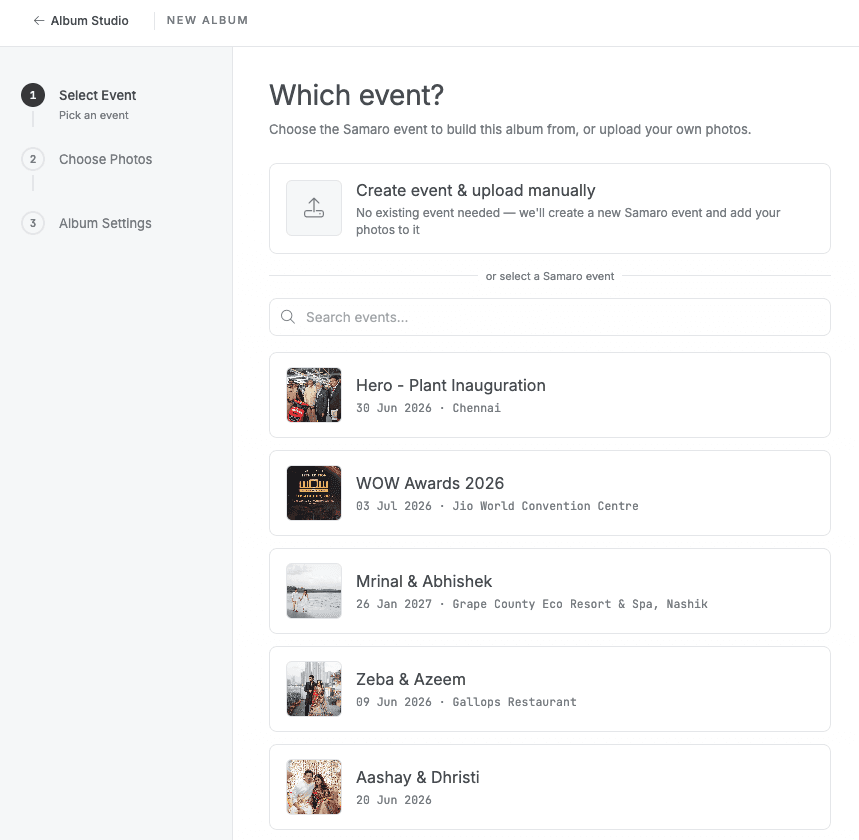
Step 10: Select the event
Choose which Samaro event you're building this album for, or use Create event & upload manually if you're working with photos outside Samaro.
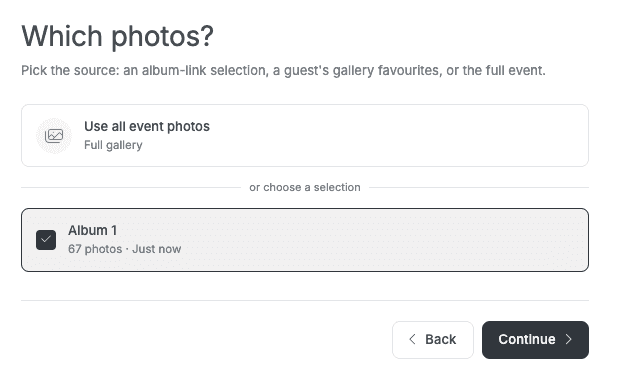
Step 11: Choose the photo source
Pick the specific favorite list you finalized with the client, or use the full event gallery if no selection round was needed.
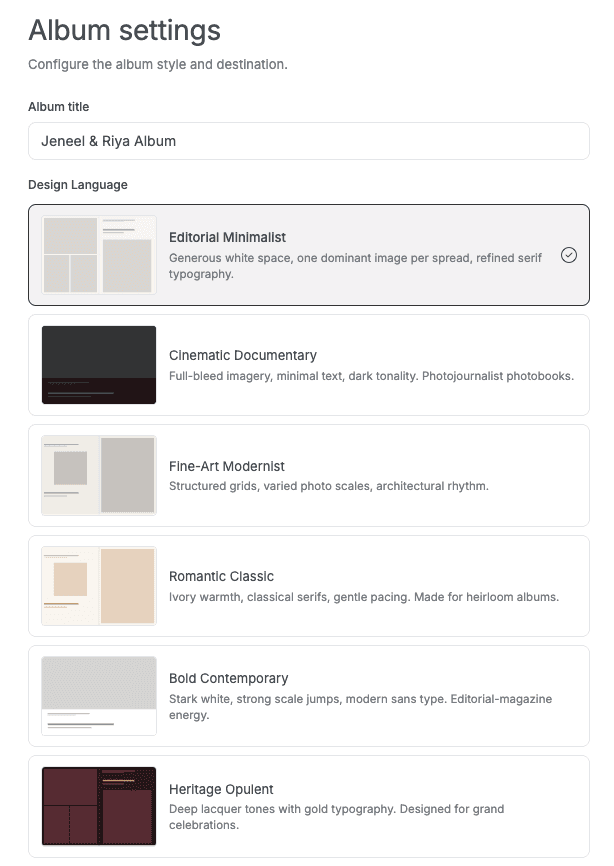
Step 12: Album title and design language
Name the album, then choose a Design Language. This sets the overall visual direction:
Editorial Minimalist: generous white space, one dominant image per spread, refined serif type
Cinematic Documentary: full-bleed imagery, minimal text, dark tonality
Fine-Art Modernist: structured grids, varied photo scales, architectural rhythm
Romantic Classic: ivory warmth, classical serifs, gentle pacing
Bold Contemporary: stark white, strong scale jumps, modern sans type
Heritage Opulent: deep lacquer tones with gold typography for grand celebrations
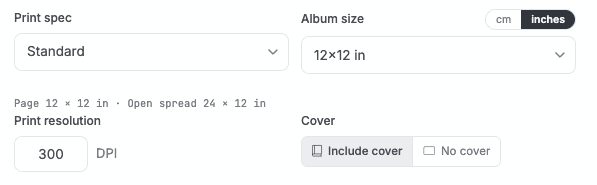
Step 13: Set album size, print resolution, and cover
Next, lock in the physical spec the album will print at:
Print spec: e.g. Standard
Album size: in inches or cm (e.g. 12×12 in, which opens as a 24×12 in spread)
Print resolution: DPI (e.g. 300 DPI)
Cover: include a cover, or skip it if you don't need one
Step 14: Set AI composition preferences
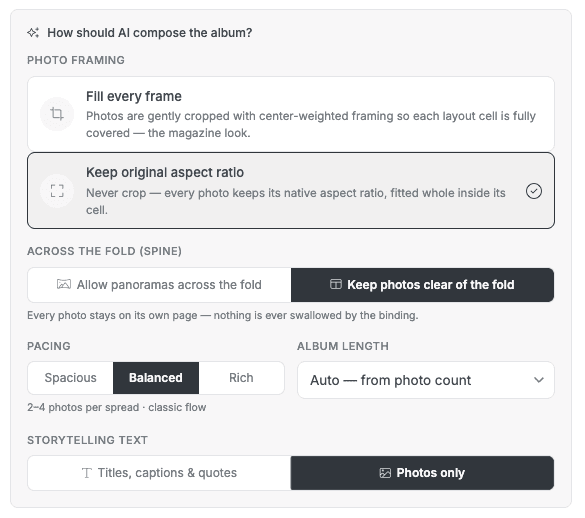
Before generating, tell the AI how you want it to compose the album:
Photo framing: fill every frame (cropped) or keep original aspect ratio (no crop)
Across the fold: allow panoramas across the spine, or keep every photo clear of the fold
Pacing: spacious, balanced, or rich (2–4 photos per spread)
Album length: auto, based on photo count
Storytelling text: titles, captions and quotes, or photos only
Step 15: Generate the album
Click Generate Album. The AI uploads and curates the photos, designs every spread, generates any text, and scores and refines the layout, then gives you the green light to open the finished draft in the editor.
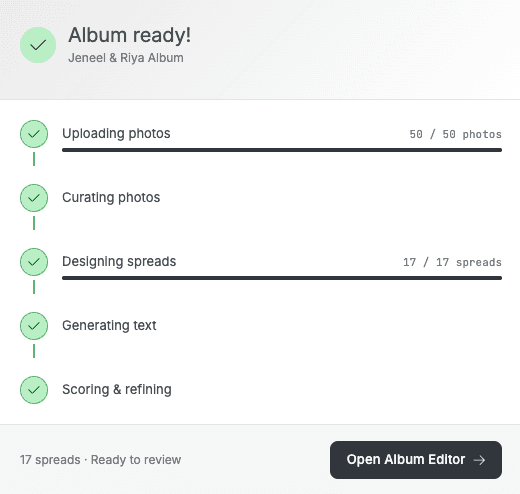
This is the step that replaces what used to be hours of manual layout work: the AI produces a complete, styled, print-ready draft on its own.
Part 3: Fine-Tuning the Design in the Album Editor
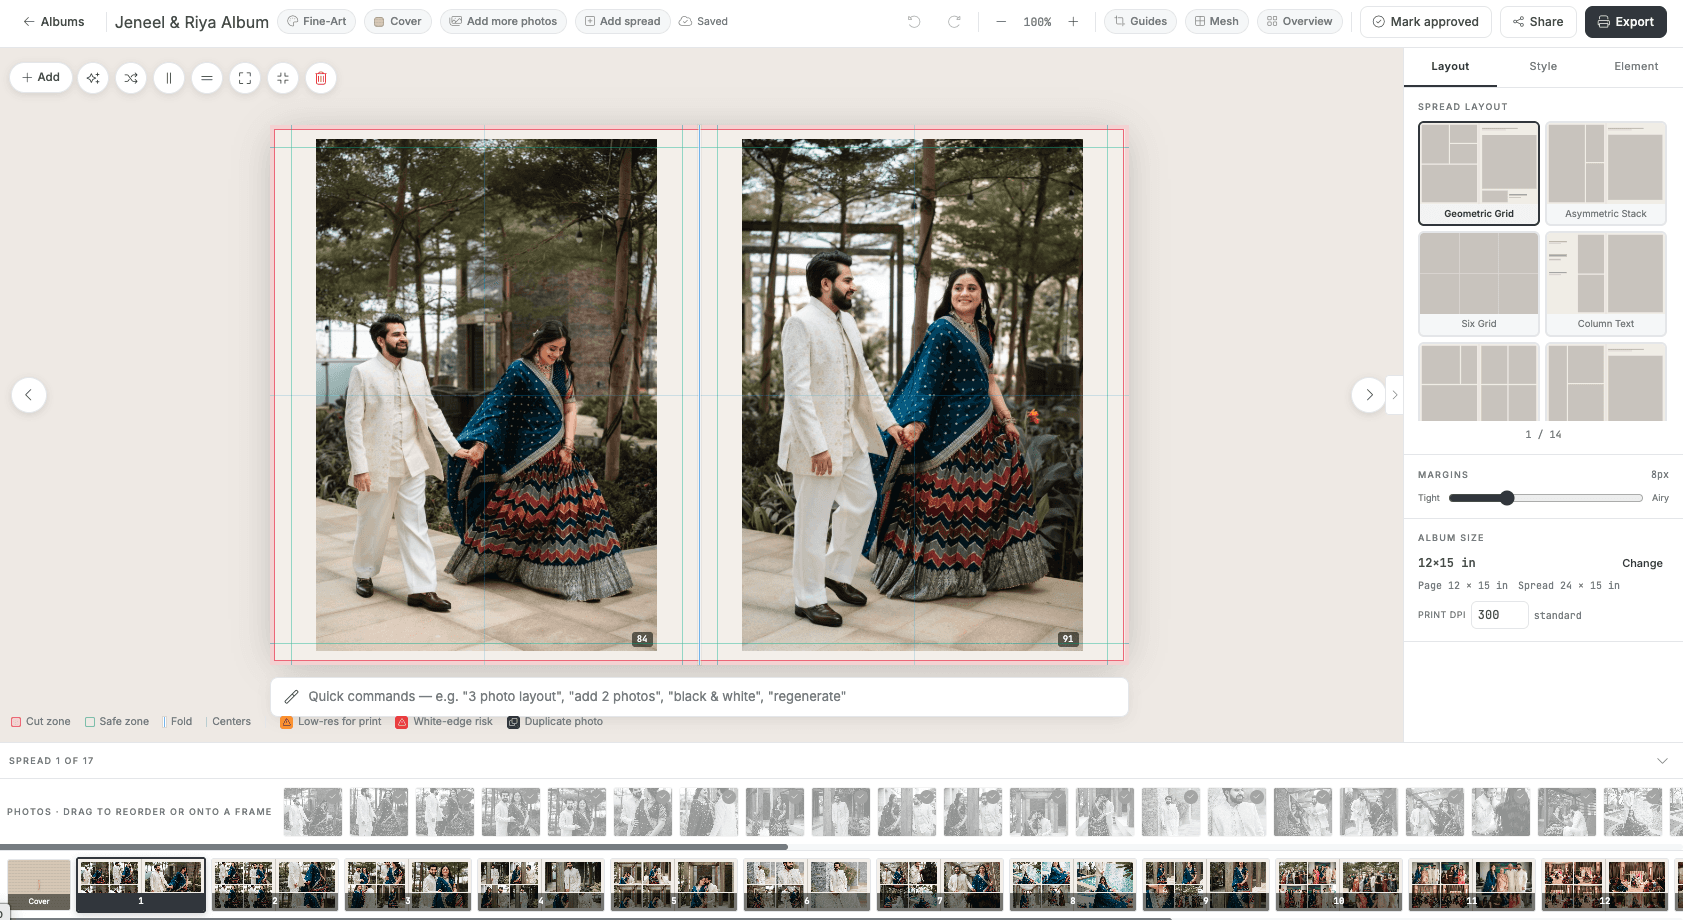
Step 16: The editor opens with every page
The Album Editor shows the full spread, cut zones, safe zones, and fold guides, with a thumbnail strip of every spread and photo along the bottom. From here you can adjust layout, swap photos, or add spreads and pages.
Step 17: Ask the AI to edit the album
Every spread has a quick-command bar at the bottom. Instead of manually adjusting a layout, you can just type what you want, like "black and white one photo, rest remains color," "3 photo layout," "add 2 photos," or "regenerate," and the AI makes the change instantly.

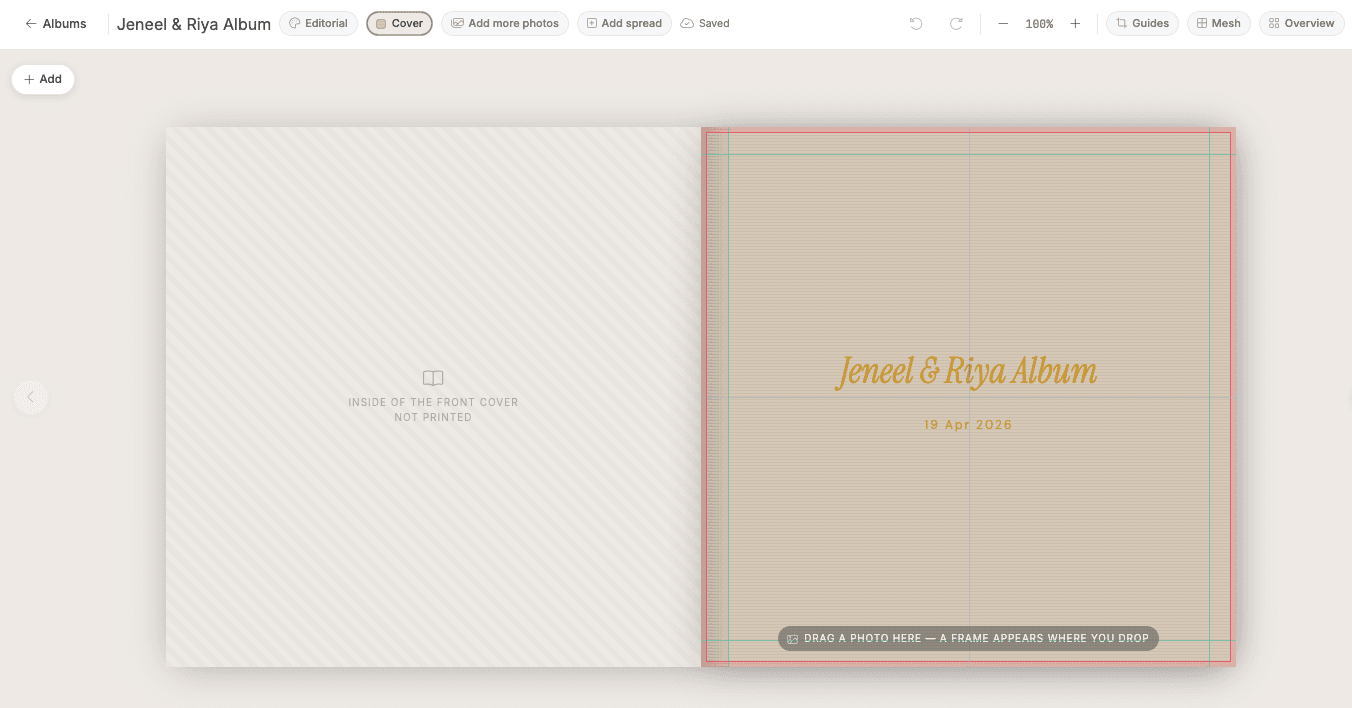
Step 18: Design the cover
The cover gets its own dedicated step: title, date, and a dedicated photo frame that you can drag a cover image into.
Step 19: Style every spread, or the whole album
The Style tab lets you set the visual treatment for a spread, or apply it to the entire album at once:
Photo toning presets: Original, Noir B&W, Film, Warm Gold, Cool Slate, Matte, Faded, Vintage, Soft B&W, Cyanotype, Rosé, Verde
Background: pull colors from the album's own photos, neutrals, or gradient washes
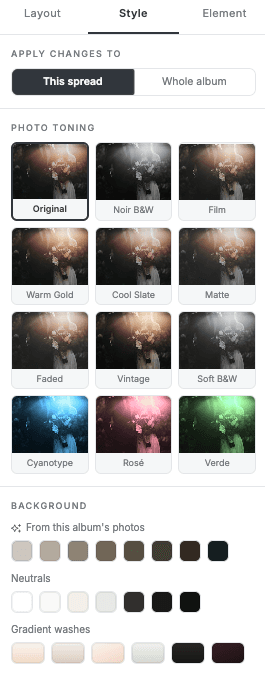
Scroll further and you'll find granular controls for:
Custom color, gradient, and angle
Photo-as-background option
Texture: none, linen, paper, canvas, or wash
Mat border width
Photo framing: fill frame or no crop
Corner style: square, rounded, arch, circle, or hexagon
Drop shadow toggle
Save as my design language: turn any combination into a reusable preset for future albums
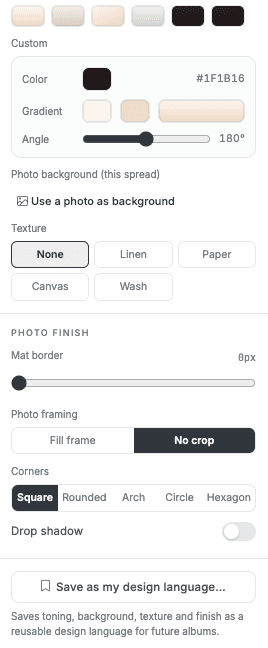
This is the part that usually sends photographers into a separate photo editor. Here, every photo's tone, border, and framing can be set directly inside the album editor.
Part 4: Client Approval and Collaboration
Once the design is in good shape, you don't have to be the only one making changes. Click Share at the top of the editor.
Step 20: Share a view-only link
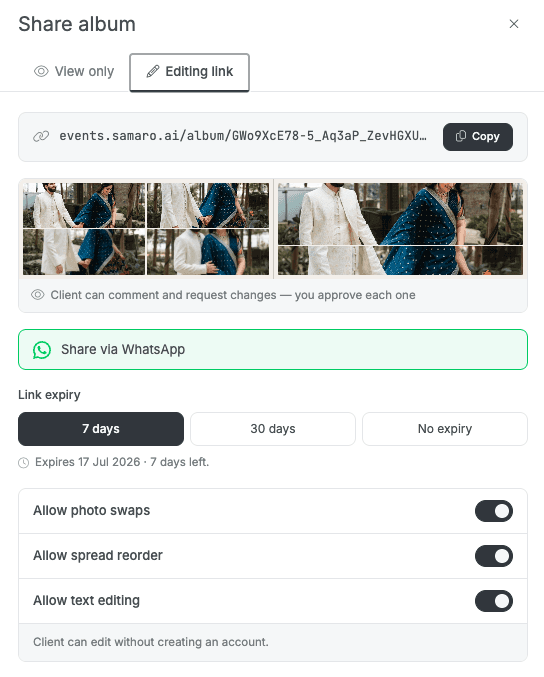
Send a view-only link so your client can review and approve before it goes to print. You control the link expiry (7 days, 30 days, or no expiry) and can require the viewer to enter their name before viewing, so you know exactly who reviewed it.

Step 21: Share an editable link
If you'd rather have the client make small changes themselves, instead of sending you a list of edits, share an editing link. You control exactly what they're allowed to touch:
Allow photo swaps
Allow spread reorder
Allow text editing
The client can make these changes without creating an account, and you approve each one.
Part 5: Exporting for Print
Step 22: Choose a print spec
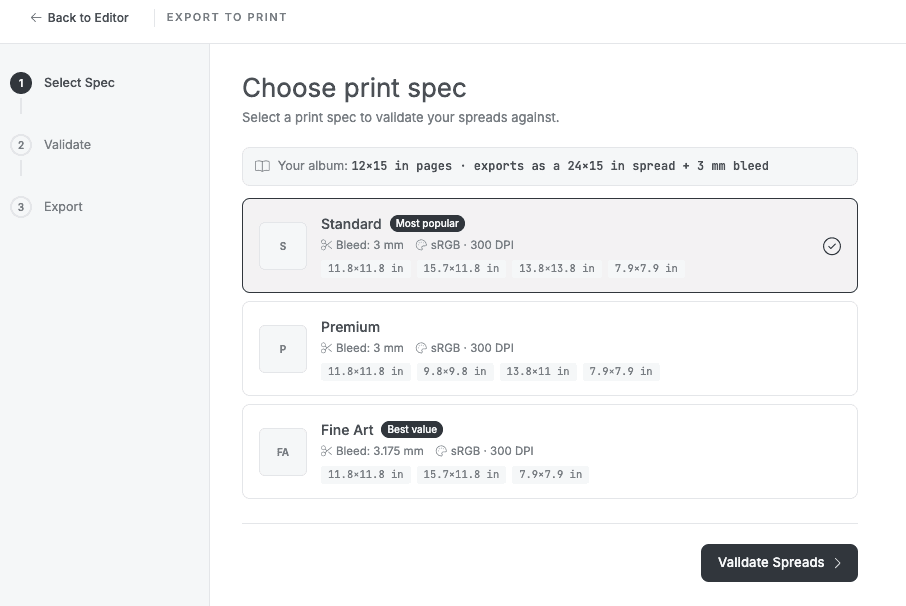
Click Export. First, choose a print spec to validate your spreads against: Standard, Premium, or Fine Art, each with its own bleed, color profile, and DPI requirements.
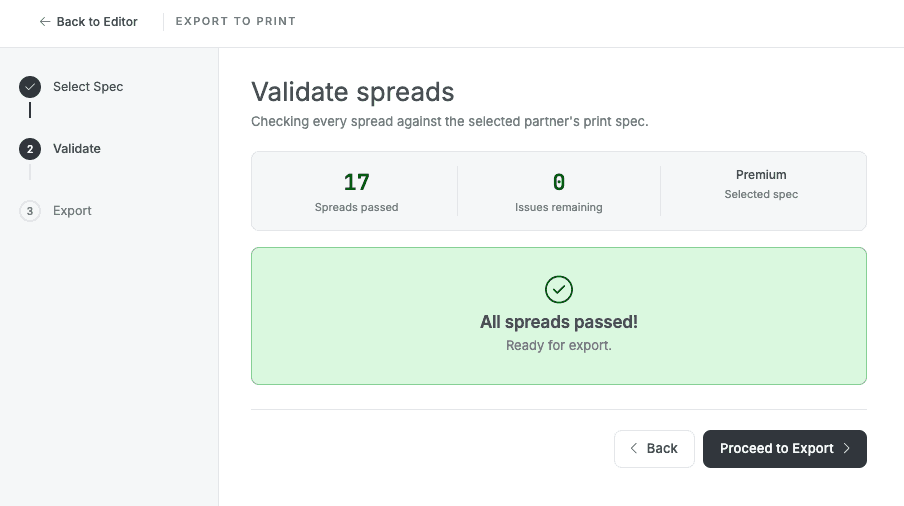
Step 23: Validate every spread
Samaro checks every spread against the chosen spec, flagging anything that could cause a printing problem (like low-resolution images or white-edge risk) before you export.
Step 24: Export in the format you need
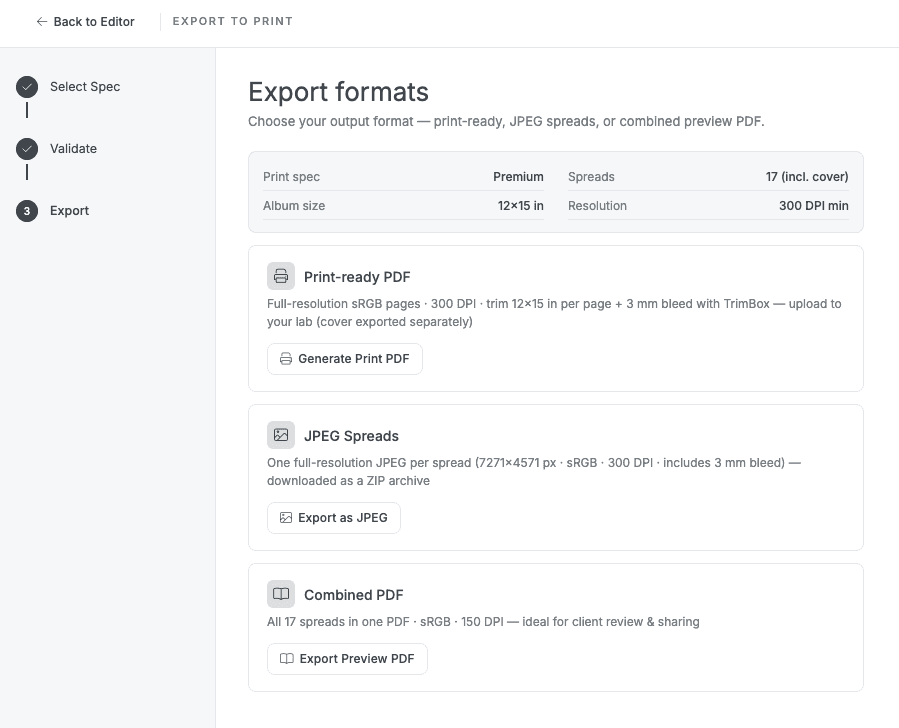
Once everything passes, choose your export format:
Print-ready PDF: full-resolution sRGB pages at 300 DPI, trimmed to size with bleed and TrimBox, ready to hand to your lab
JPEG Spreads: one full-resolution JPEG per spread, downloaded as a ZIP
Combined PDF: every spread in a single lower-resolution PDF, ideal for client review and sharing
And that's a complete album, from the first client photo pick to a print-ready file, without ever opening a separate design tool.
Why This Matters for Photographers and Studios
Faster turnaround: a first-draft album that used to take hours of manual layout work is generated in minutes
Fewer back-and-forth emails: clients pick their own favorites and can review or lightly edit the design themselves
Consistent output: design languages and saved style presets keep every album on-brand
No separate tools needed: photo toning, cropping, and layout all happen inside the album editor
Print-safe by default: automated validation against real print specs catches issues before they reach the lab
FAQ
What is Samaro Album Studio?
It's an AI-powered album design feature inside Samaro that turns a client's photo selections into a fully designed, print-ready wedding album.
Do I need Lightroom to use it?
No. Album Studio designs the album entirely inside Samaro. You can still export a Lightroom copy list of the client's selected photos if you prefer to do additional edits there first.
Can clients edit the album themselves?
Yes. You can share a view-only link for approval, or an editing link that lets clients swap photos, reorder spreads, or edit text, all without creating an account.
What formats can I export the finished album in?
Print-ready PDF (with bleed and trim marks), JPEG spreads as a ZIP, or a combined lower-resolution PDF for client review.
How does the AI decide the layout?
Based on the design language and composition preferences you set: photo framing, fold handling, pacing, and album length, before you click Generate.
Your Next Album Is Already Waiting to Be Designed
Somewhere in your event gallery is a finished album. It just hasn't been built yet.
Samaro Album Studio turns your client's photo picks into a complete, styled, print-ready design in the time it takes to make a cup of coffee. No blank canvas, no manual grid-building, no chasing approvals over email.
Open Album Studio, upload your next event, and let AI handle the layout while you focus on the shoot, the client, and the next booking.
Guest/Host Login